I feel like this is always one of my most popular topics since starting this blog over 8 years ago. I travel quite a bit and have really grown leaps and bounds in the packing department. For years, including TWO European trips, I overpacked like it was my job. OKAY, OKAY… it technically IS my job. It’s hard enough packing for a getaway and wanting to bring ALL THE THINGS. It’s harder when I’m always trying to shoot new outfits and take advantage of the new location for pretty backgrounds, trying to shoot for upcoming campaigns, and am just generally a pretty freezing human being and need lots of layers. What I’ve found (even with all of that) is that over packing makes me extremely unhappy.
First of all, you look like a jackass. Ever go to Europe with 17 pieces of luggage? You look like an American who has never traveled before. All the other Europeans will stare at you with your 17 pieces of luggage and judge you HARD. And THEY SHOULD, I’m sorry. Now that I’m on the other side of it and have learned to pack, you just look dumb and extremely excessive. Unless you’re rolling into Paris Fashion Week with your TEAM of people, there’s just no reason why anyone needs THAT much stuff with them when they are on vacation. Packing for Europe in the cooler months is even tougher, but I’m here to show you that I EASILY packed for 5 days in just a carry-on, and actually, physically wore the below 8 outfits. I could have come up with about 5 more outfits, too… just saying! So, don’t make the excuse that it was only under a week… I could have kept going! There’s nothing better than traveling LIGHT. It’ll make your vacation relaxing off the bat (instead of paranoid city hoping your luggage makes it to your destination), you’ll have it with you. You’ll be able to get in and out of cabs and ubers in 3 seconds and you won’t look like an idiot BREEZING into your hotel with only the items in your hands. It’s glorious and you will thank me.
Let’s chat a bit about how I made this work.
THE LUGGAGE

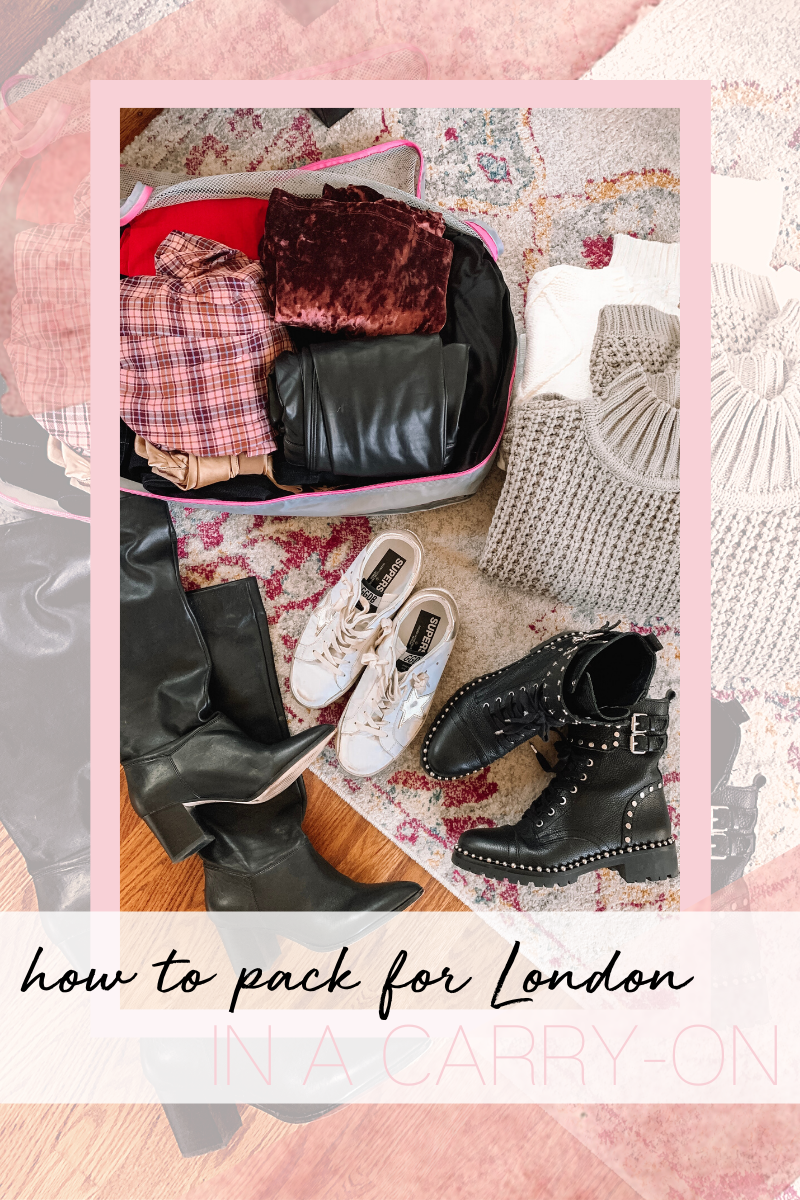
Delsey Chatelet 21″ Spinner. I’ve had this set for about 5 years and this little carry-on roller gets the most use! I absolutely love this piece and cannot recommend it enough… it has NEVER let me down. I’m able to fit so much into it, it’s extremely lightweight, rolls like a dream, and has been so durable. Using the large packing cube from the set above, I use one side of the luggage for clothing, and the other side for shoes/accessories.
Logan & Lenora “The Weekender” Tote. This tote is new to me this season as I was in desperate need of a new weekender bag. I not only loved the gorgeous rose color of this one, but loved that it’s a performance fabric that’s machine washable. I also love that it has an exterior back pocket that converts into a flap to let it slide over the handle of the roller luggage, which makes it extremely easy to transport. This bag is also Mary Poppins style, I swear. The amount of stuff I’m able to fit in here is actually insane (and a little dangerous)! While traveling, I kept my makeup and cosmetic bags, laptop and charger, my Chanel flap bag in the dust bag (the only purse I brought), and drawstring pouch (where I keep miscellaneous things I don’t want to dig around for). The key to using a tote bag this large is to NOT stuff it completely full. This needs to be the piece that fits under the seat in front of you on the plane. I was able to turn the bag on its side and slide it under the seat with ample room, but it would have gotten tricky if it was stuffed any further. Like I mentioned, this bag can fit A LOT, so even though I had the room to add more to it, I scaled back as much as I could.
Packing Cubes. I only started using packing cubes about a year ago and can’t believe I went so long without them. Not only do they allow you to fit more of your stuff into the actual luggage, it also keeps everything extremely organized inside and allows the luggage to zip up with ease. I found this pack on Amazon for under $50 and tend to use the largest size the most. It fits PERFECTLY into one side of the carry-on luggage. To pack with them, I roll all of my pieces and line them up, usually in two layers. I then zip it back up, lay the mesh part DOWN inside the luggage and press out any remaining air. Doing so helps compress the packing cub to lay flat on one side of the luggage. Since I was also packing bulkier sweaters for this trip, I actually layered the two sweaters under the packing cube, and there was still enough room on one side!
Drawstring Pouch. This is actually a drawstring makeup/cosmetic pouch, but I don’t use it for my makeup. I love having compartments or additional bags inside of bigger bags so that I’m not constantly digging around for the important stuff. I bring this little $7 bag with me EVERYWHERE I travel, even if it’s just for the night, because I love keeping my phone charger, portable phone charger, headphones/charger, lip balm, a pen, gum, outlet converters (needed for anywhere in Europe), hair ties, etc. Basically, anything I would go to reach for during ANY part of travel or the actual trip. When I’m going through security, I make sure to add my passport, airline ticket and my phone in there so everything is together when I go through and I’m not digging to find it when I come out.
ALL THE PIECES
This was only the second or third time I’ve gone somewhere with cooler temps and packed in a carry-on but it was another success. It’s a little more challenging than the summer with lightweight dresses and sandals (I’ll give you that), but I actually love dressing in the fall and winter because it’s ALL about layering. I always try to pack solids and stick to a color scheme. For this trip, I went with black, white, tan/gold and red/burgundy. Doing so allows everything to match, you can mix and match pieces without people even knowing you did… a teeny bit harder to do with a loud print, you get my drift?!?
TOPS. For layering pieces, I packed this black fitted turtleneck (to wear under bulky sweaters for an extra layer) and this fitted scoop-neck black bodysuit. For blouses, I packed two: this gold plunging top and this velvet burgundy style that could easily be dressed up or down. As I mentioned above, I packed two bulkier sweaters for extra warmth and was glad I did, it was freezing and damp in London and much needed! I also wore this sweatshirt when traveling layered over a plain long sleeve white tee.
BOTTOMS. I wore a pair of leggings to travel in and packed one pair of cropped black jeans, a pair of faux leather skinny pants (with a pocket, not leggings), a black denim skirt, and two pair of tights (sheer and printed).
DRESSES. I packed three dresses for this trip, mostly to wear at night for dinners and events (we went to a wine tasting event one night). I love always keeping a little black dress with me, you never know what could come up!
COATS/JACKETS/BLAZERS. I only brought ONE heavy coat with me and wore it on the plane. I also brought a lighter weight faux leather jacket which I layered under the heavier coat some days when it was really cold. I also brought one plaid blazer.
FOOTWEAR. I stuck to boots and sneakers for this trip and was easily able to make it work without a pair of heels. I could have fit them in, but I knew realistically at night, I wouldn’t want to be in heels with the cold. I made sure all of my boots had blocked heels (easier to walk around in), and traveled in my sneakers. For packing, I stuffed my underwear, socks, and tights in my boots to help keep their shape and allow maximum storage space.
ACCESSORIES. They help make an outfit feel new again, so I always make sure to add a few in.
THE OUTFITS
TRAVEL STYLE
OUTFIT ONE (DAYTIME: BRUNCH/WALKING AROUND)
OUTFIT TWO (NIGHTTIME: DINNER/NIGHT OUT)
OUTFIT THREE (DAYTIME: SIGHT SEEING/LUNCH)
OUTFIT FOUR (NIGHTTIME: DINNER/NIGHT OUT)
OUTFIT FIVE (DAYTIME: SIGHT SEEING/LUNCH)
OUTFIT SIX (NIGHTIME: DINNER/DRINKS)
OUTFIT SEVEN (DAYTIME: SIGHTSEEING)
OUTFIT EIGHT (NIGHTTIME: DINNER)
BEAUTY
This was also a little tricky but completely doable. London Heathrow Airport is known for being one of the toughest airports to get your cosmetics/toiletries through when carrying on. You need to be able to fit ANY liquids you’re carrying into a small sandwich size bag. I don’t mess around with that, so I always err on the side of cautious and bring only what I NEED. I paired down my makeup bag and was able to fit everything into this clear pouch. I removed one additional clear pouch from this bag and used this for all my other toiletries (including hair/skin/body). This Drunk Elephant mini set comes in handy anytime I travel, so this is what I use for my skincare (yes, my trusty and expensive AF SkinCeuticals products stay safe and sound at home). I also would recommend a travel curling iron/straightener made to convert for European outlets. I wouldn’t bring along your expensive one from home with a converter, I’ve fried a many!
I hope this was helpful for you guys who will be traveling — I know MANY of you asked for this post so hopefully it’ll inspire you to carry-on for your upcoming trips! Leave any other questions below!

No Comments