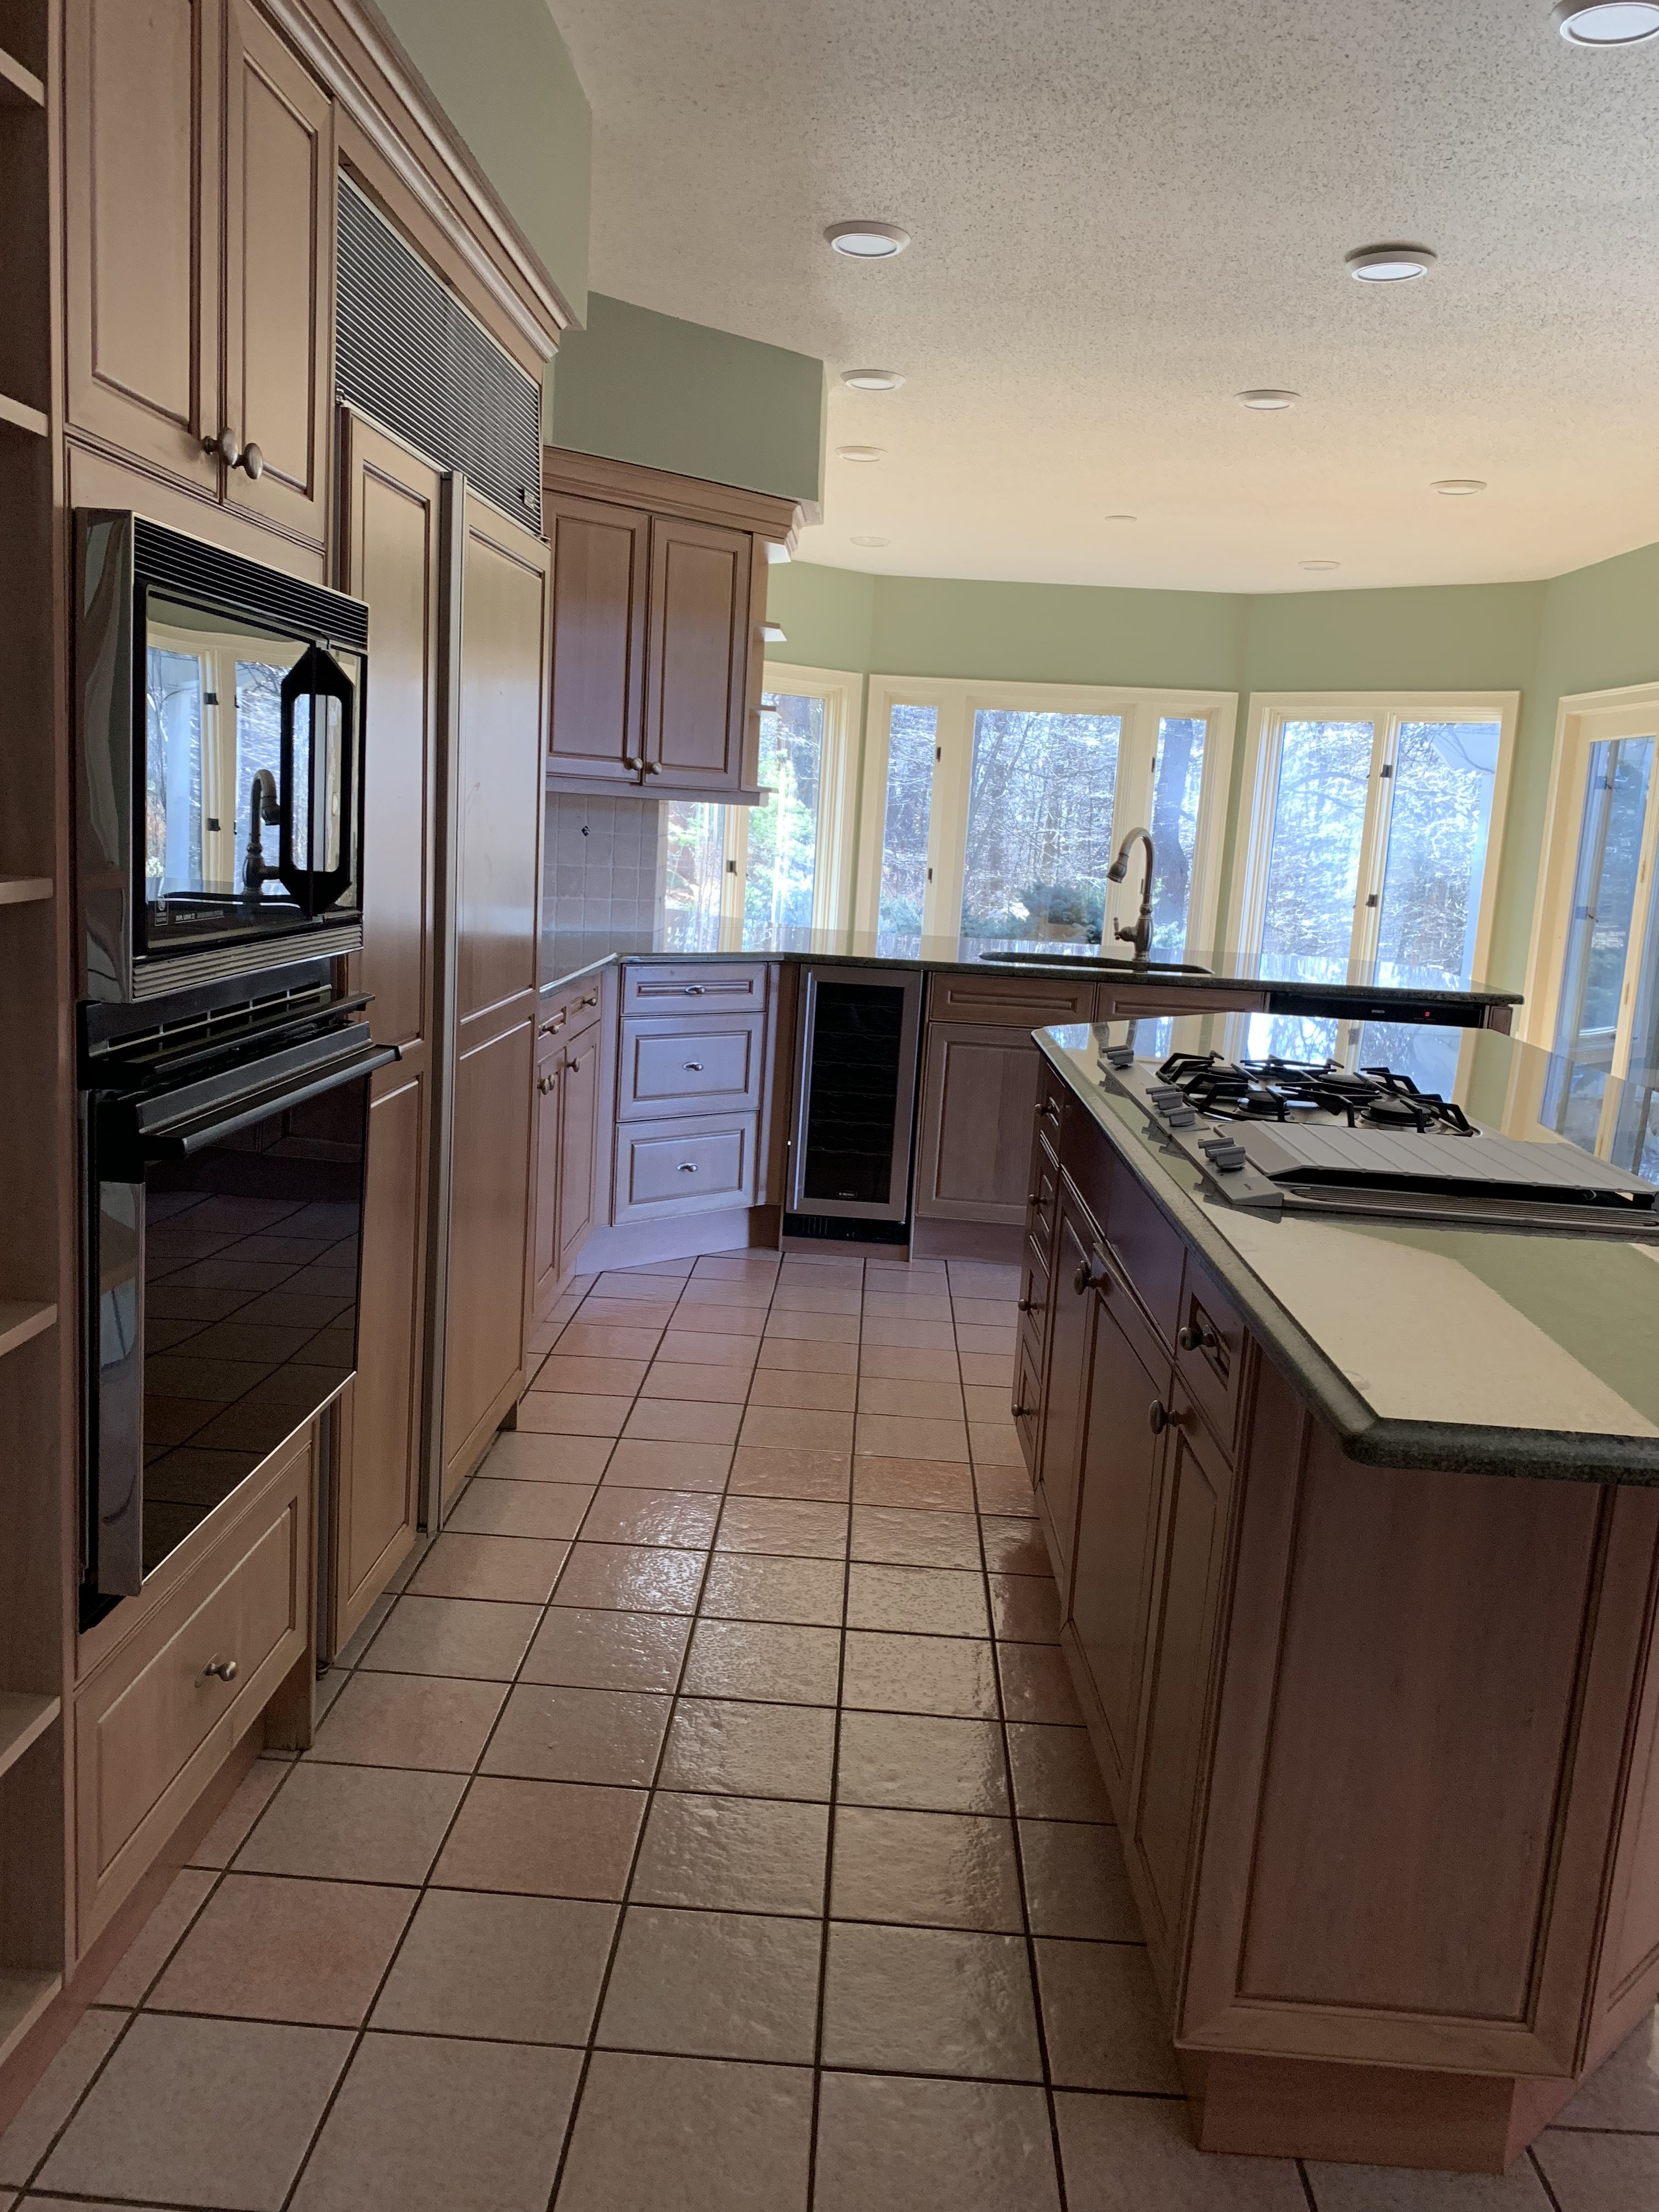
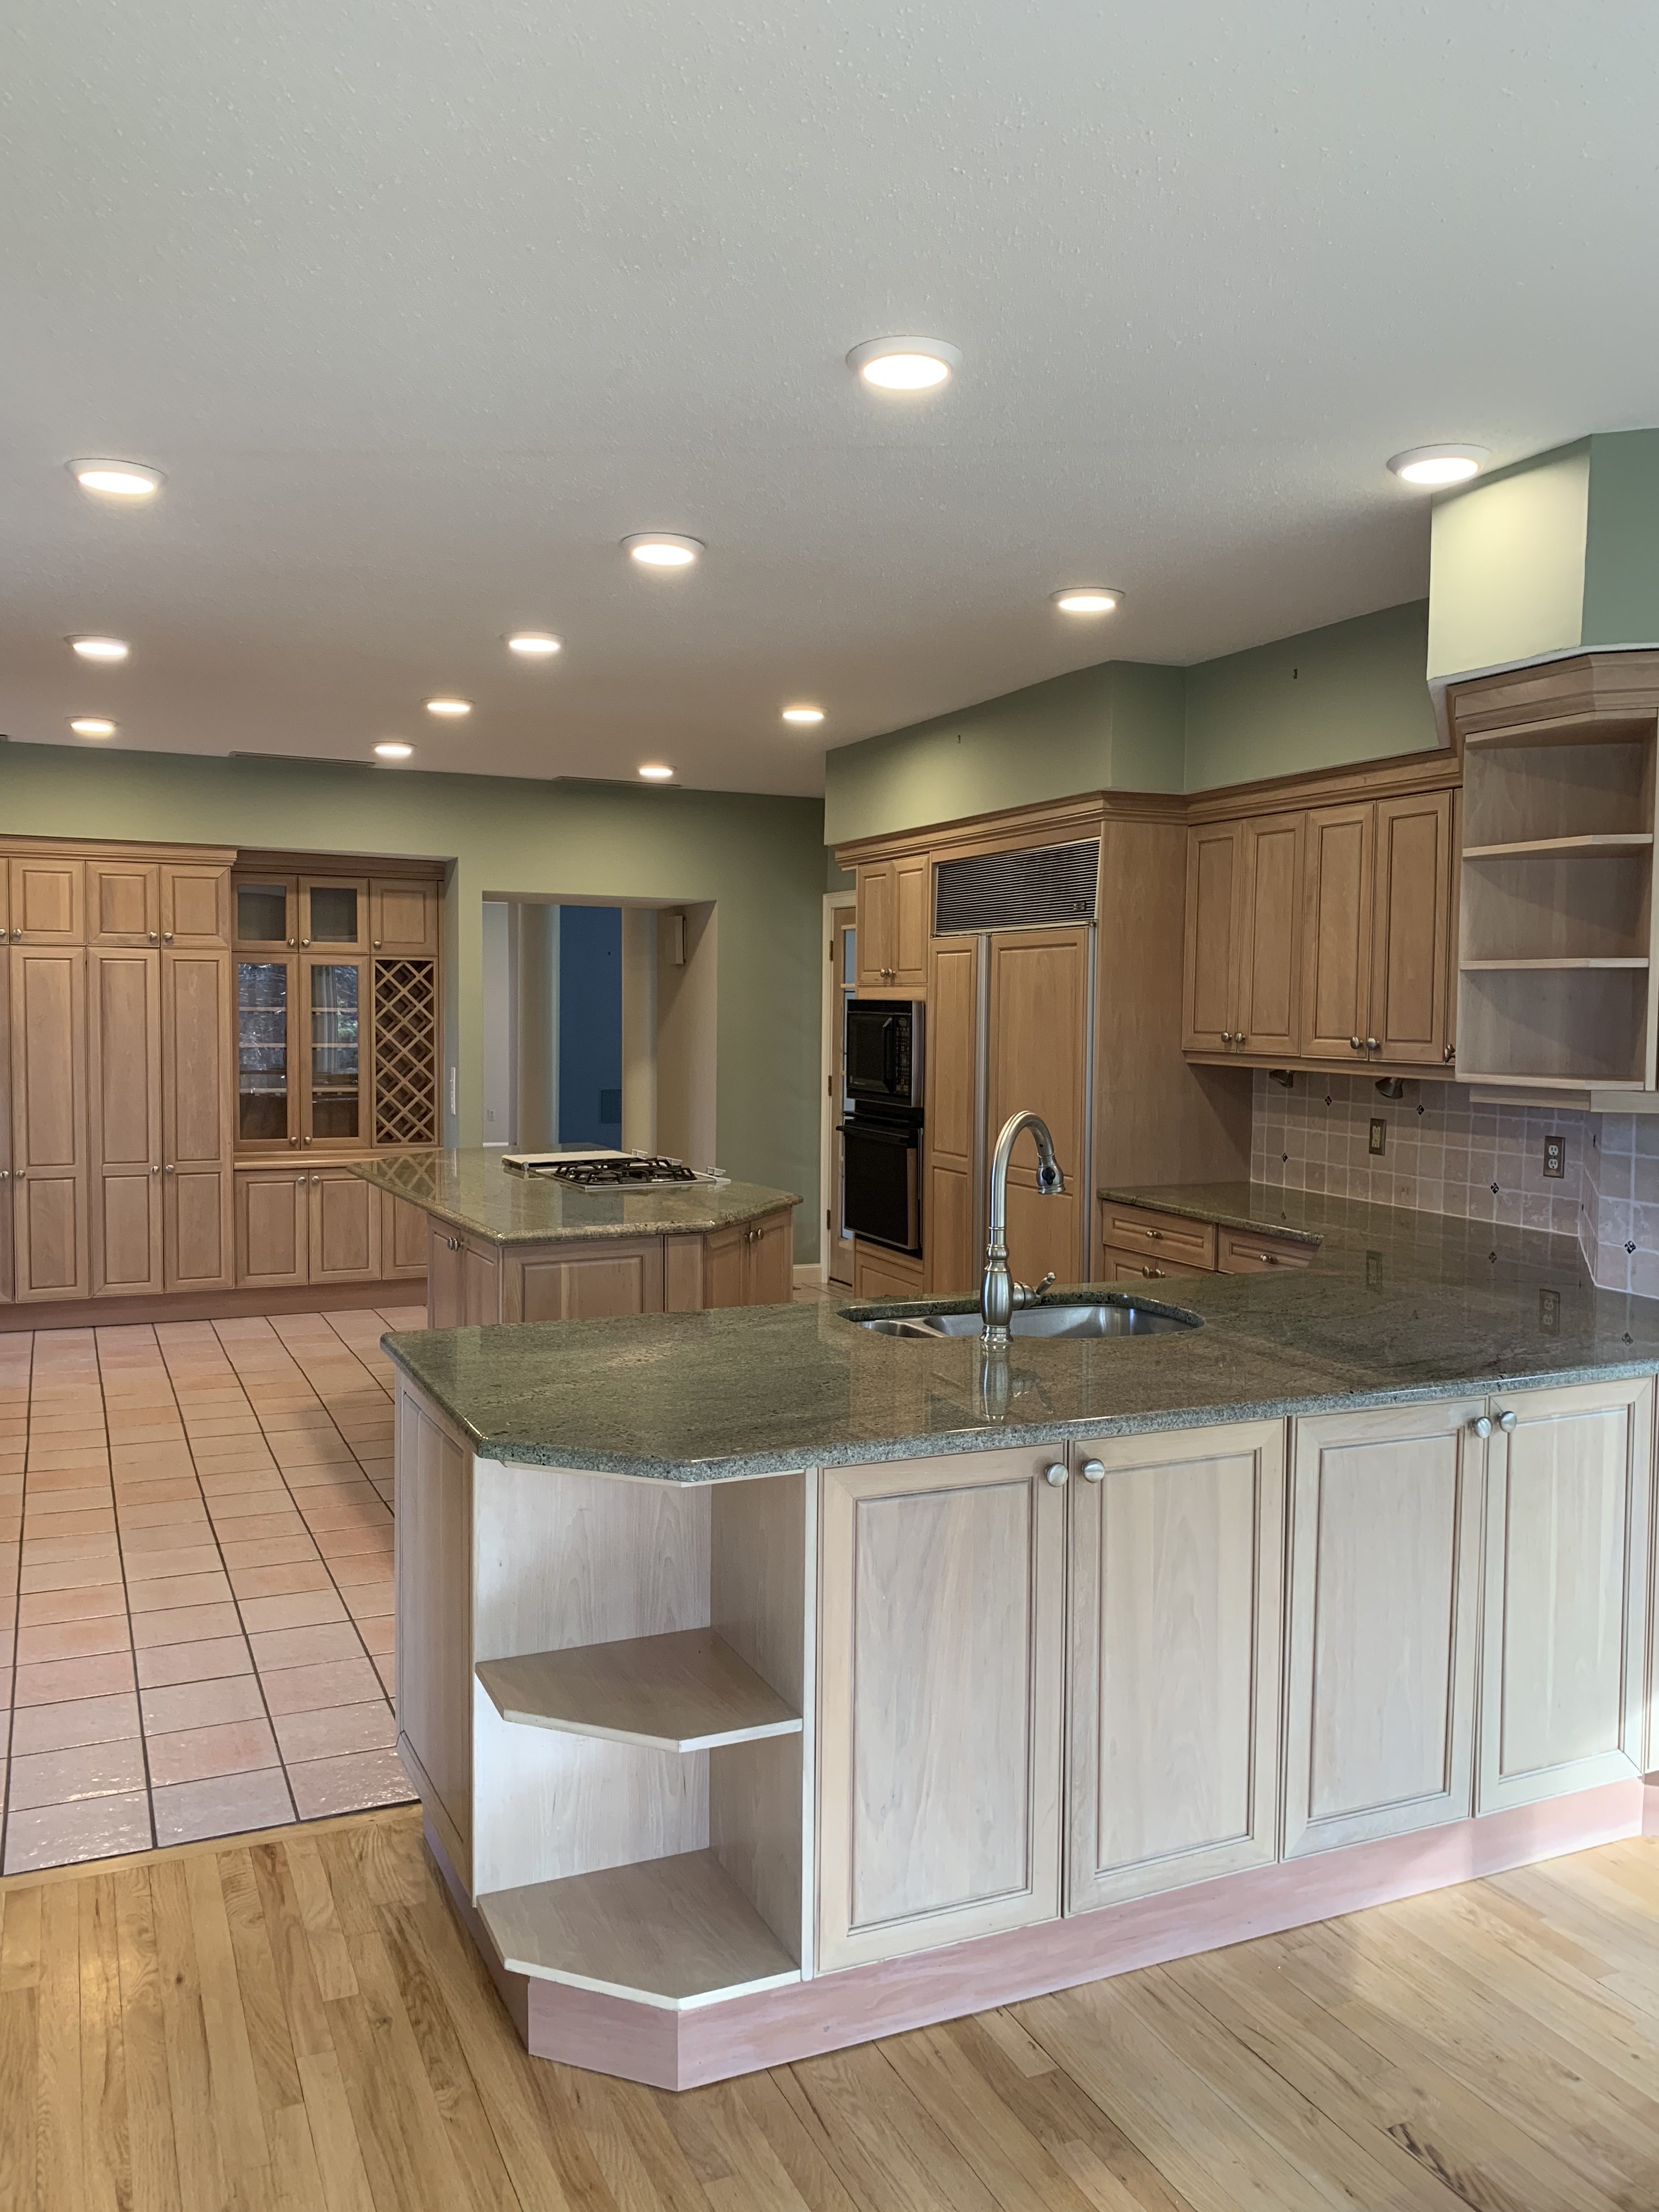
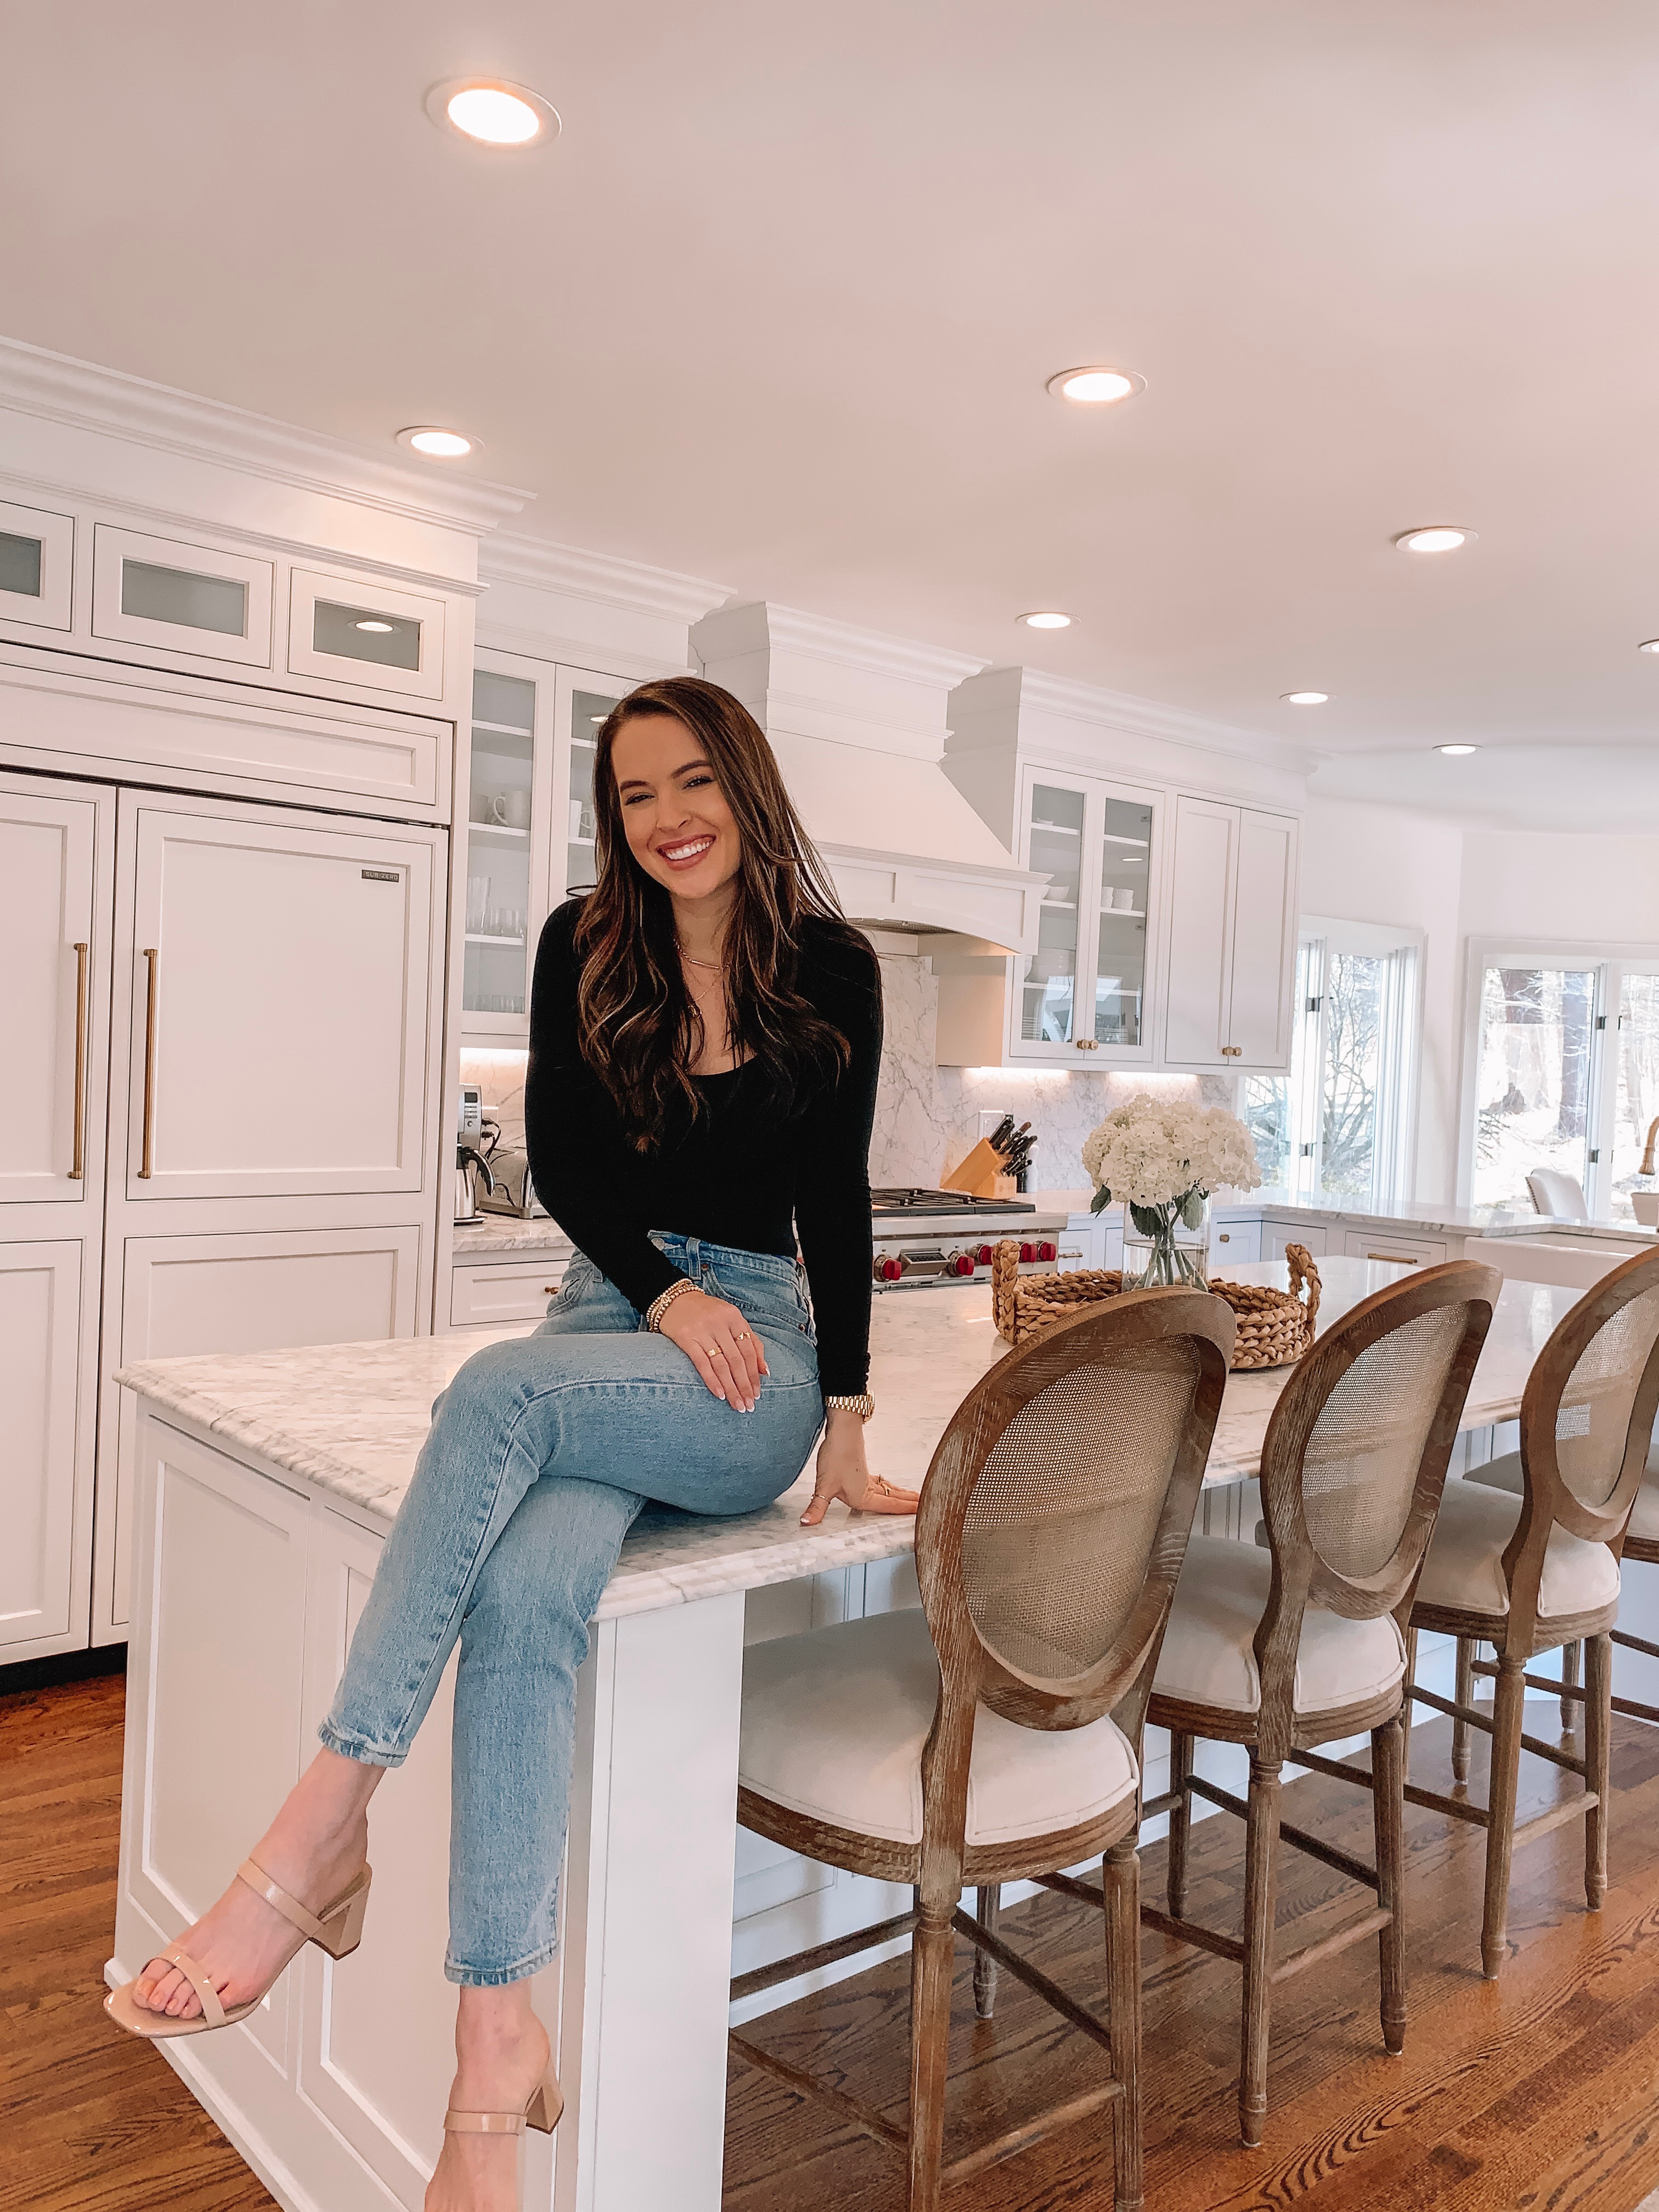
Our kitchen renovation was something we knew we were going to tackle from the moment we stepped into our house at the first showing. The space had SO much potential — beautiful natural light and lots of windows, a big island, a breakfast nook, outside patio access, and a massive double sided fireplace that it shares with the family room. Not only was the space dated (hello 90’s pink floor tile & pickled oak cabinets) — but there were a few layout changes we wanted to make in terms of where the appliances would go for better flow. Since we were removing the floor tile (to replace with hardwood floors) and wanted to make layout changes (that would affect the cabinets), EVERYTHING had to go. This was a lengthy renovation that took about 5 months start to finish.
Goals of Renovation
:: Replace all cabinets and appliances
:: Remove popcorn ceiling
:: Remove floor tile and replace with hardwood floors
:: Remove cooktop from center island and move to back wall
:: Flatten back wall to remove “jut out” for more open feel
:: Remove all upper soffits to allow cabinets and moulding to reach ceiling
:: Replace downdraft ventilation system for cooktop with upper hood ventilation
:: Update electrical to code, add additional outlets + USB outlets
:: Add “smart home” features for lighting, dimming capabilities
:: Replace all recessed lighting with new canisters
:: Add under cabinet lighting
:: Remove hearth from kitchen fireplace and rebuild brick for “floating” fireplace look, add mantel to kitchen side
:: Increase island size to allow for additional seating
:: Increase sink size, add disposal
:: Add deep drawers to cabinets for optimal storage
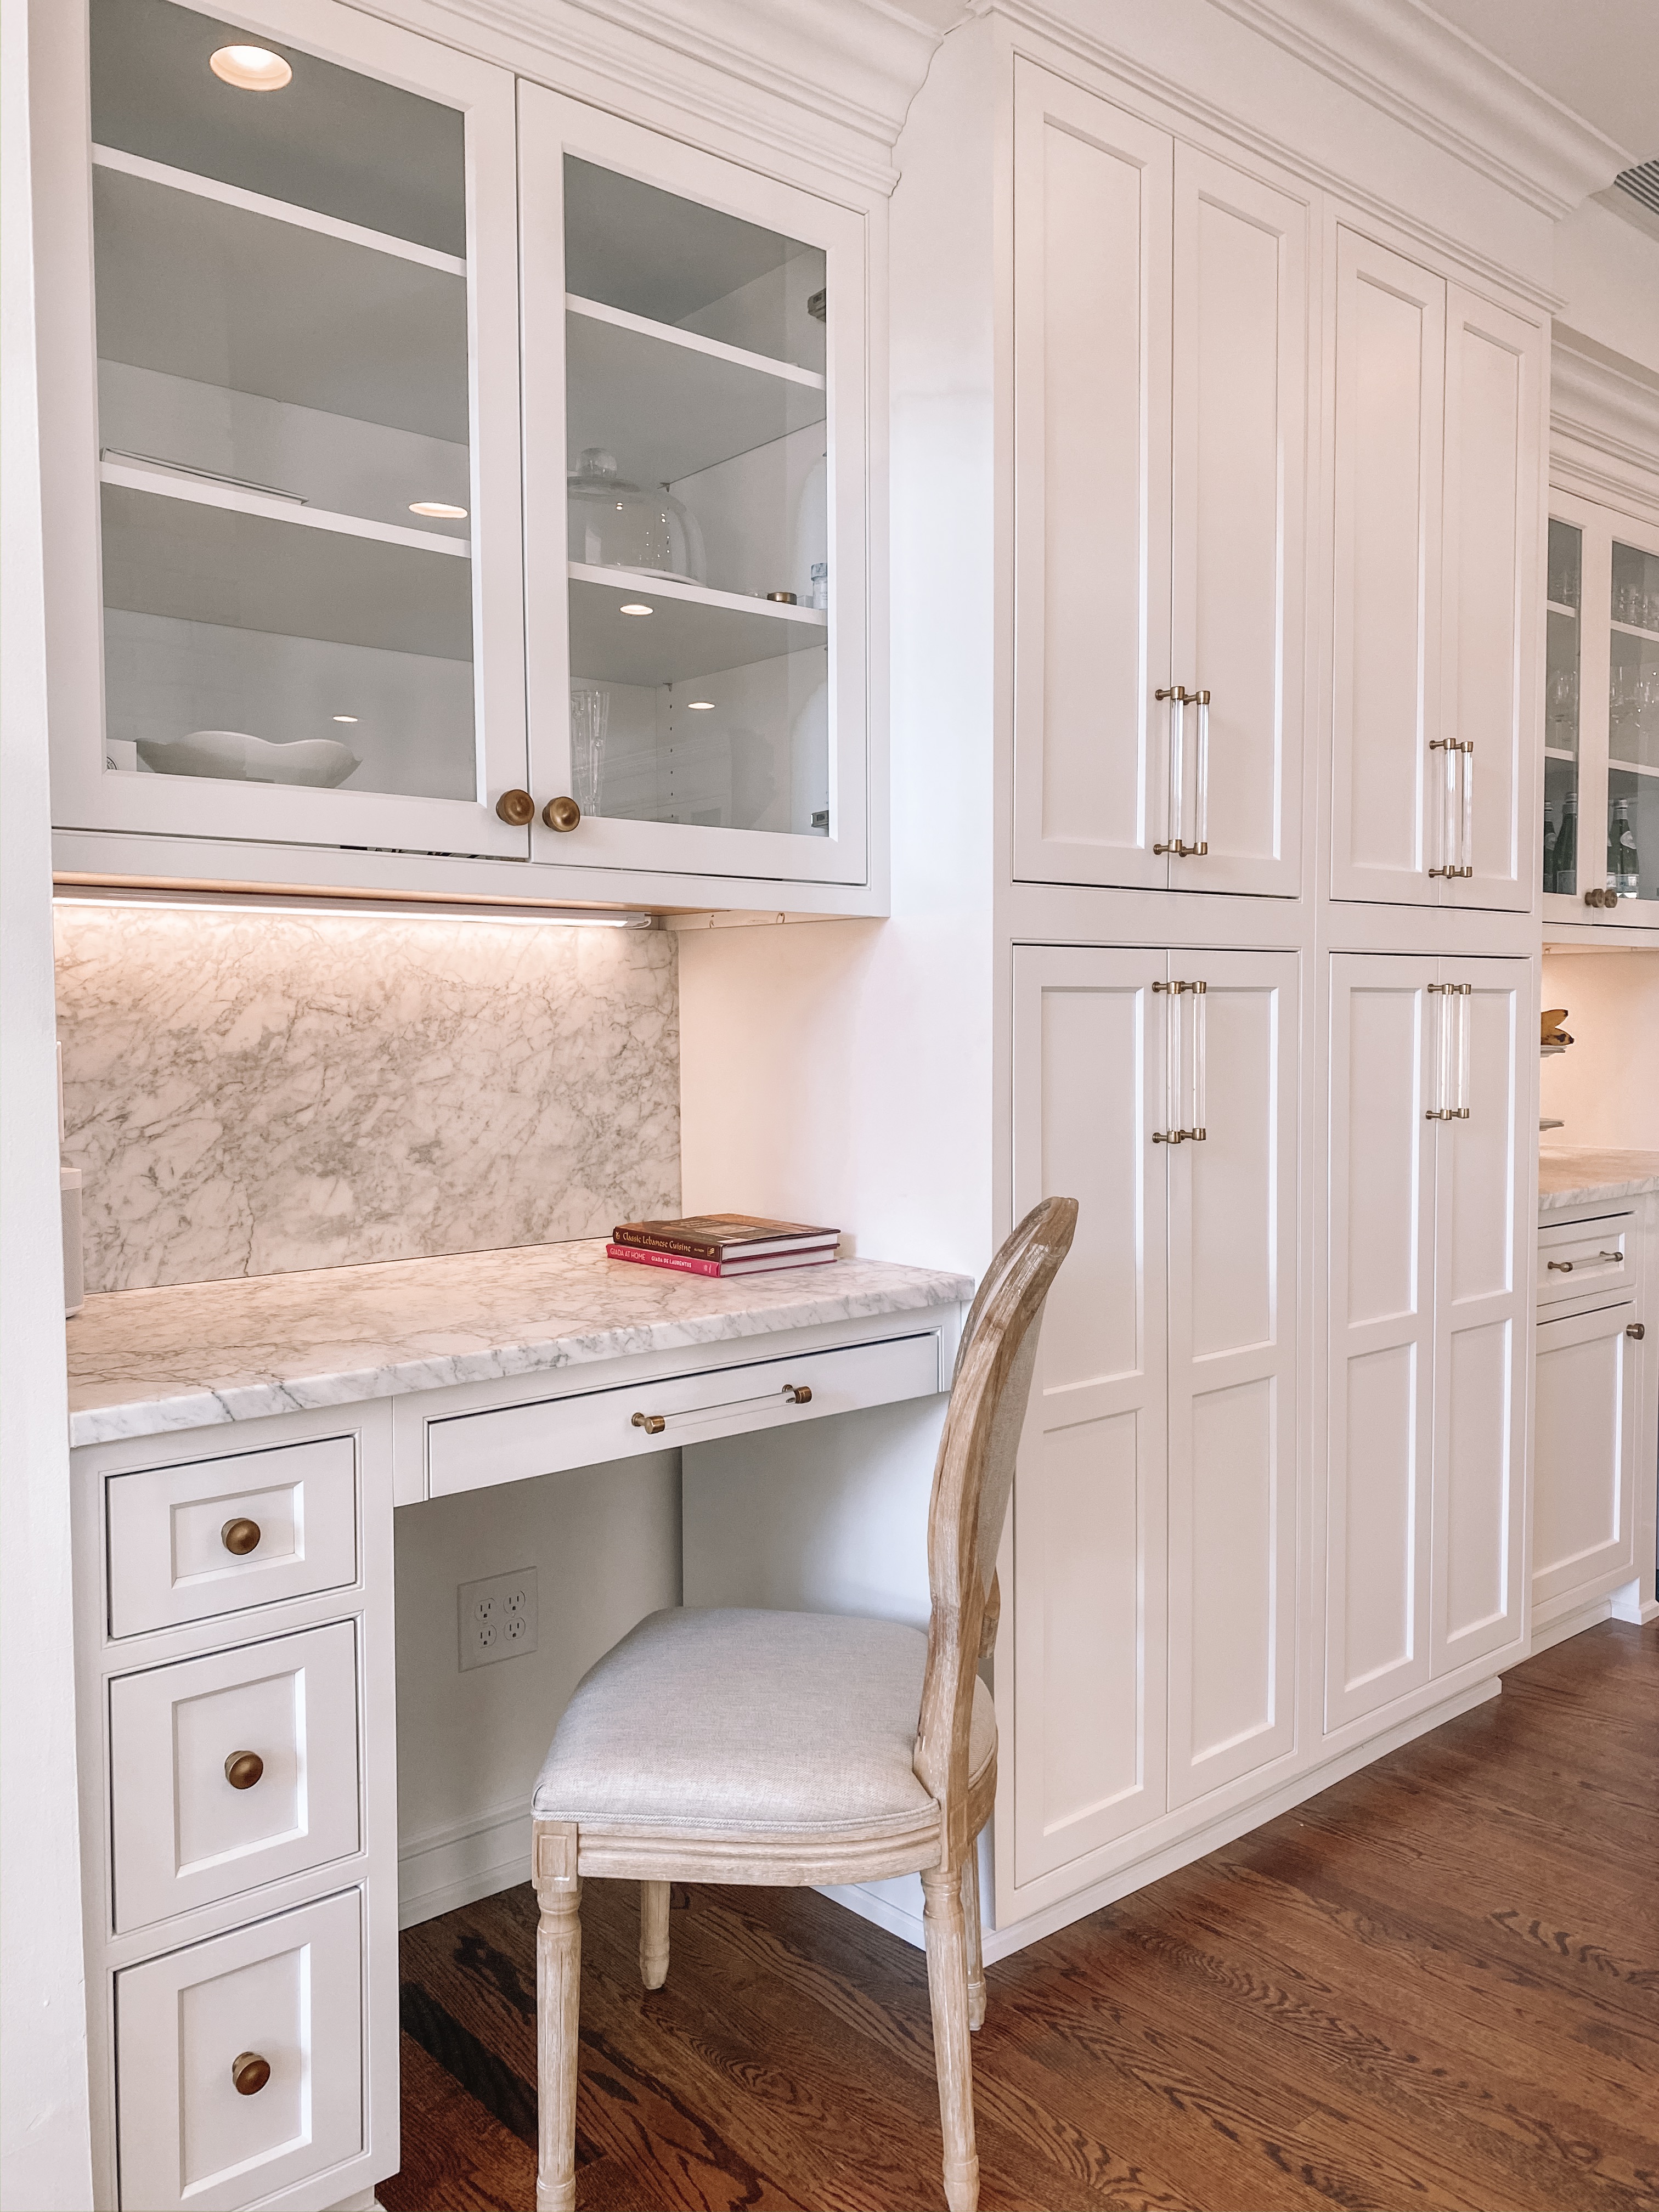
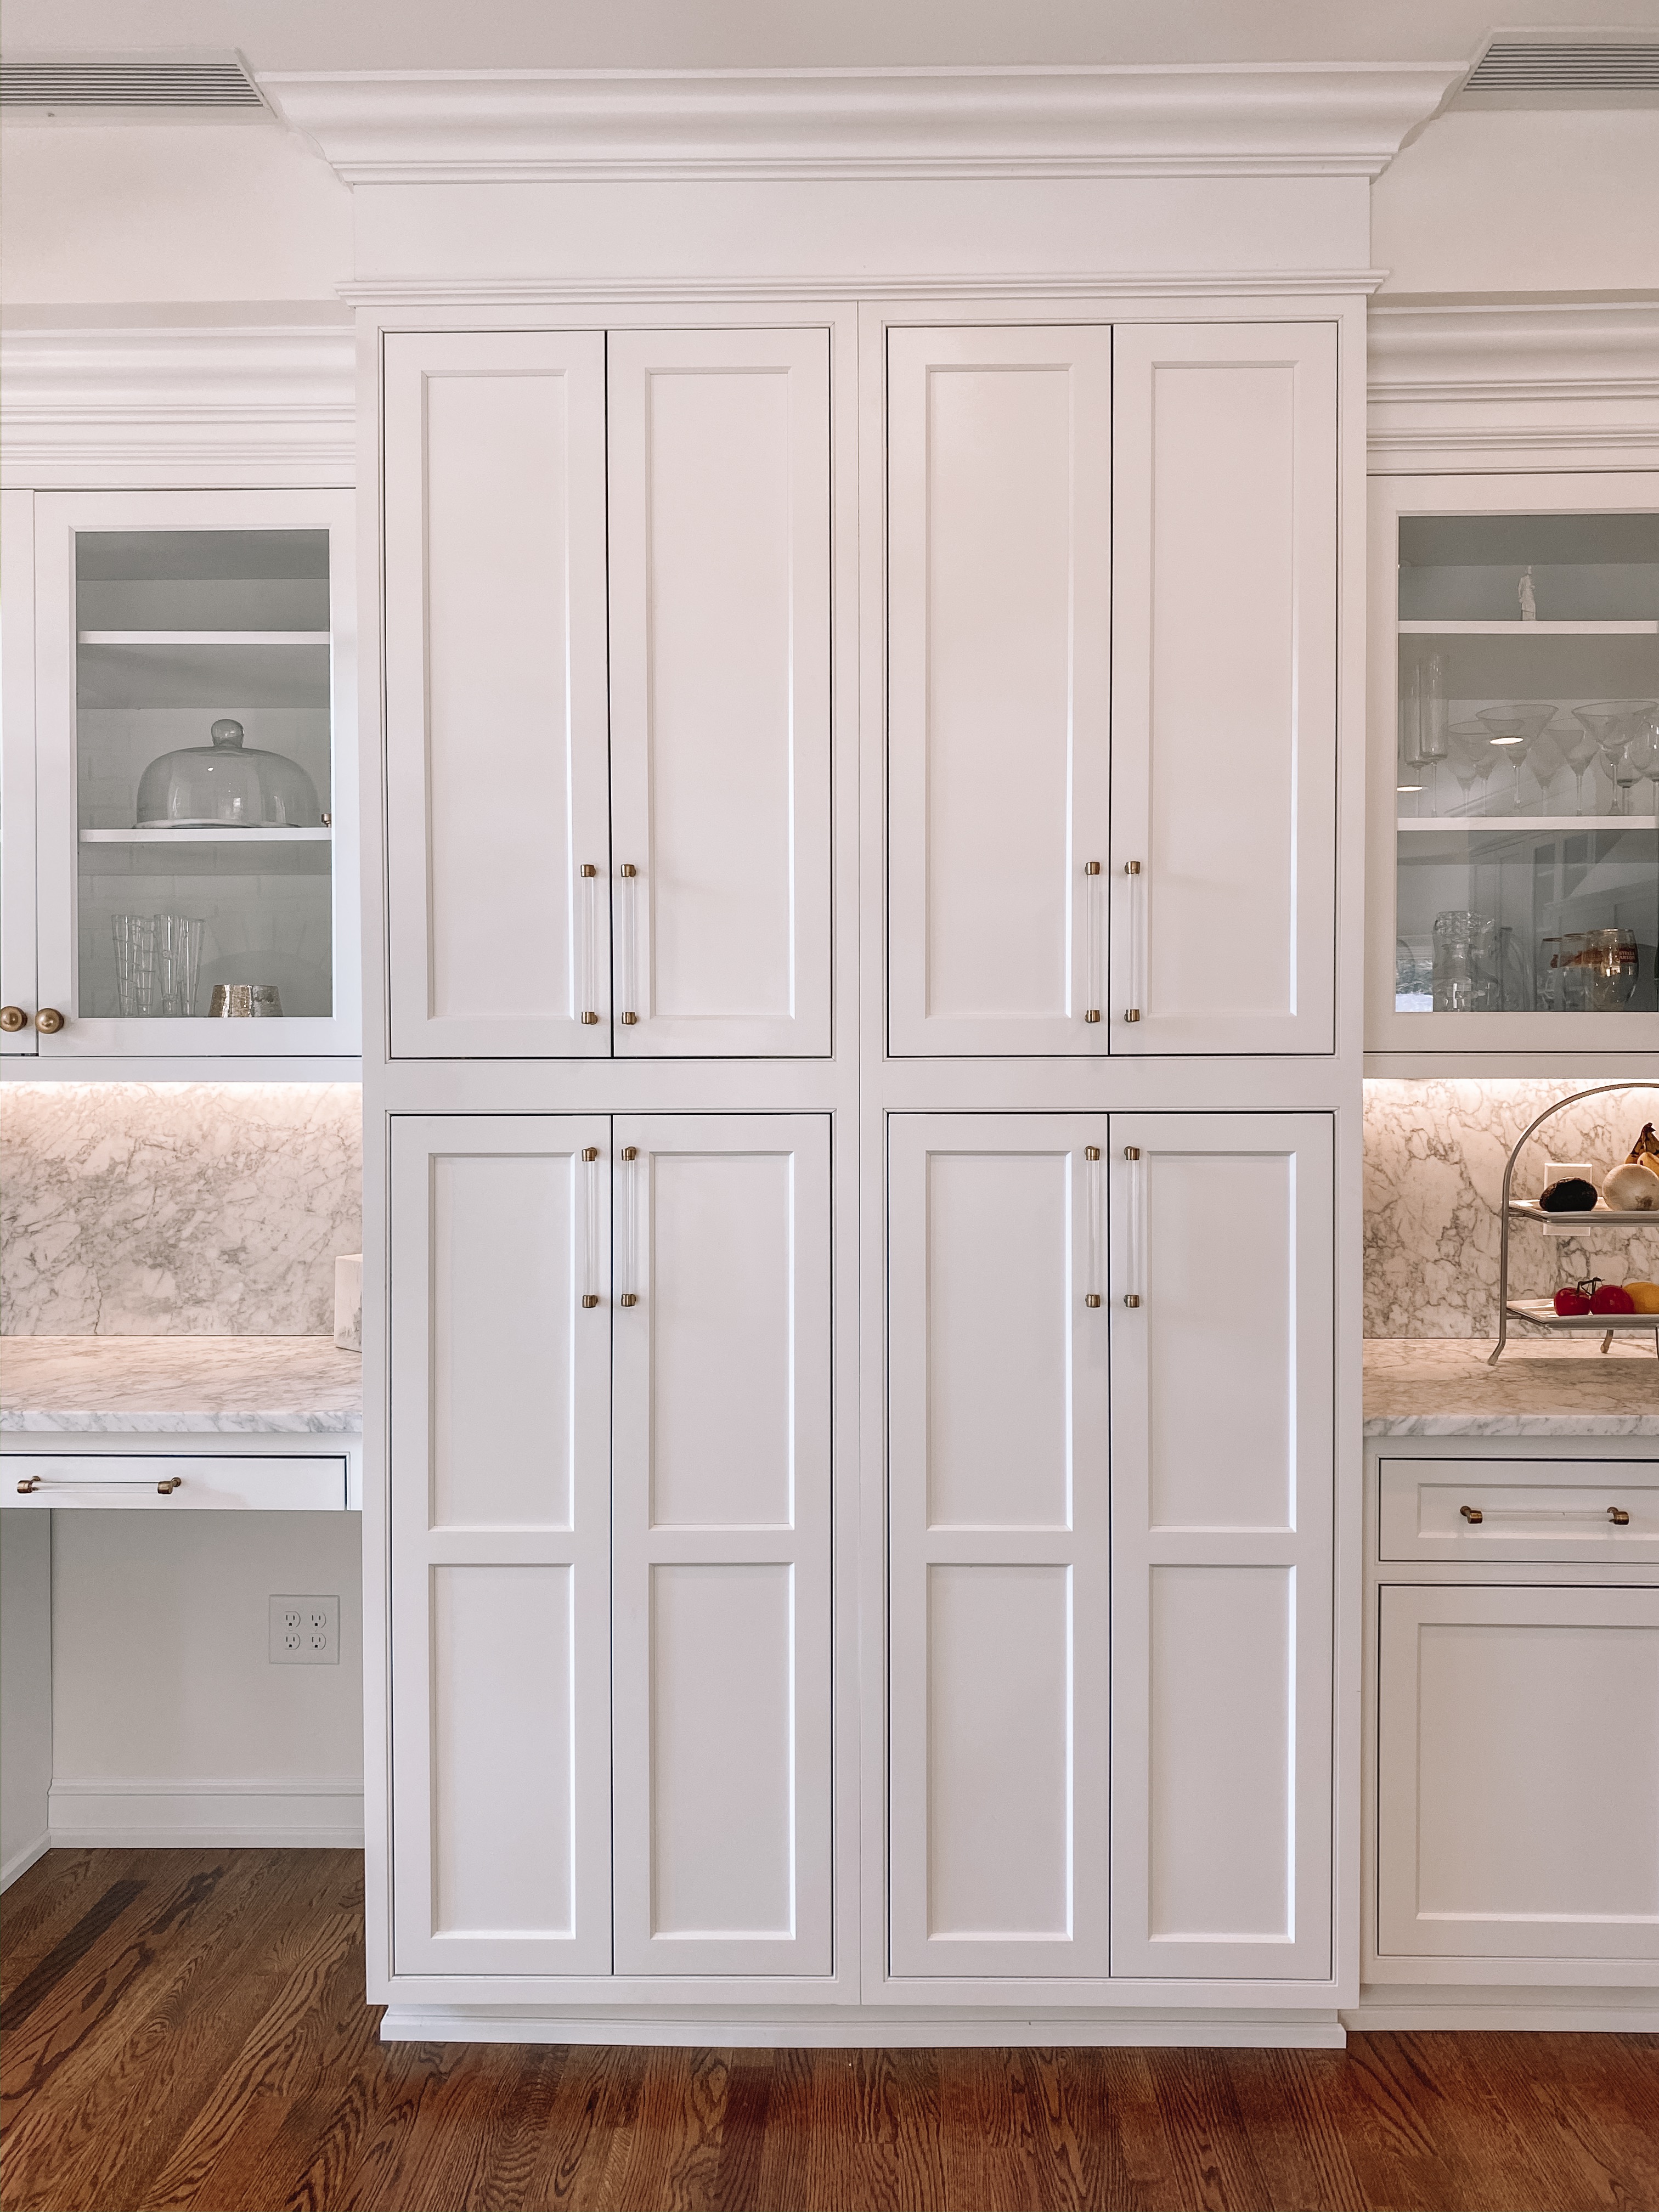
:: Shift wine bar location from sink area to pantry area
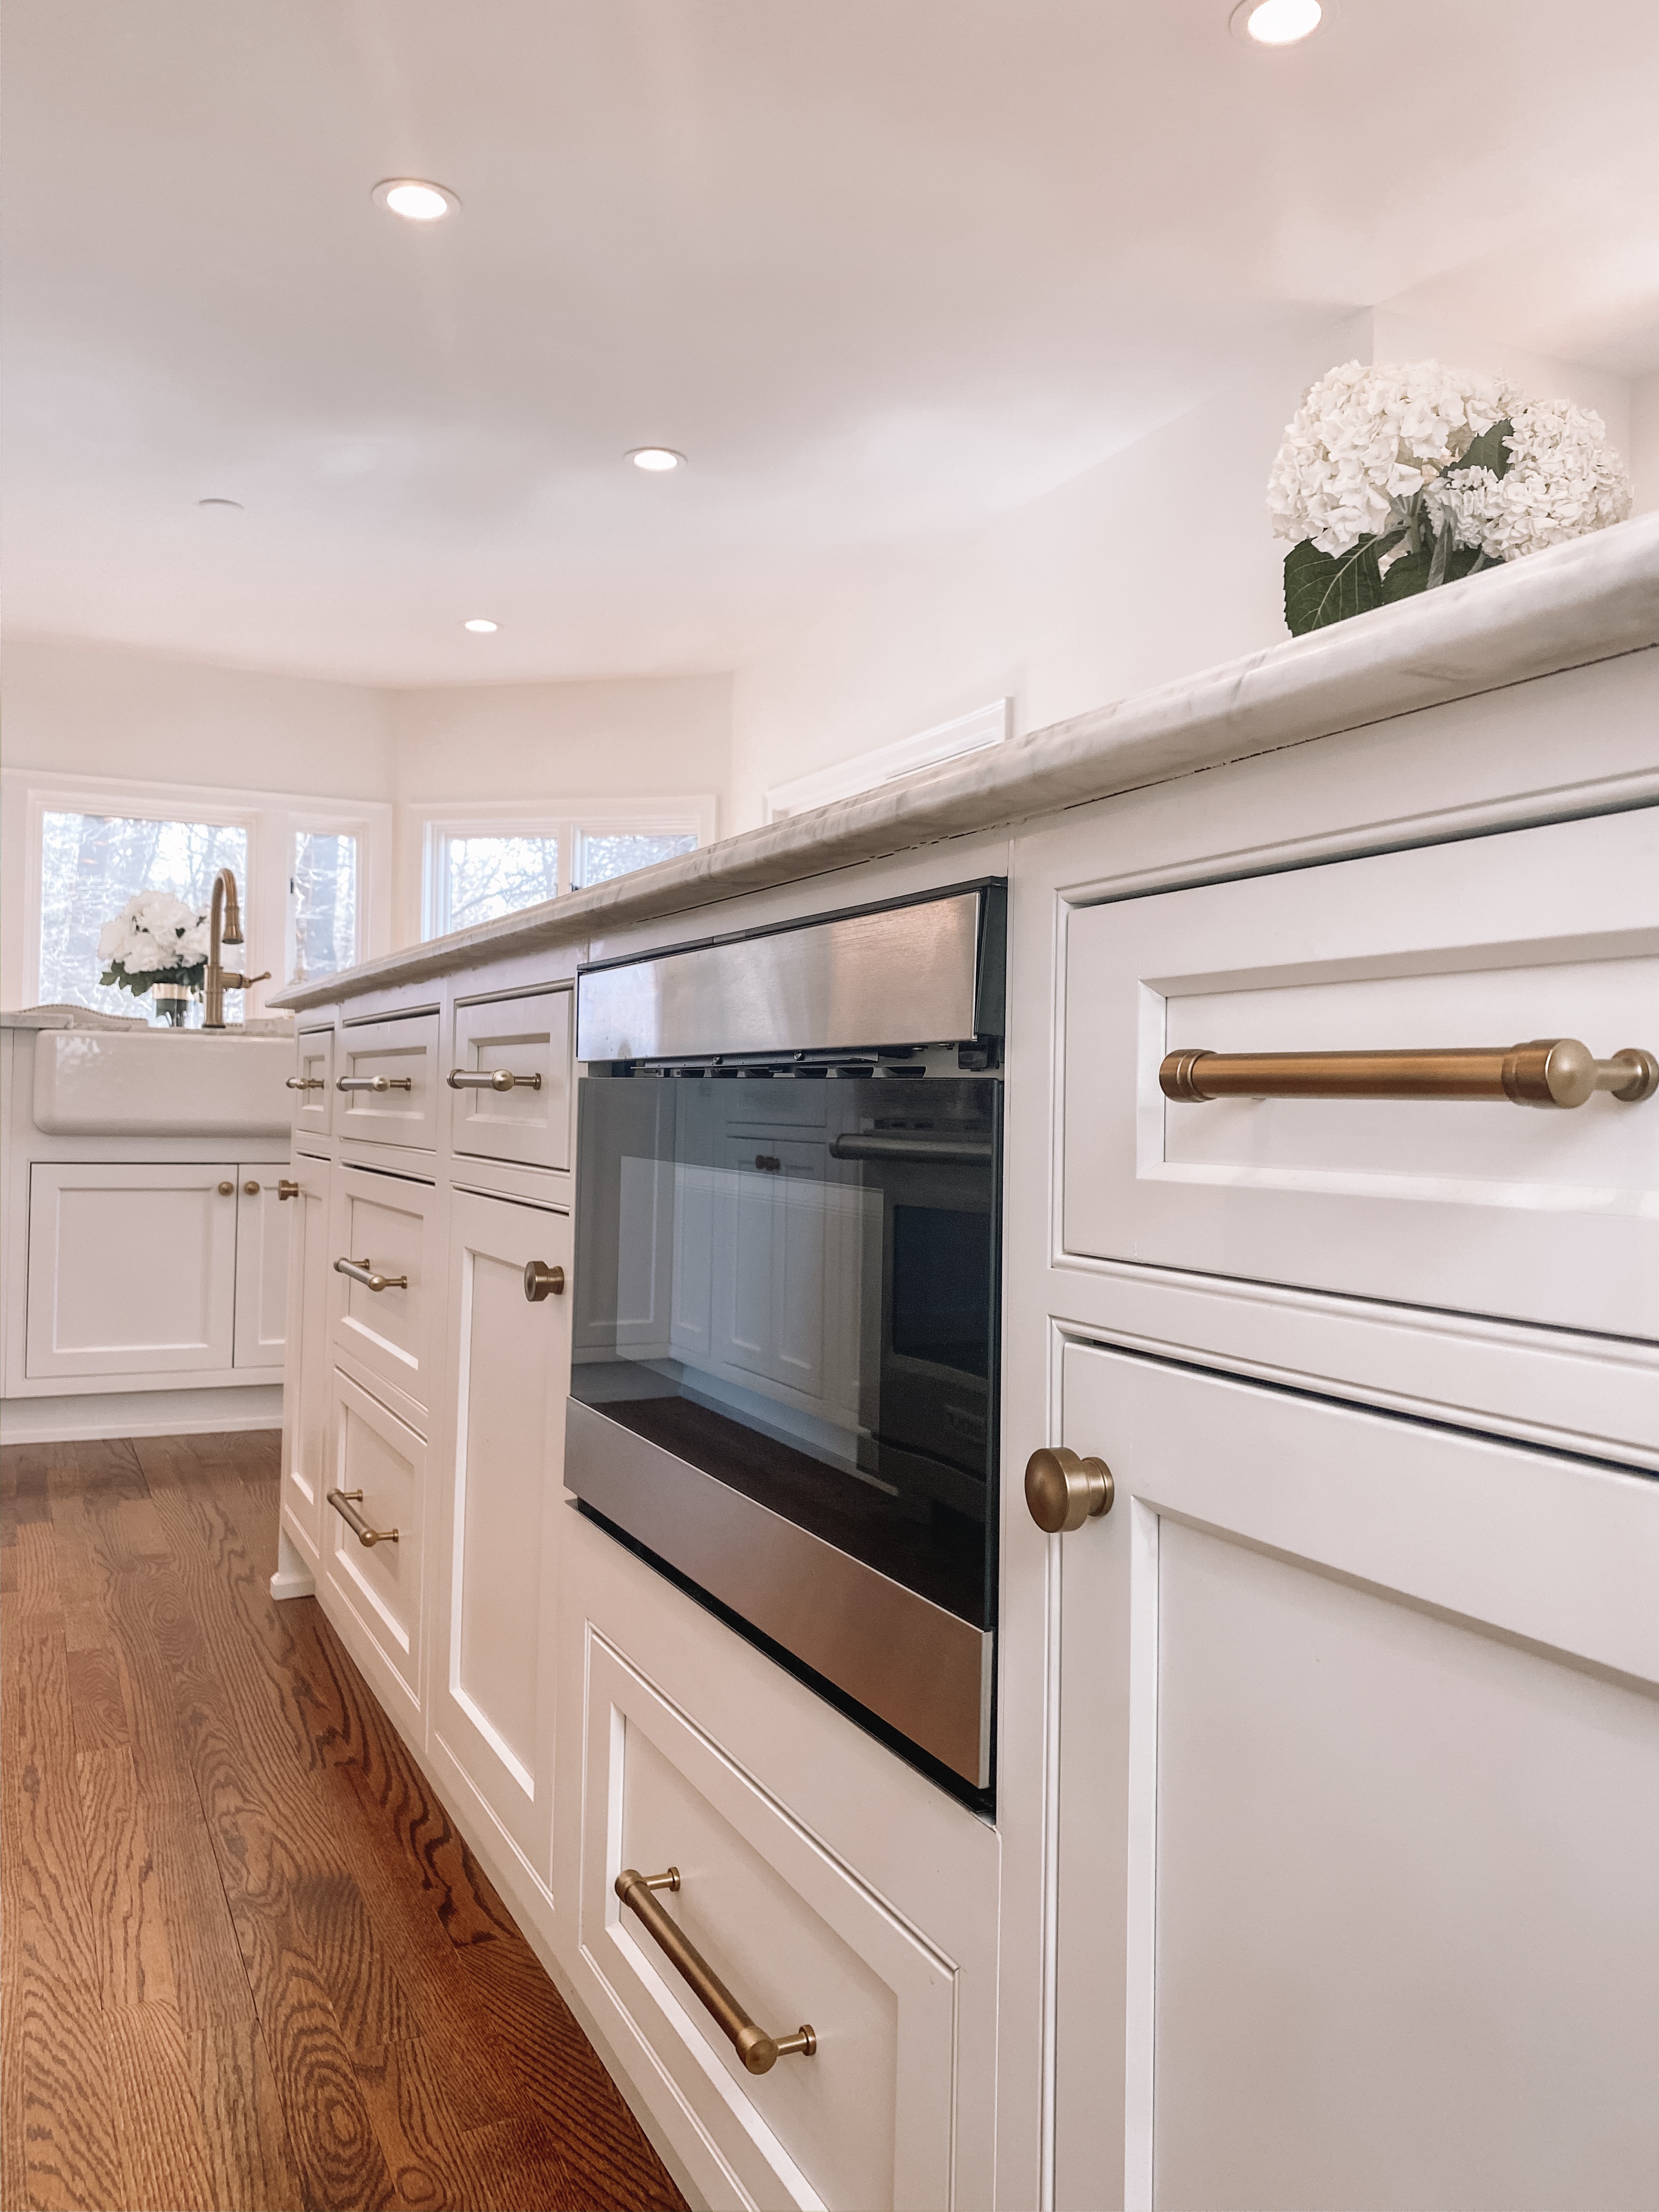
:: Shift microwave location from back wall to island
:: Add more glass cabinet faces
:: Overall cosmetic goal: create a more open/airy and bright feel
In this blog post, I’m going to share the REVEAL (with some before photos), share an overview timeline, a source list, and some FAQs!
BEFORE & AFTER
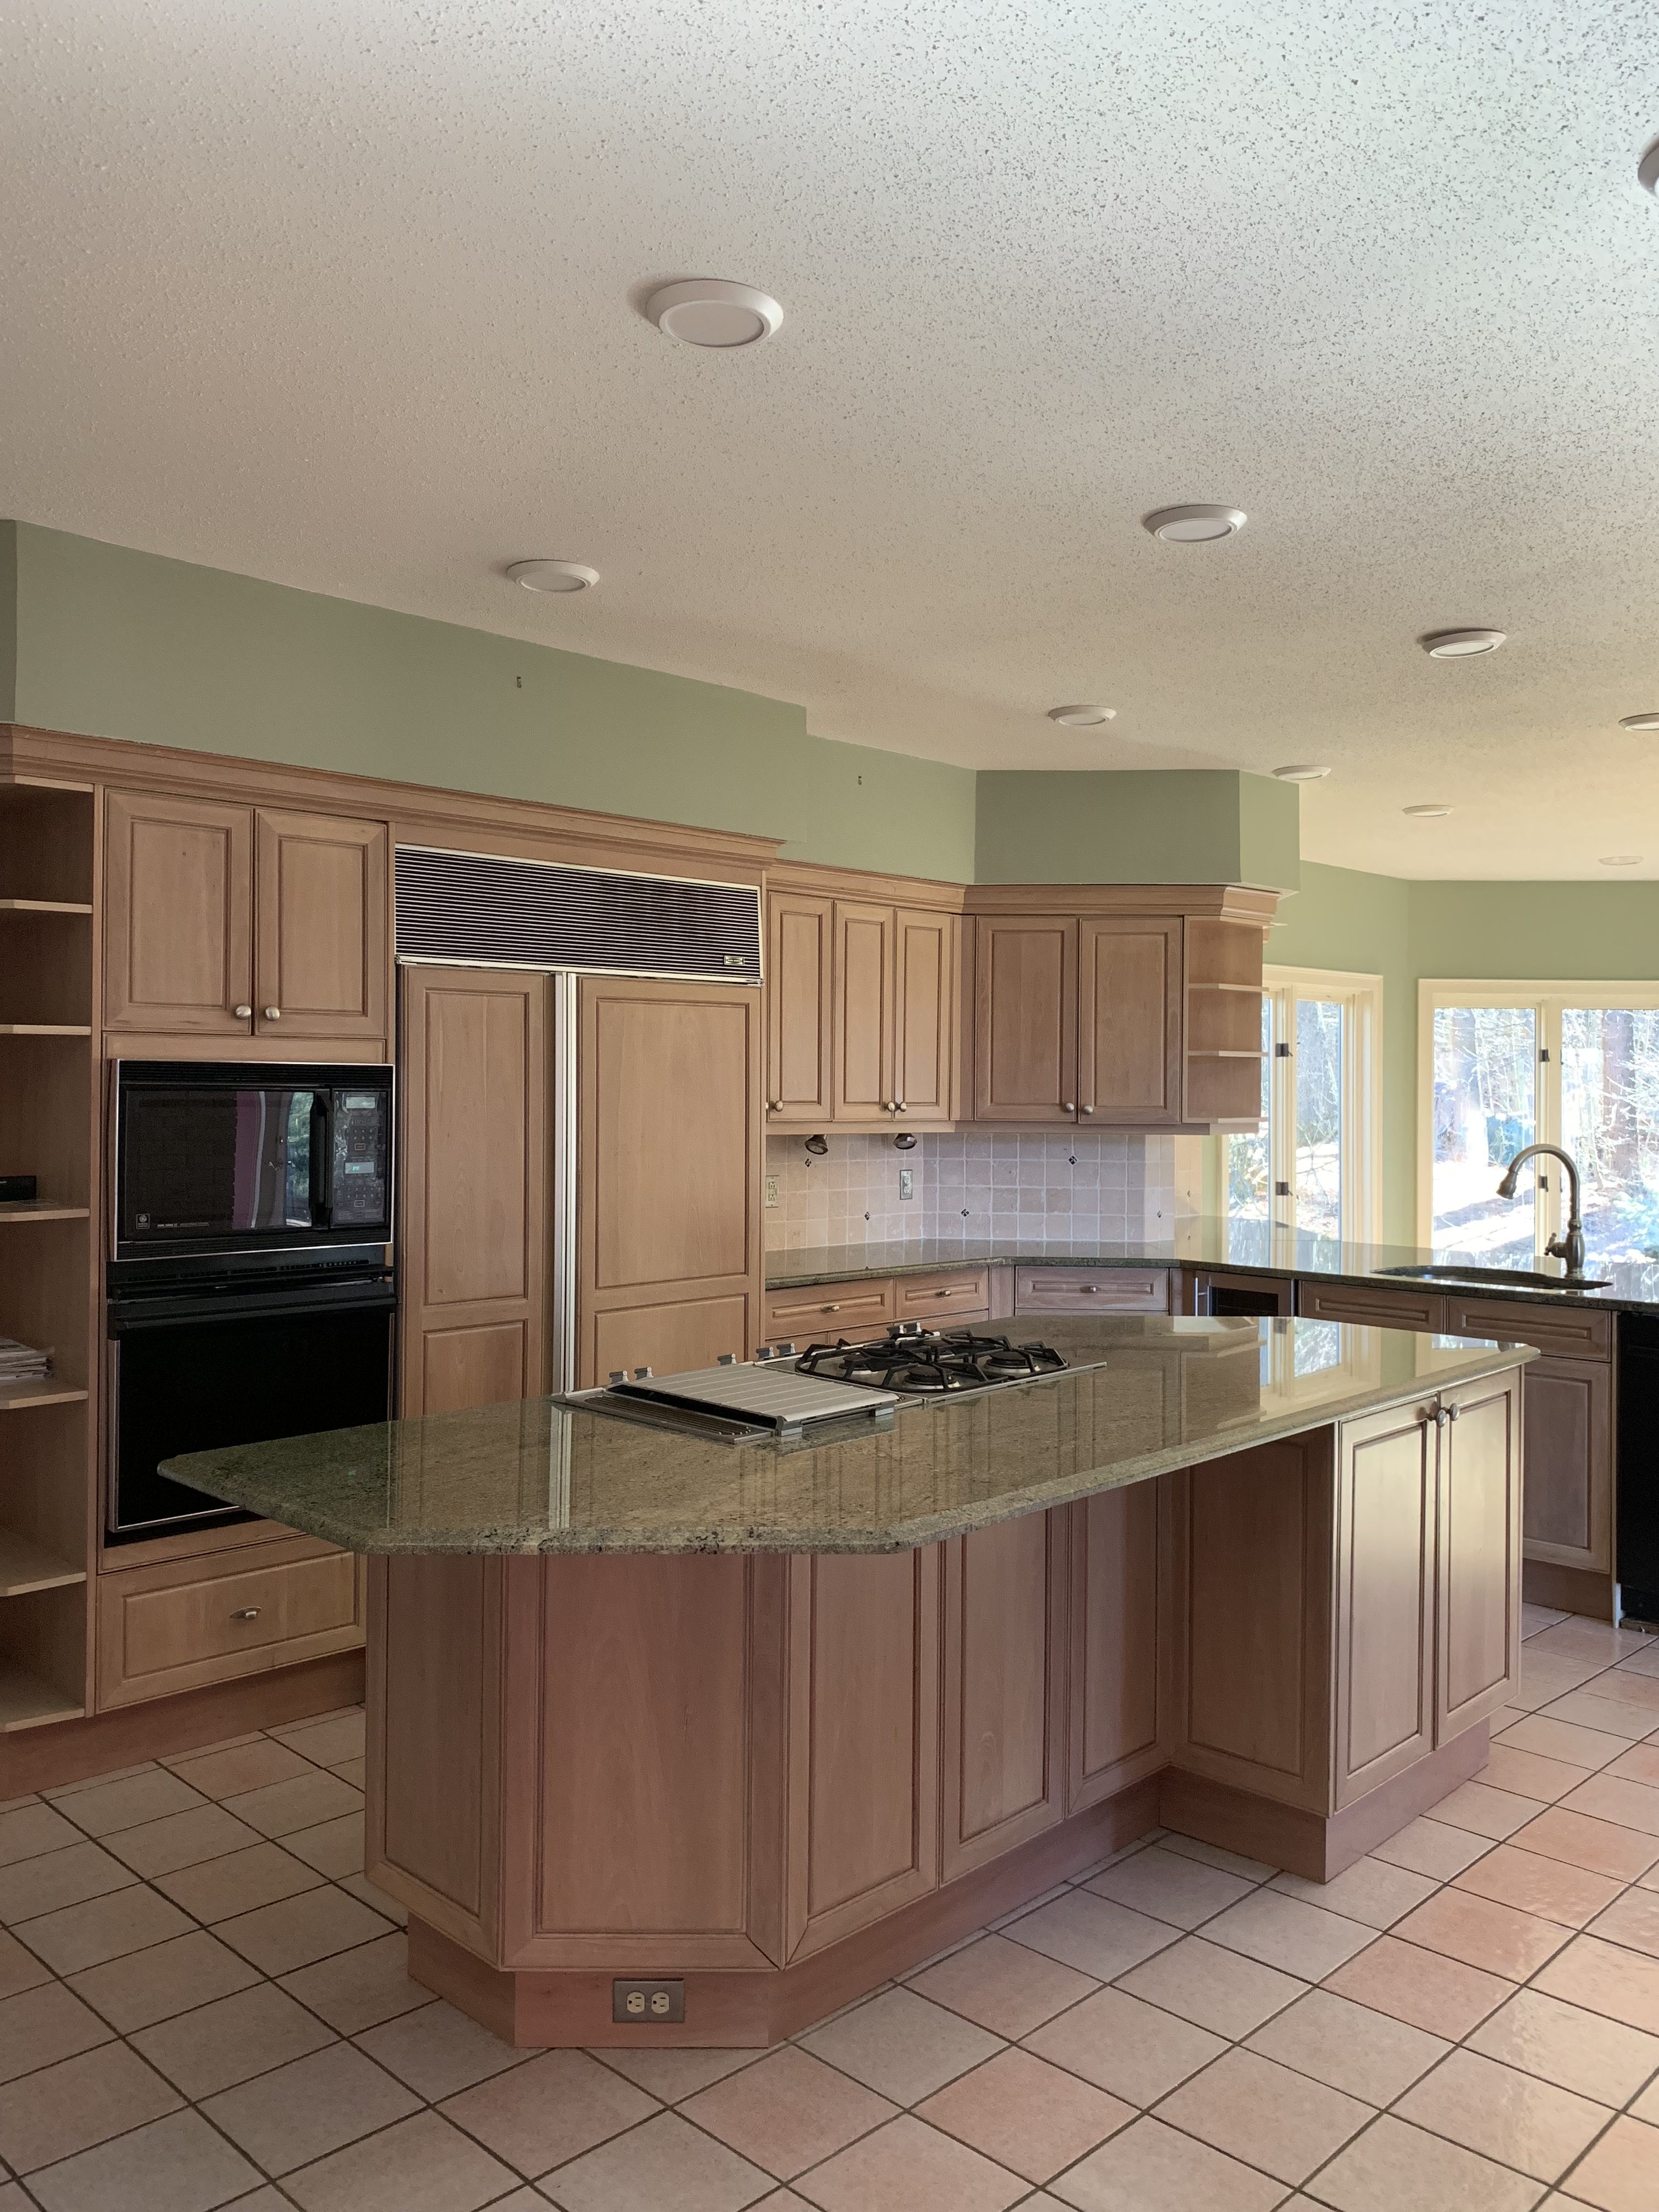
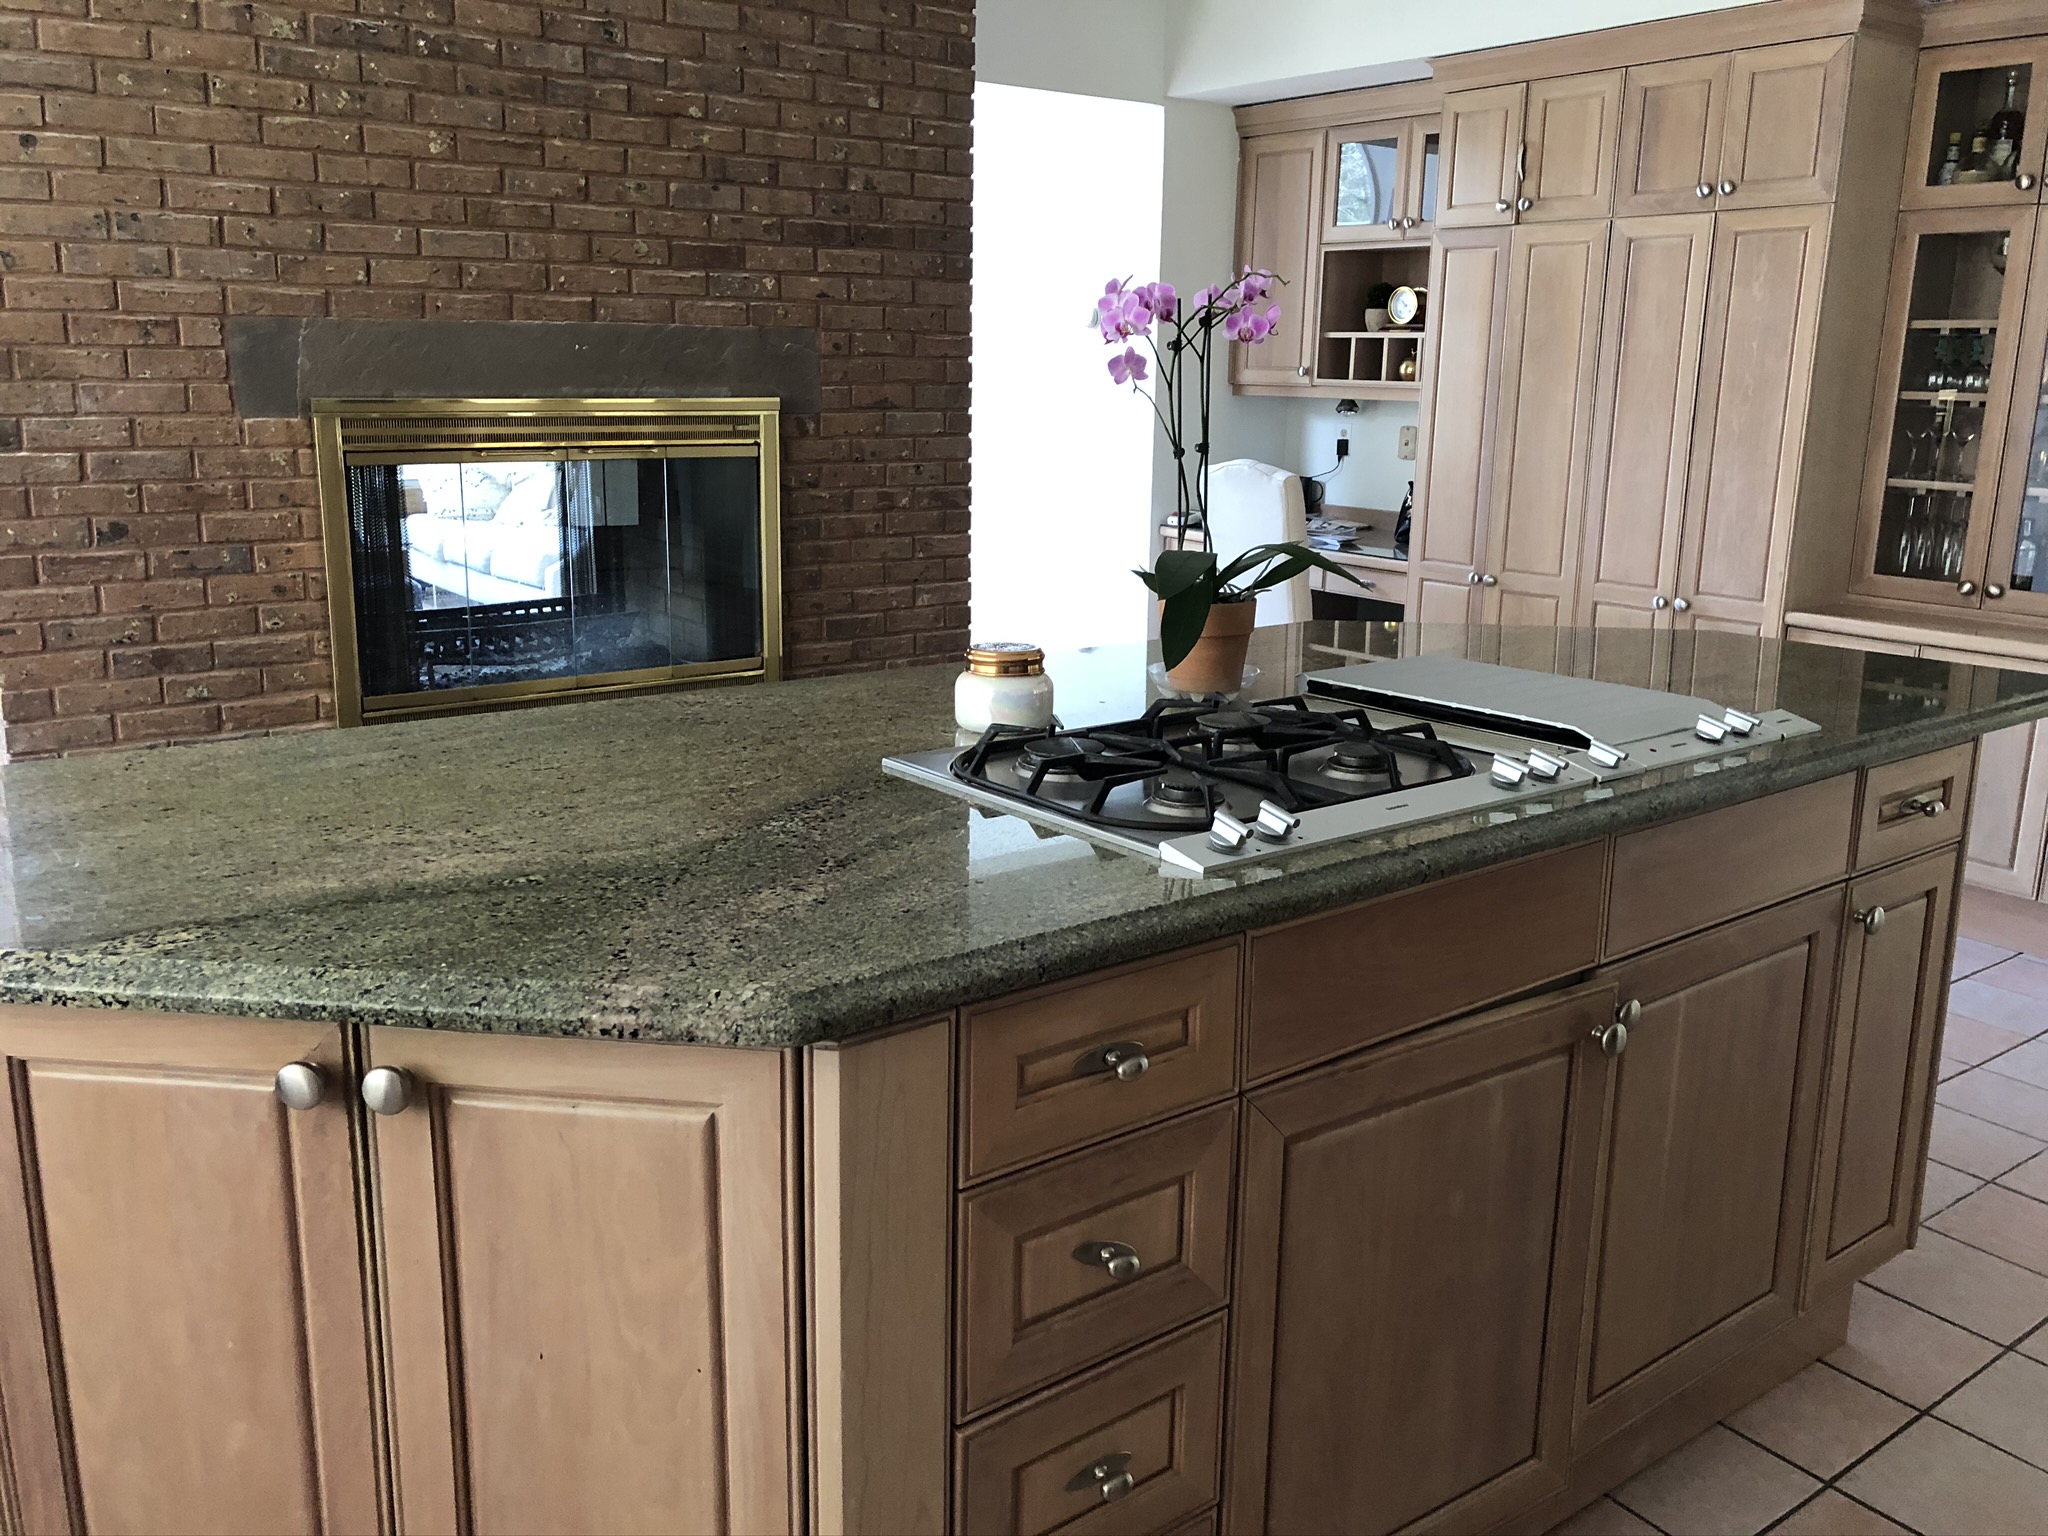
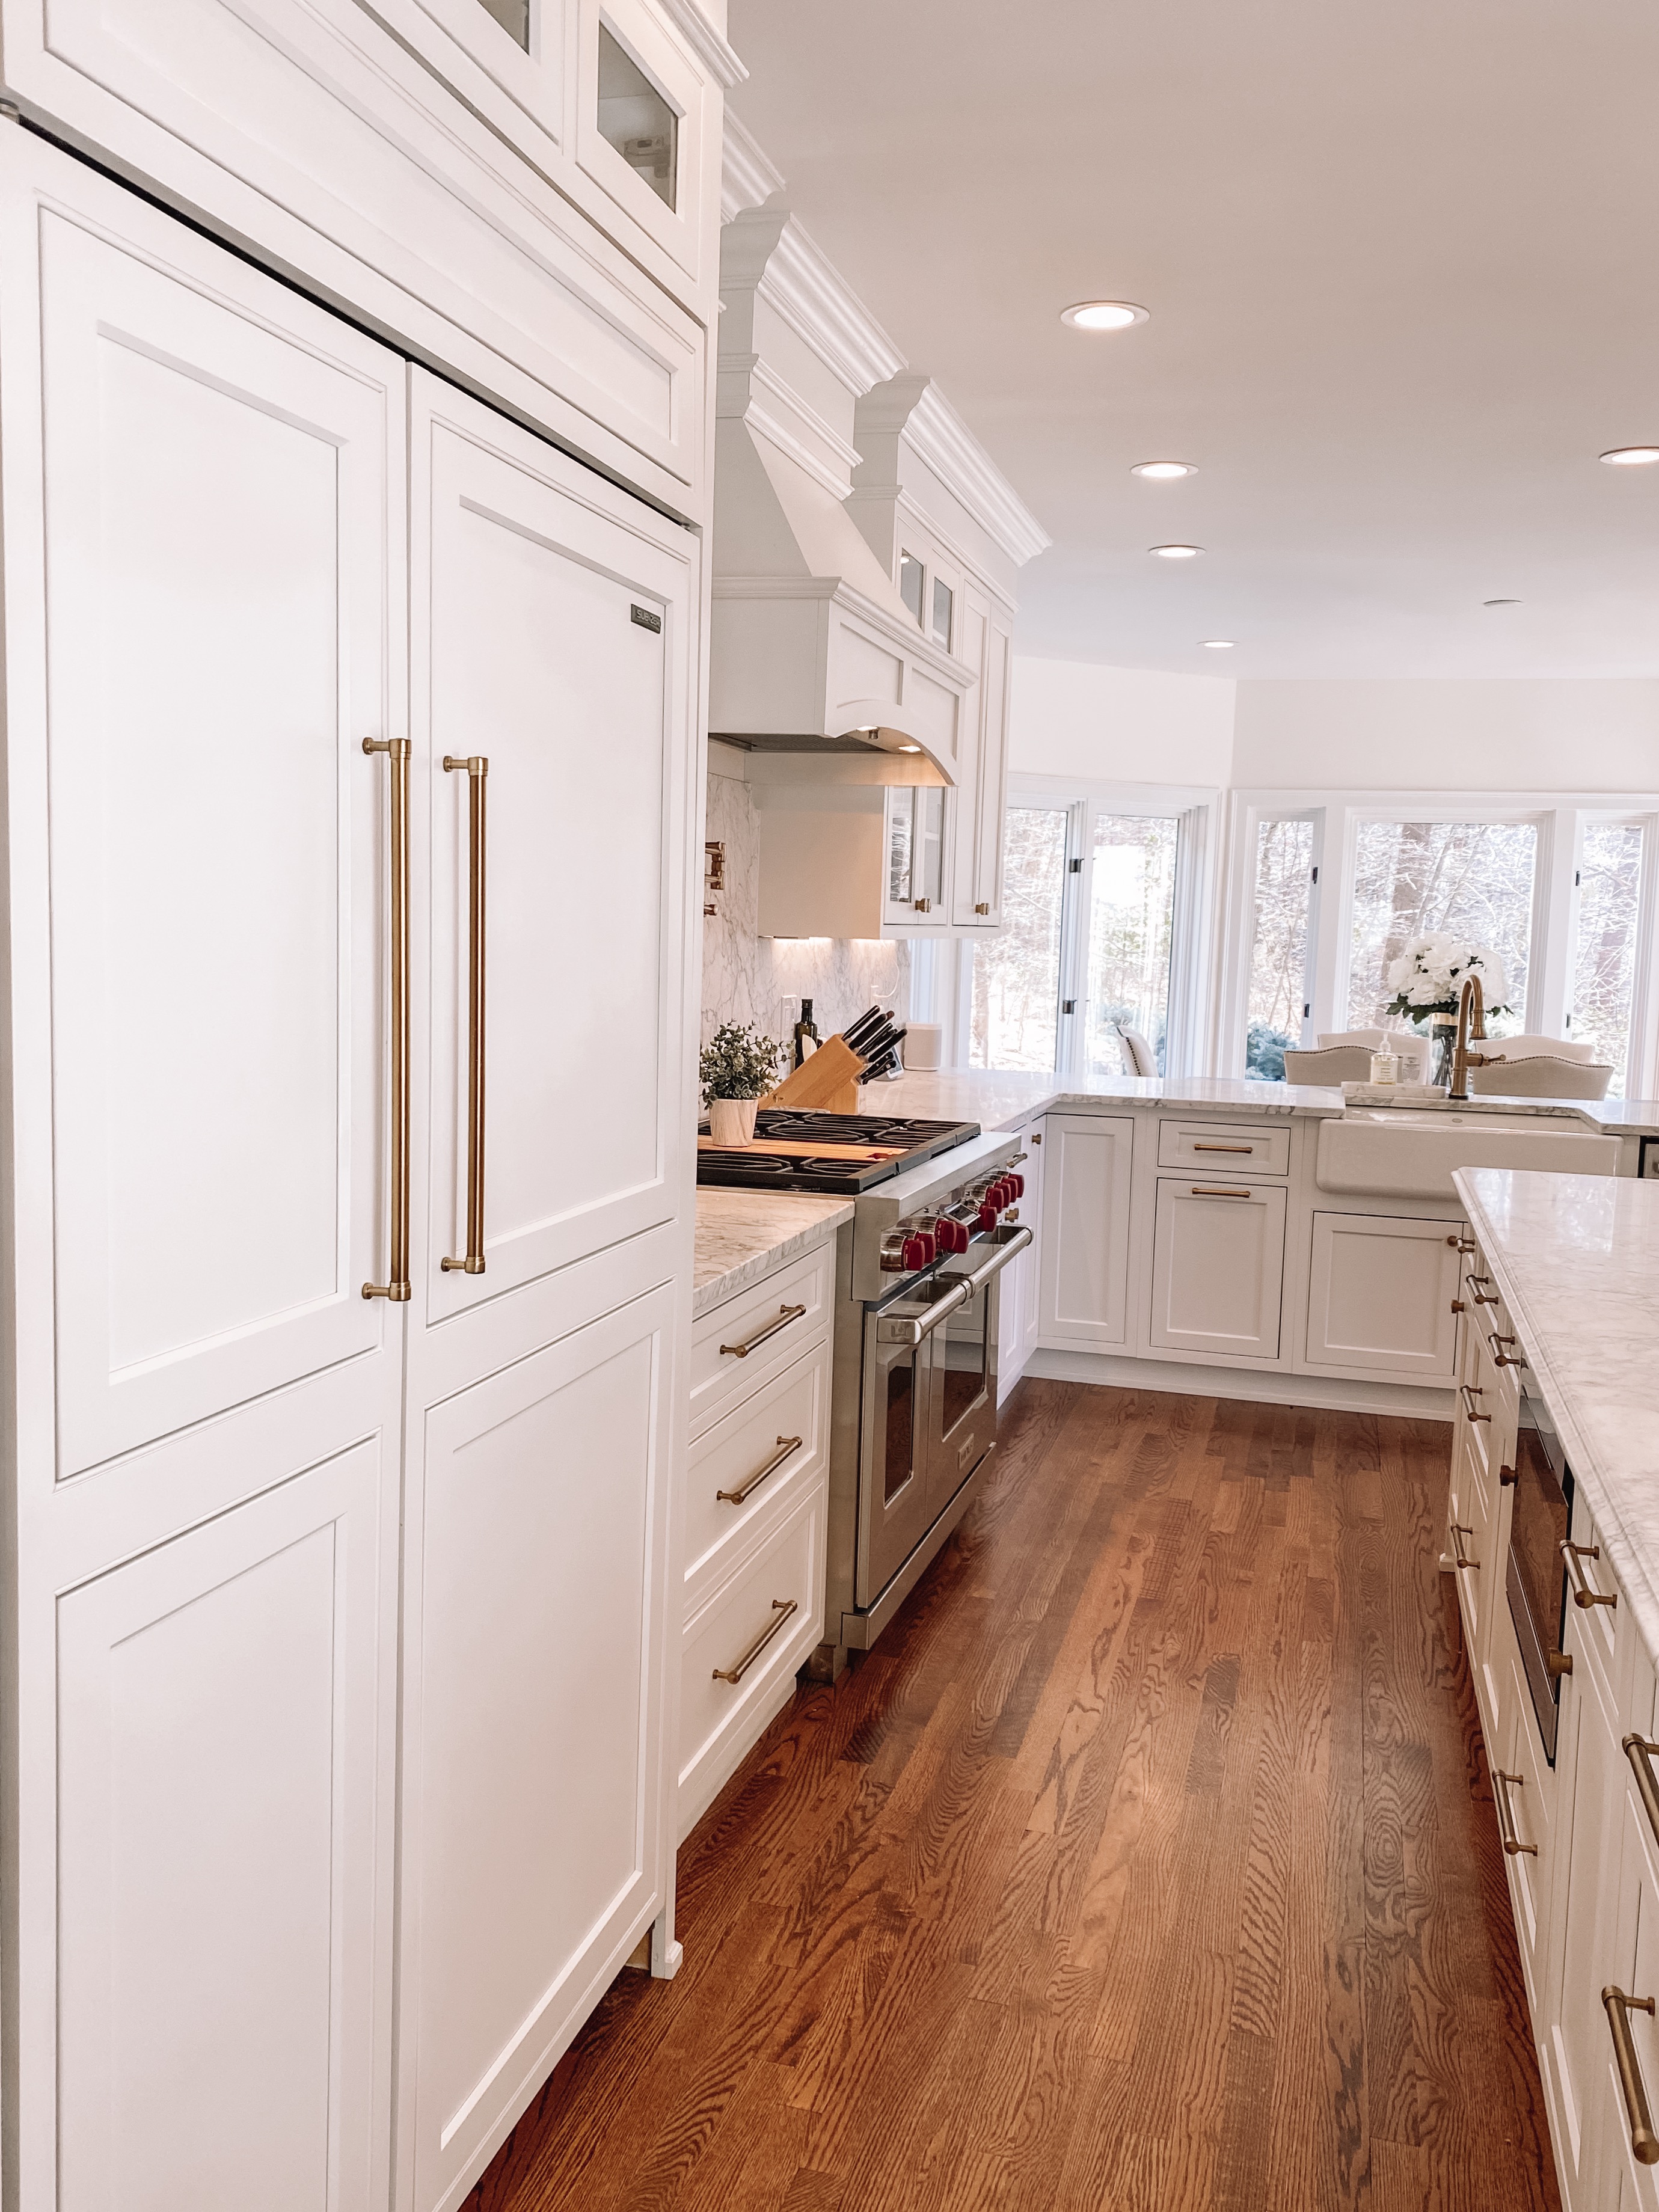
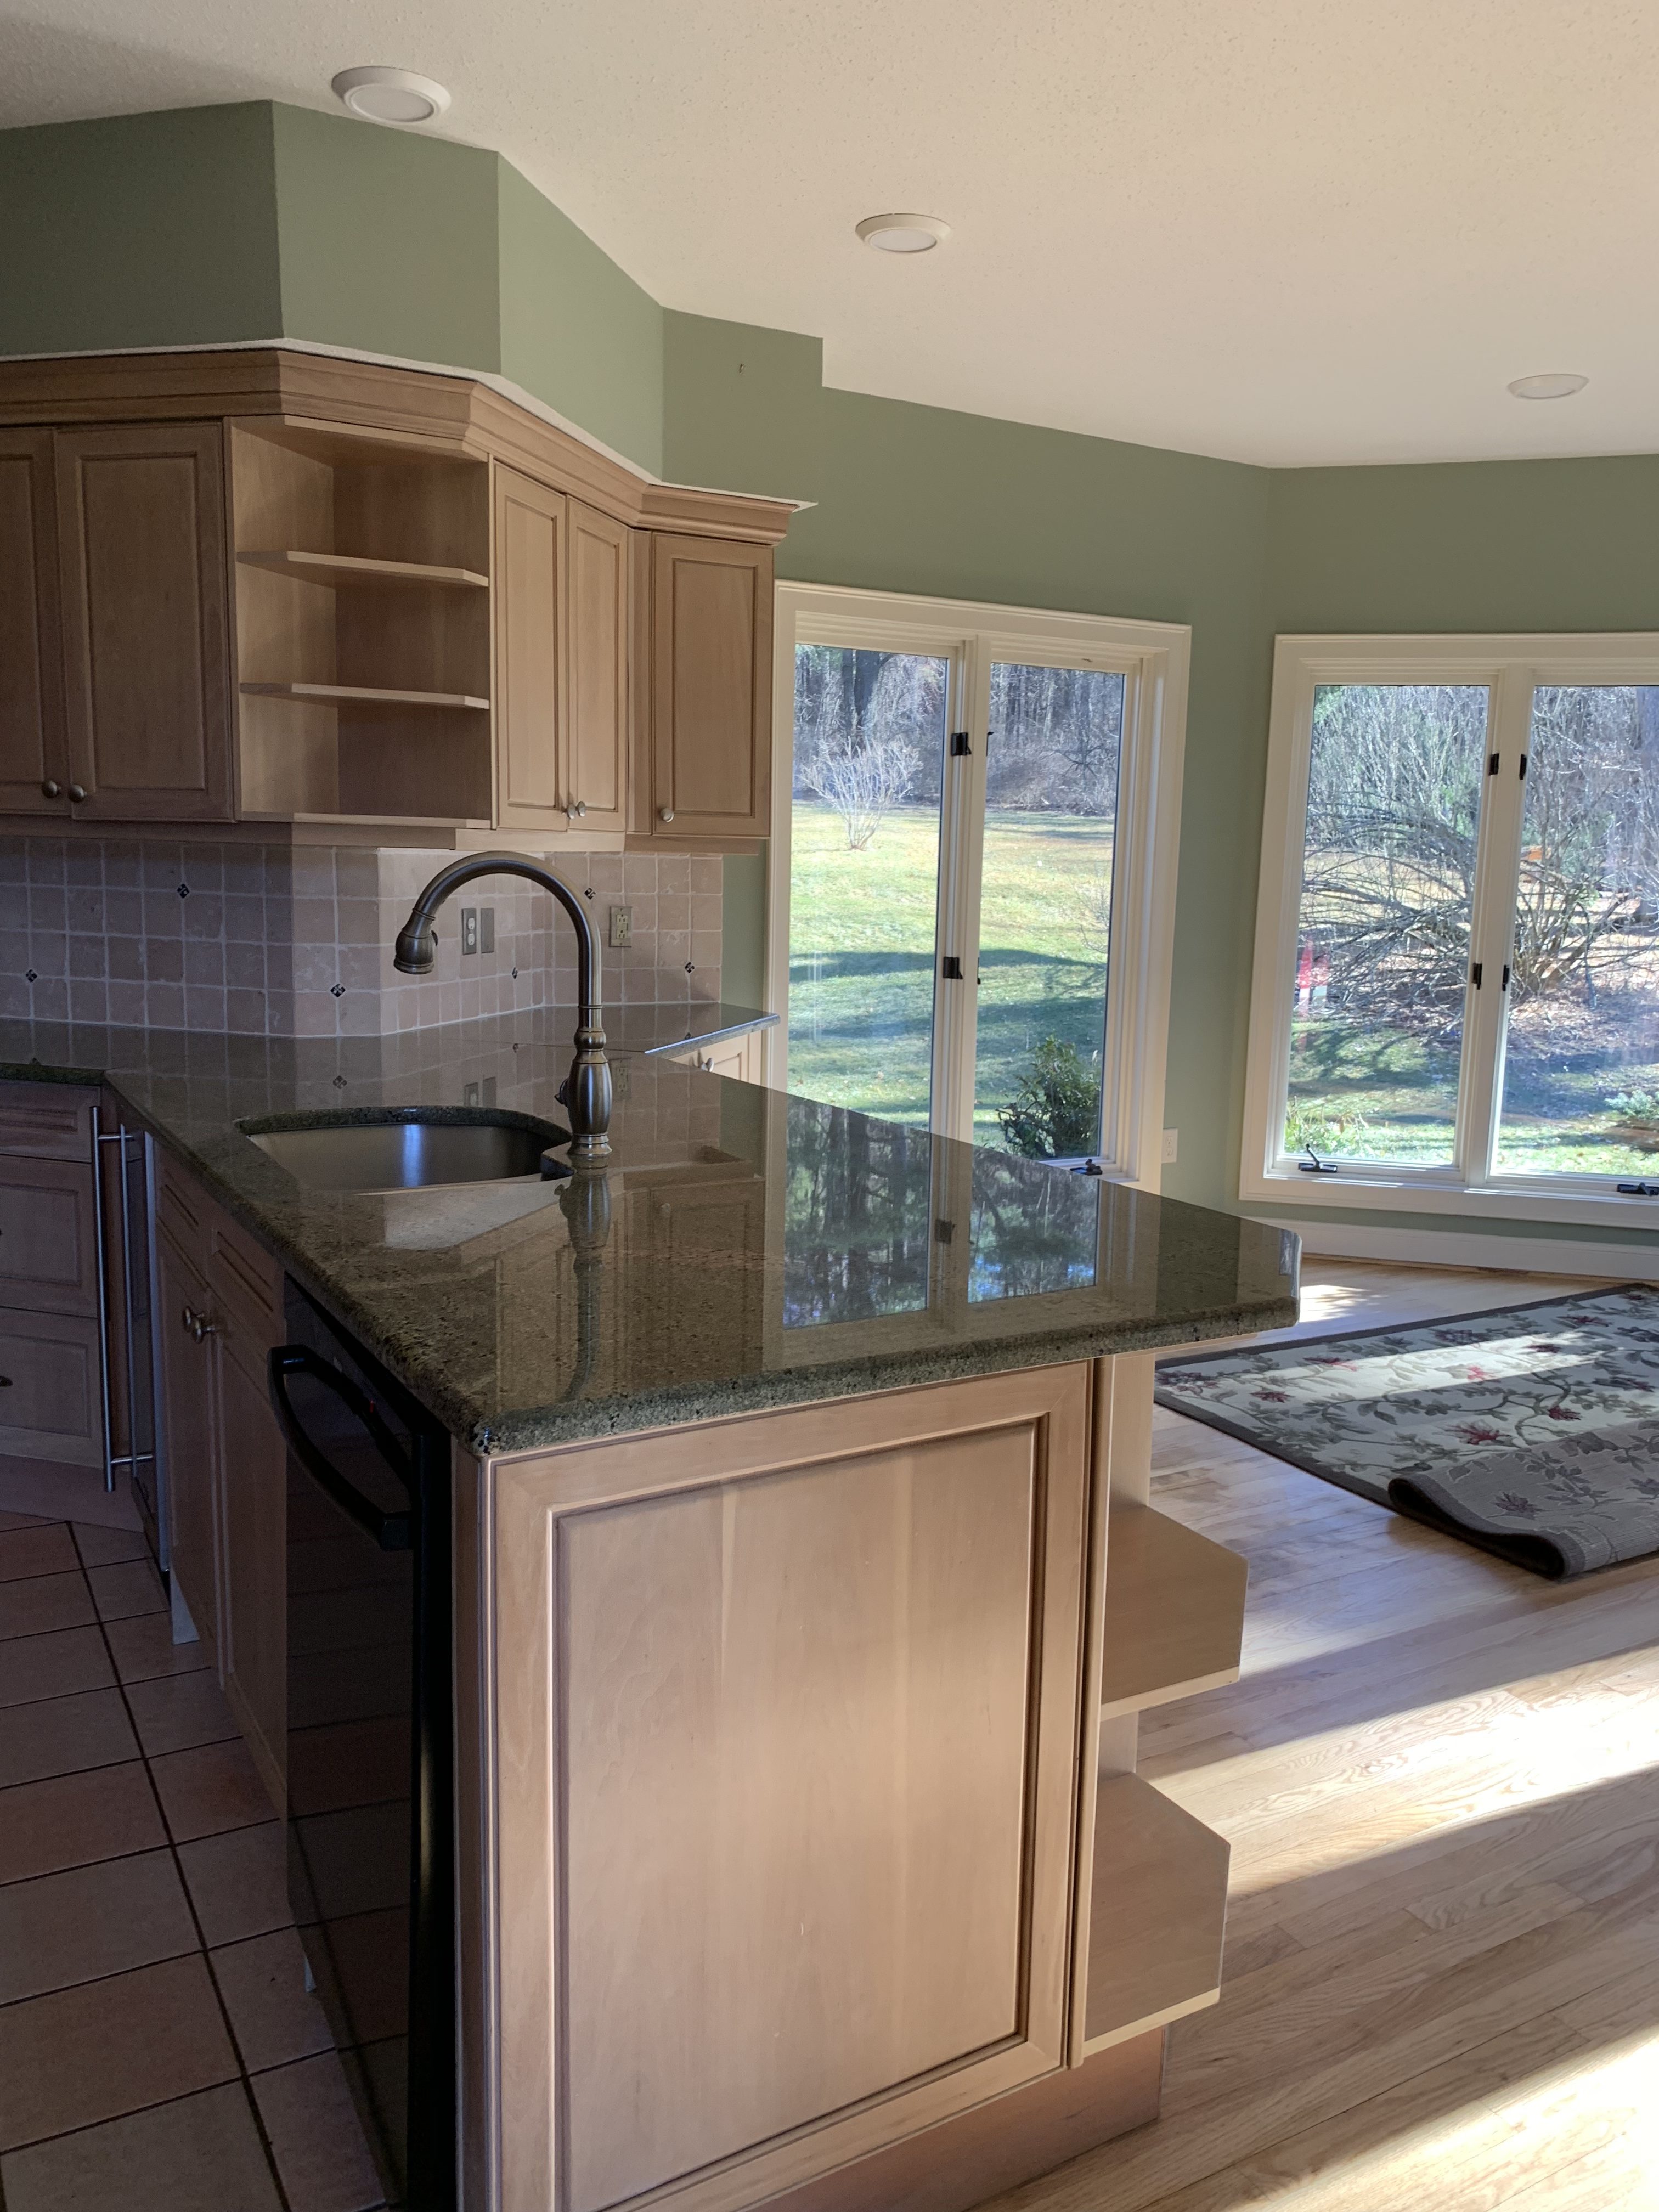
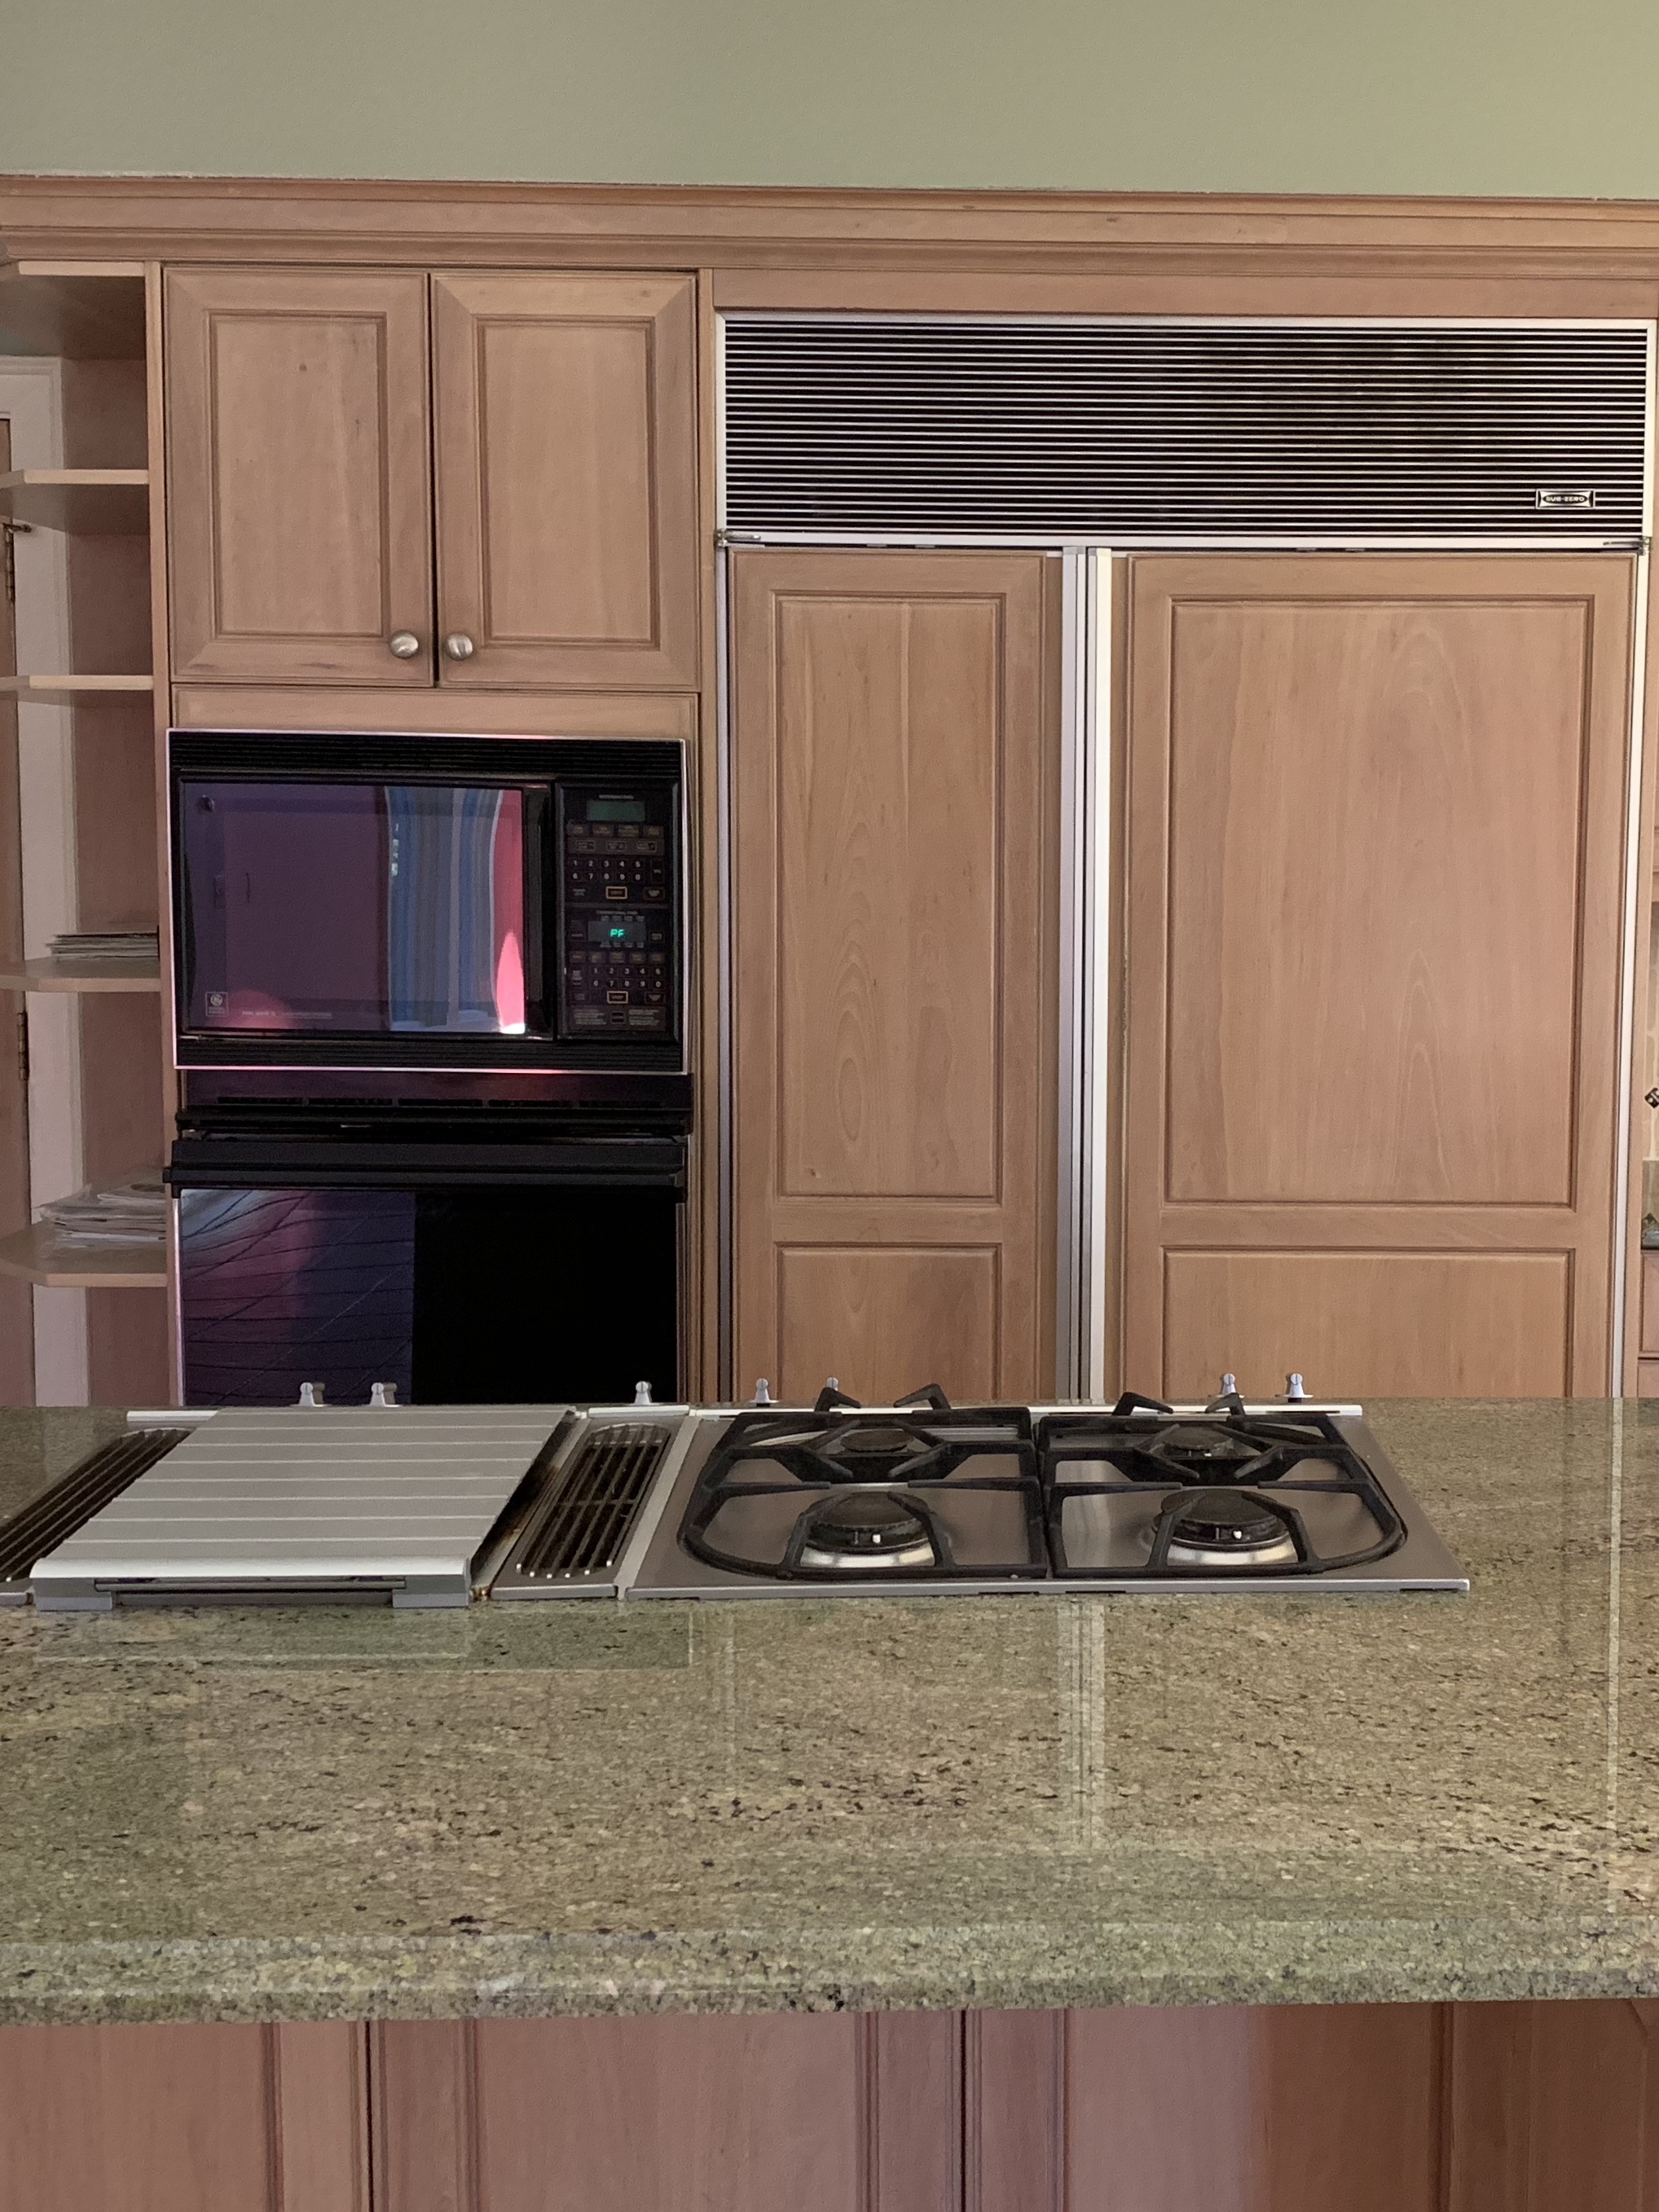
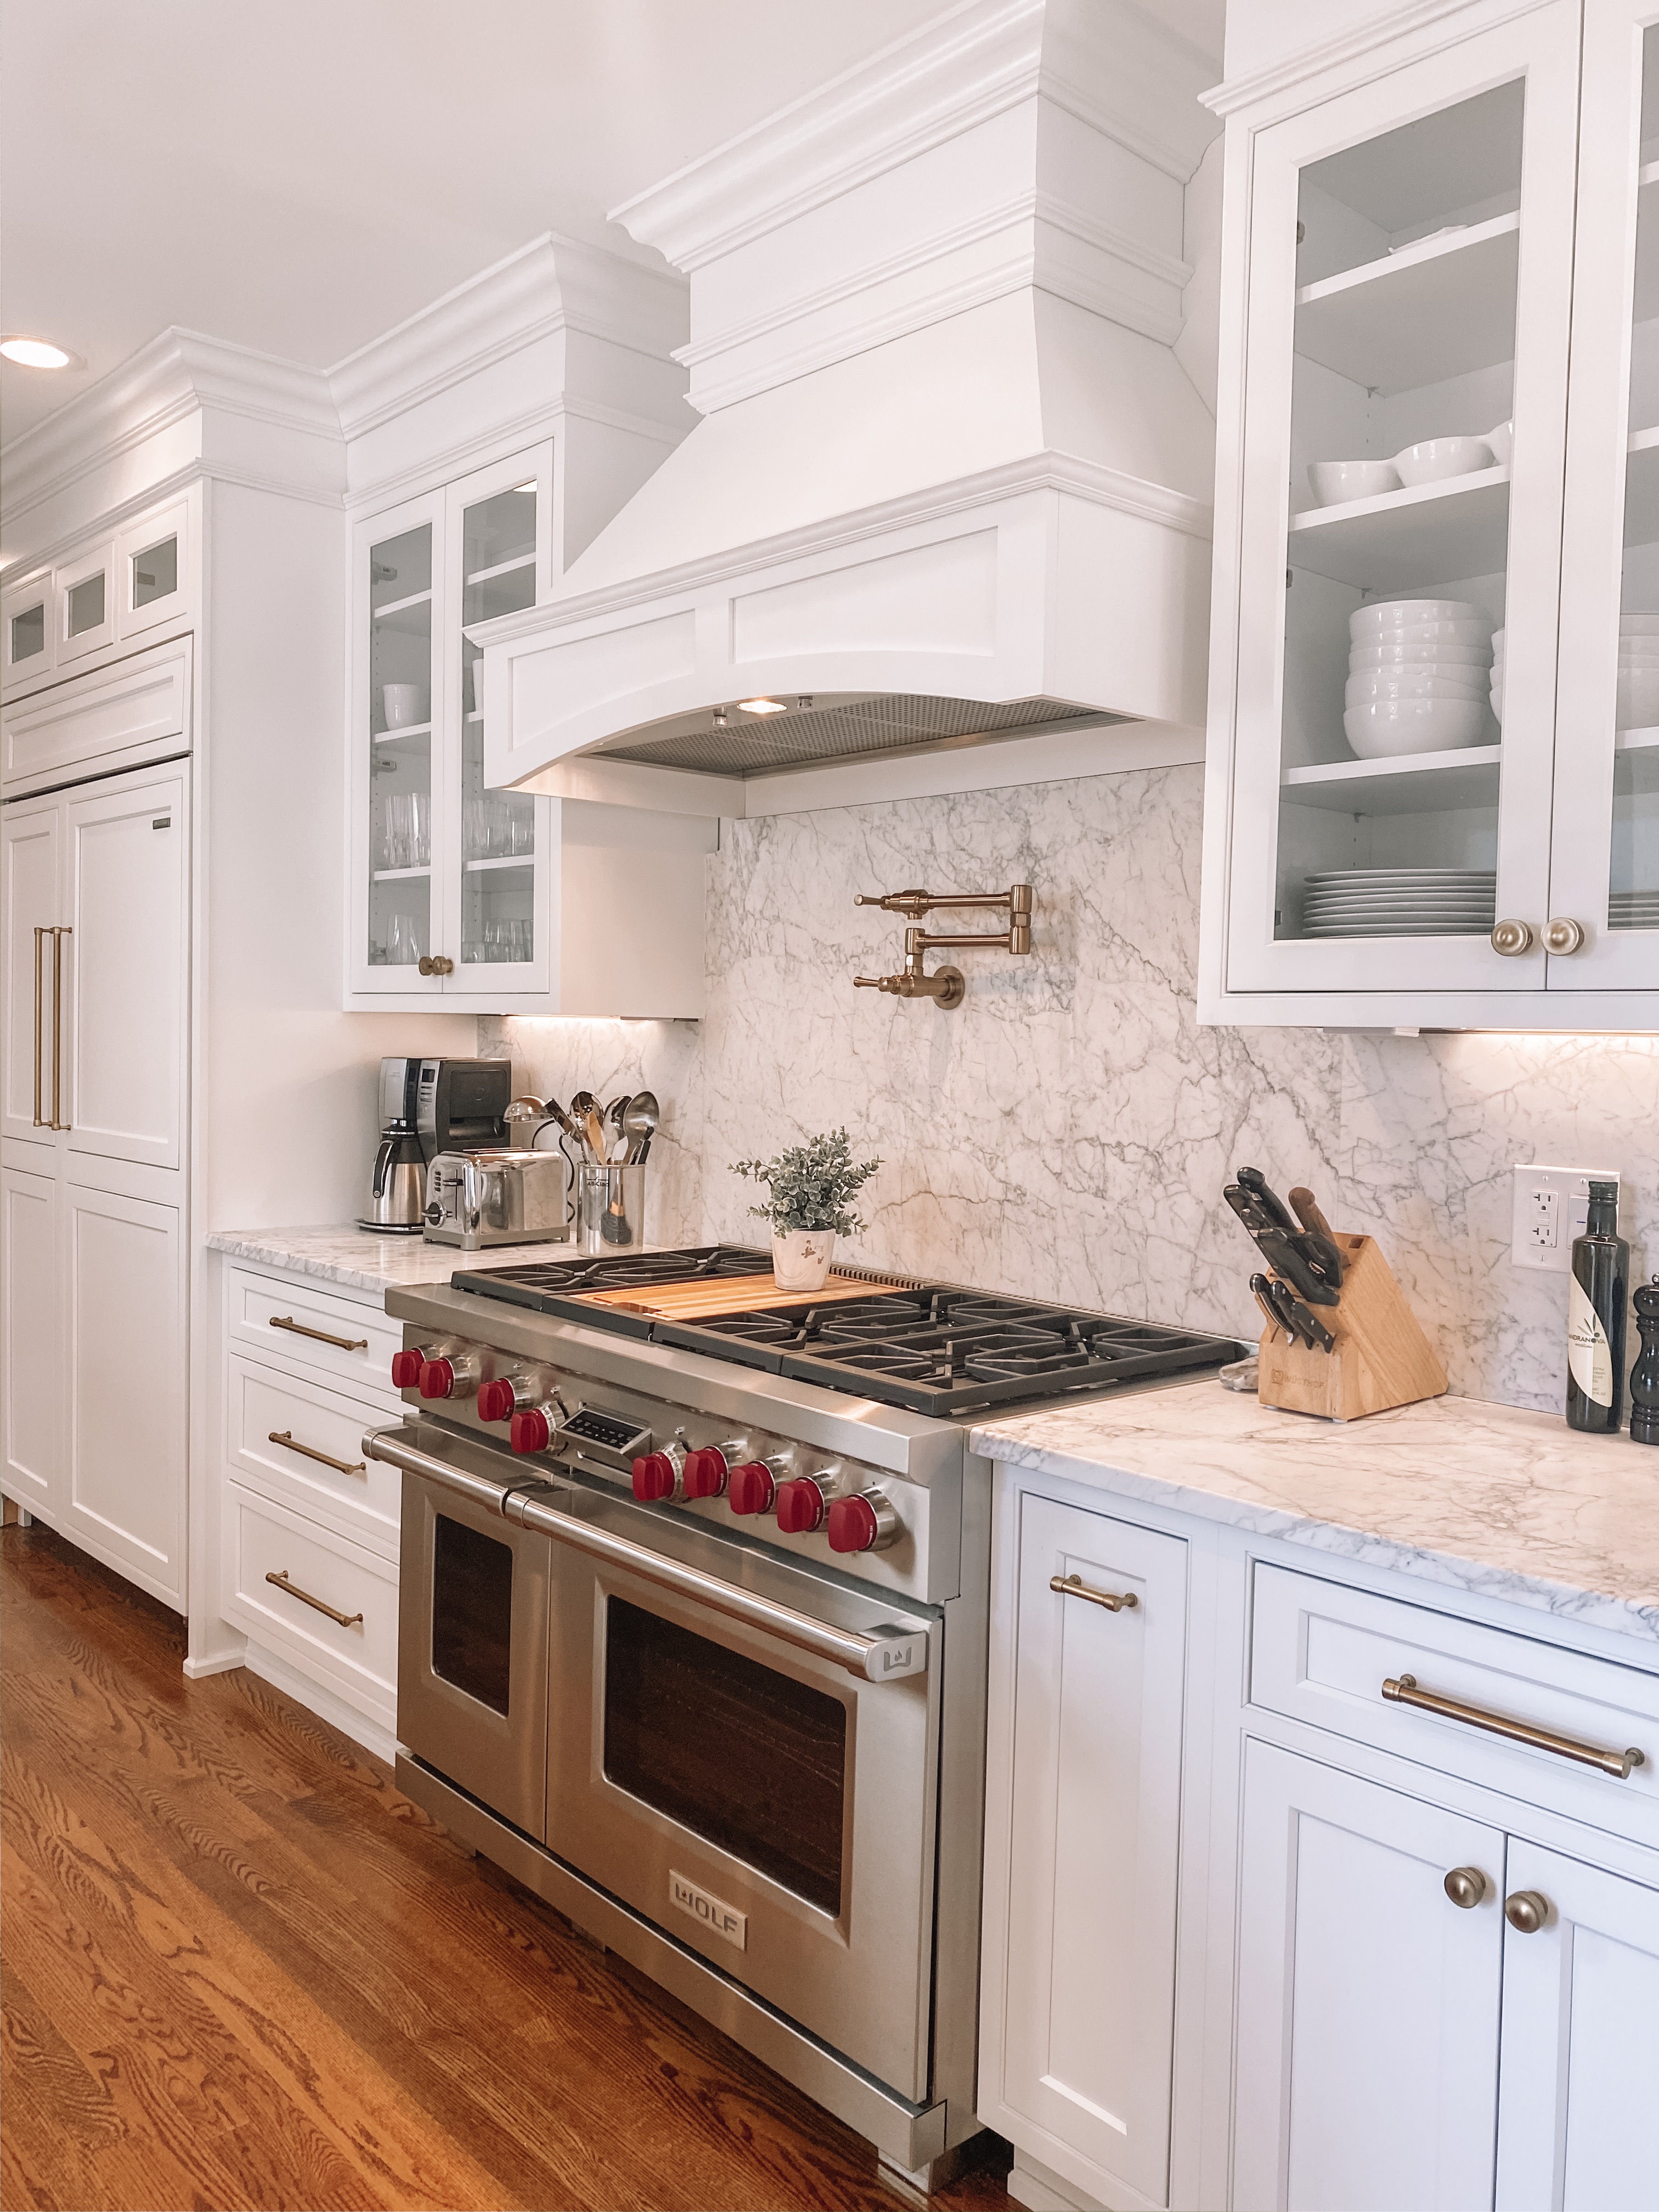
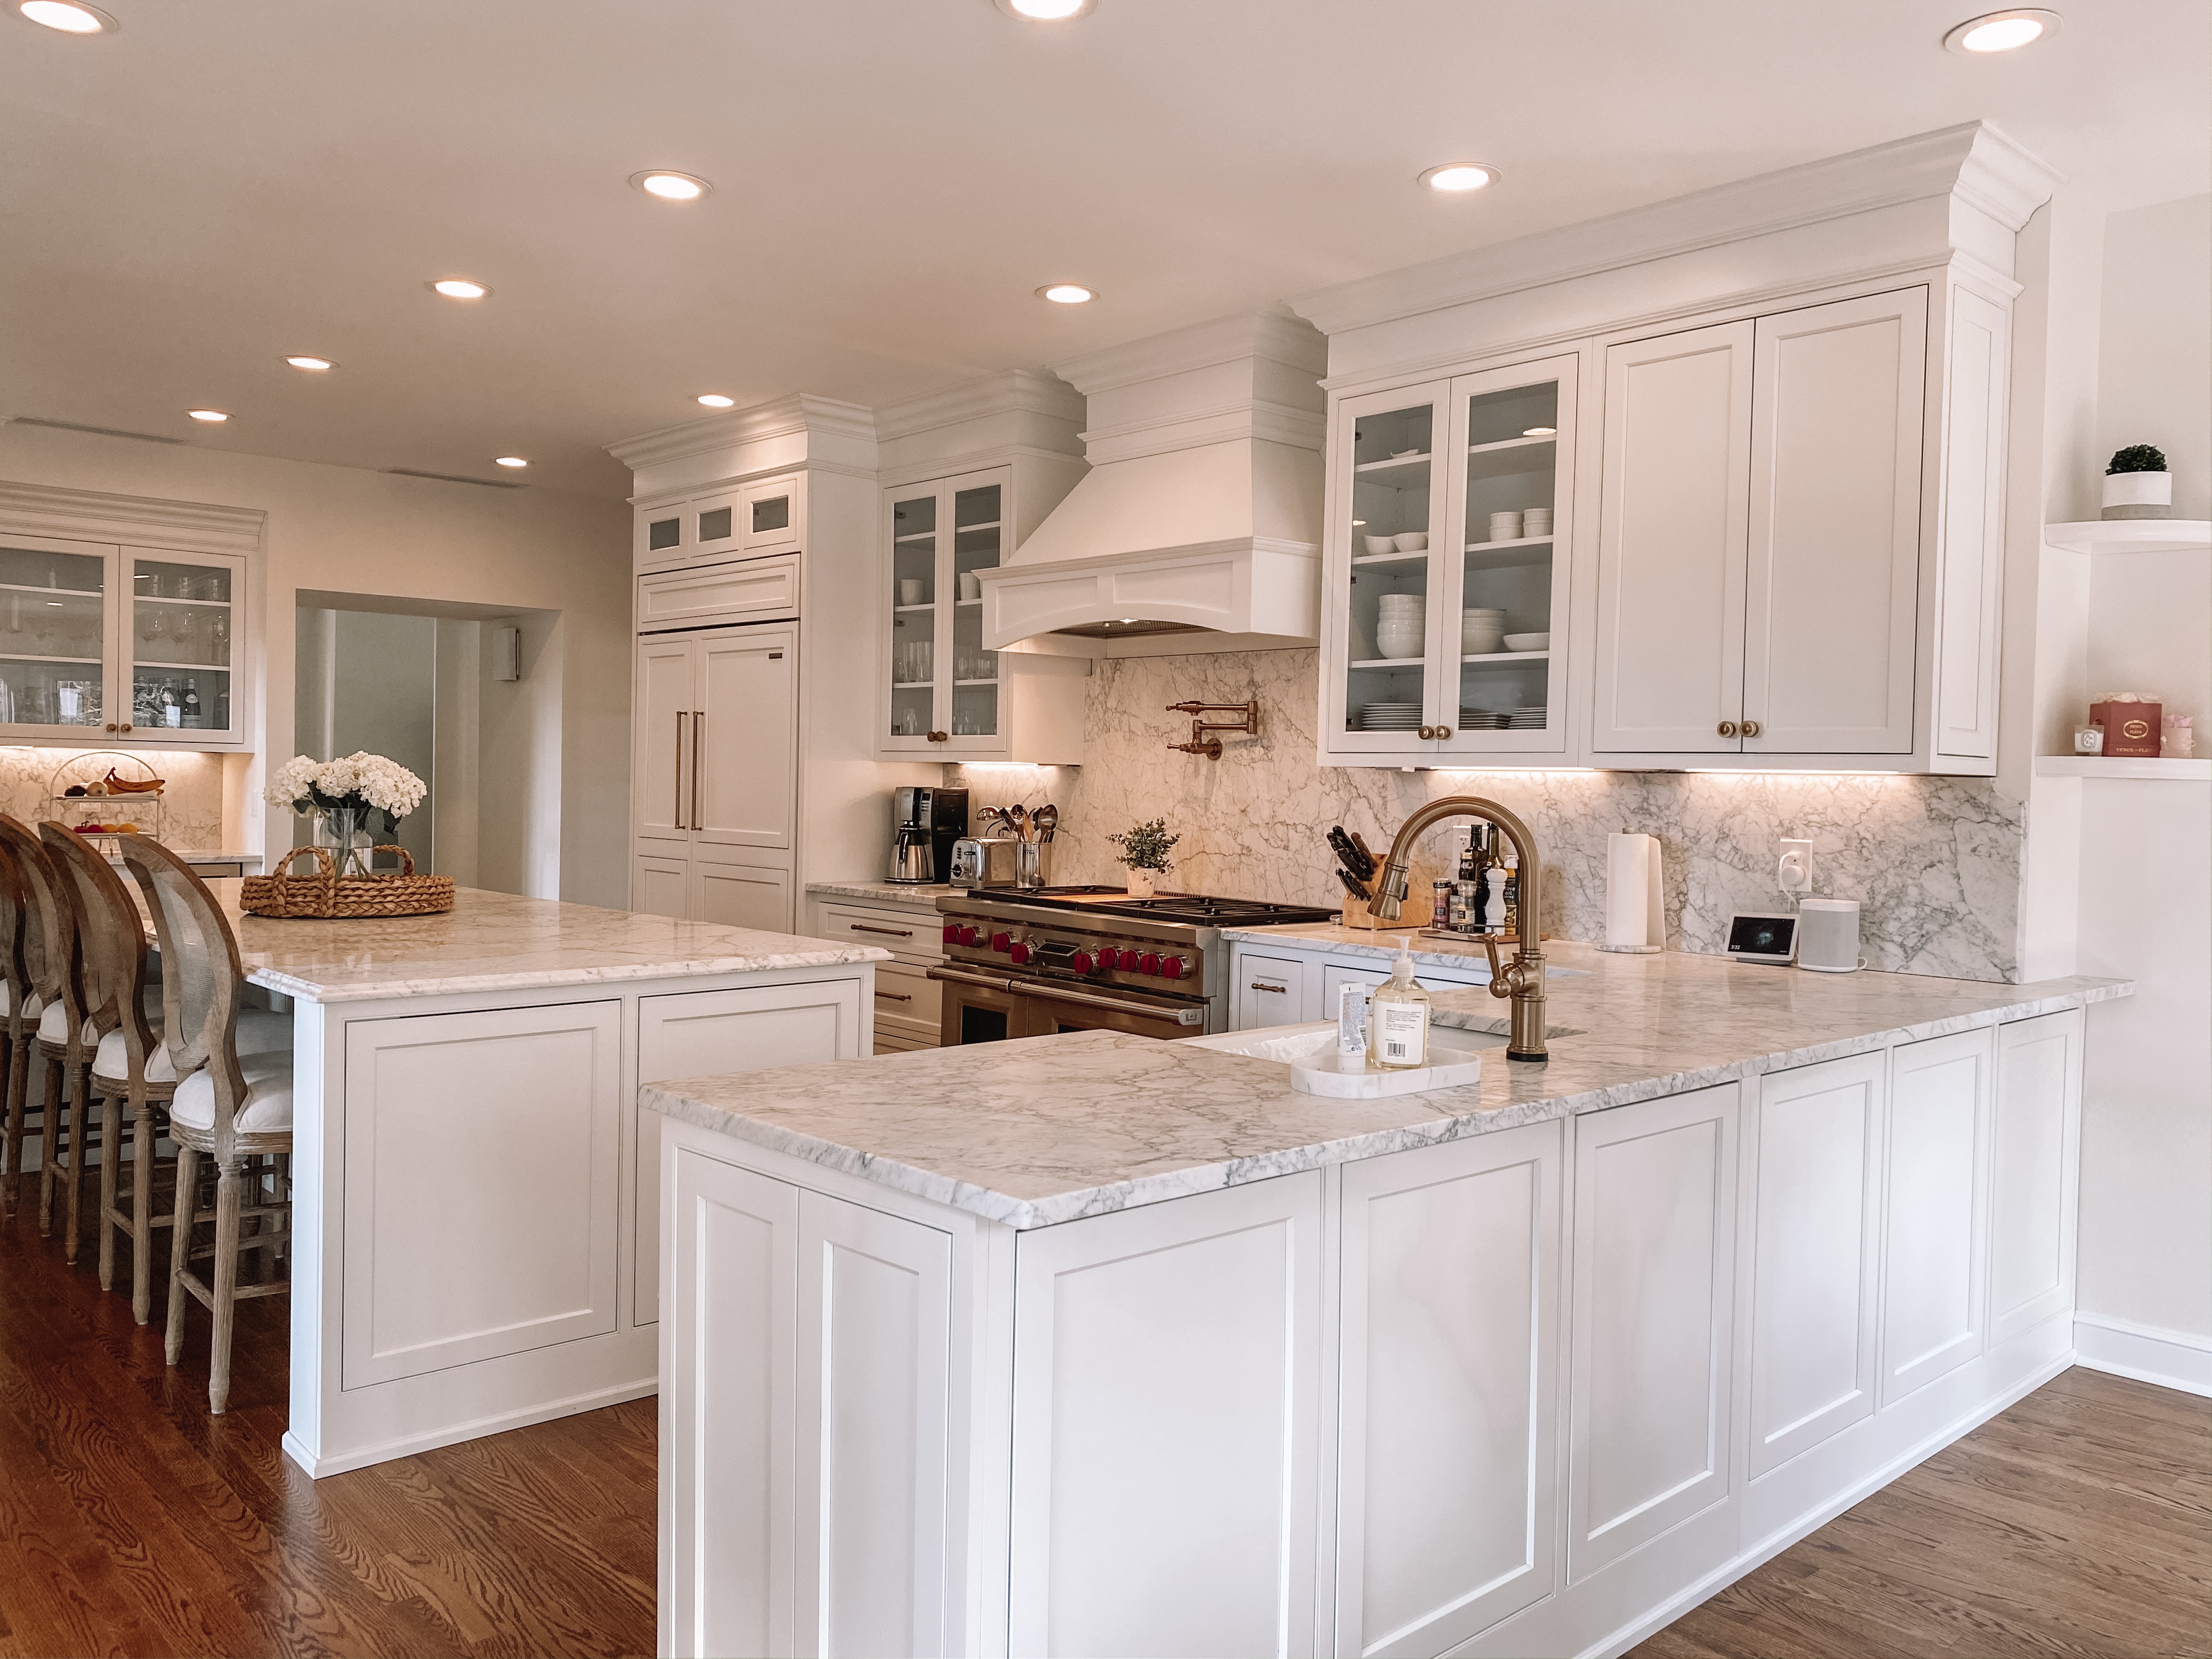
The overall before & after transformation still shocks me! This is looking from where the double sided fireplace is in our family room by the pantry wall. The most extensive work can be seen in this photo. Since we wanted to remove the cooktop off the island and remove the down draft to an overhead ventilation system, it required a ton of “behind-the-scenes” work behind that back wall (which we also wanted to flatten out for cosmetic reasons). First off, we found out there was actually a huge duct behind that “jut out” in the old kitchen. In order to keep the wall flat (and so that all the appliances could live there), we had to build the wall forward about 10 inches and were able to relocate that big duct PLUS the equipment needed for the gas range and overhead ventilation system behind the wall. It was one of the most major things we did in the kitchen, required a lot of thought/strategy, a ton of different professionals to make it happen, and was time consuming, but was worth it for the overall flow of the kitchen. I wanted a clean island and with the amount of cooking we do, I’m not a huge fan of a downdraft system (where the ventilation pops up when you’re cooking). It usually makes a mess and becomes difficult to entertain on the island to when you have a flame — not to mention how much of a hazard it is! It was important for us to keep the island clean from a functional standpoint!
BEFORE & AFTER
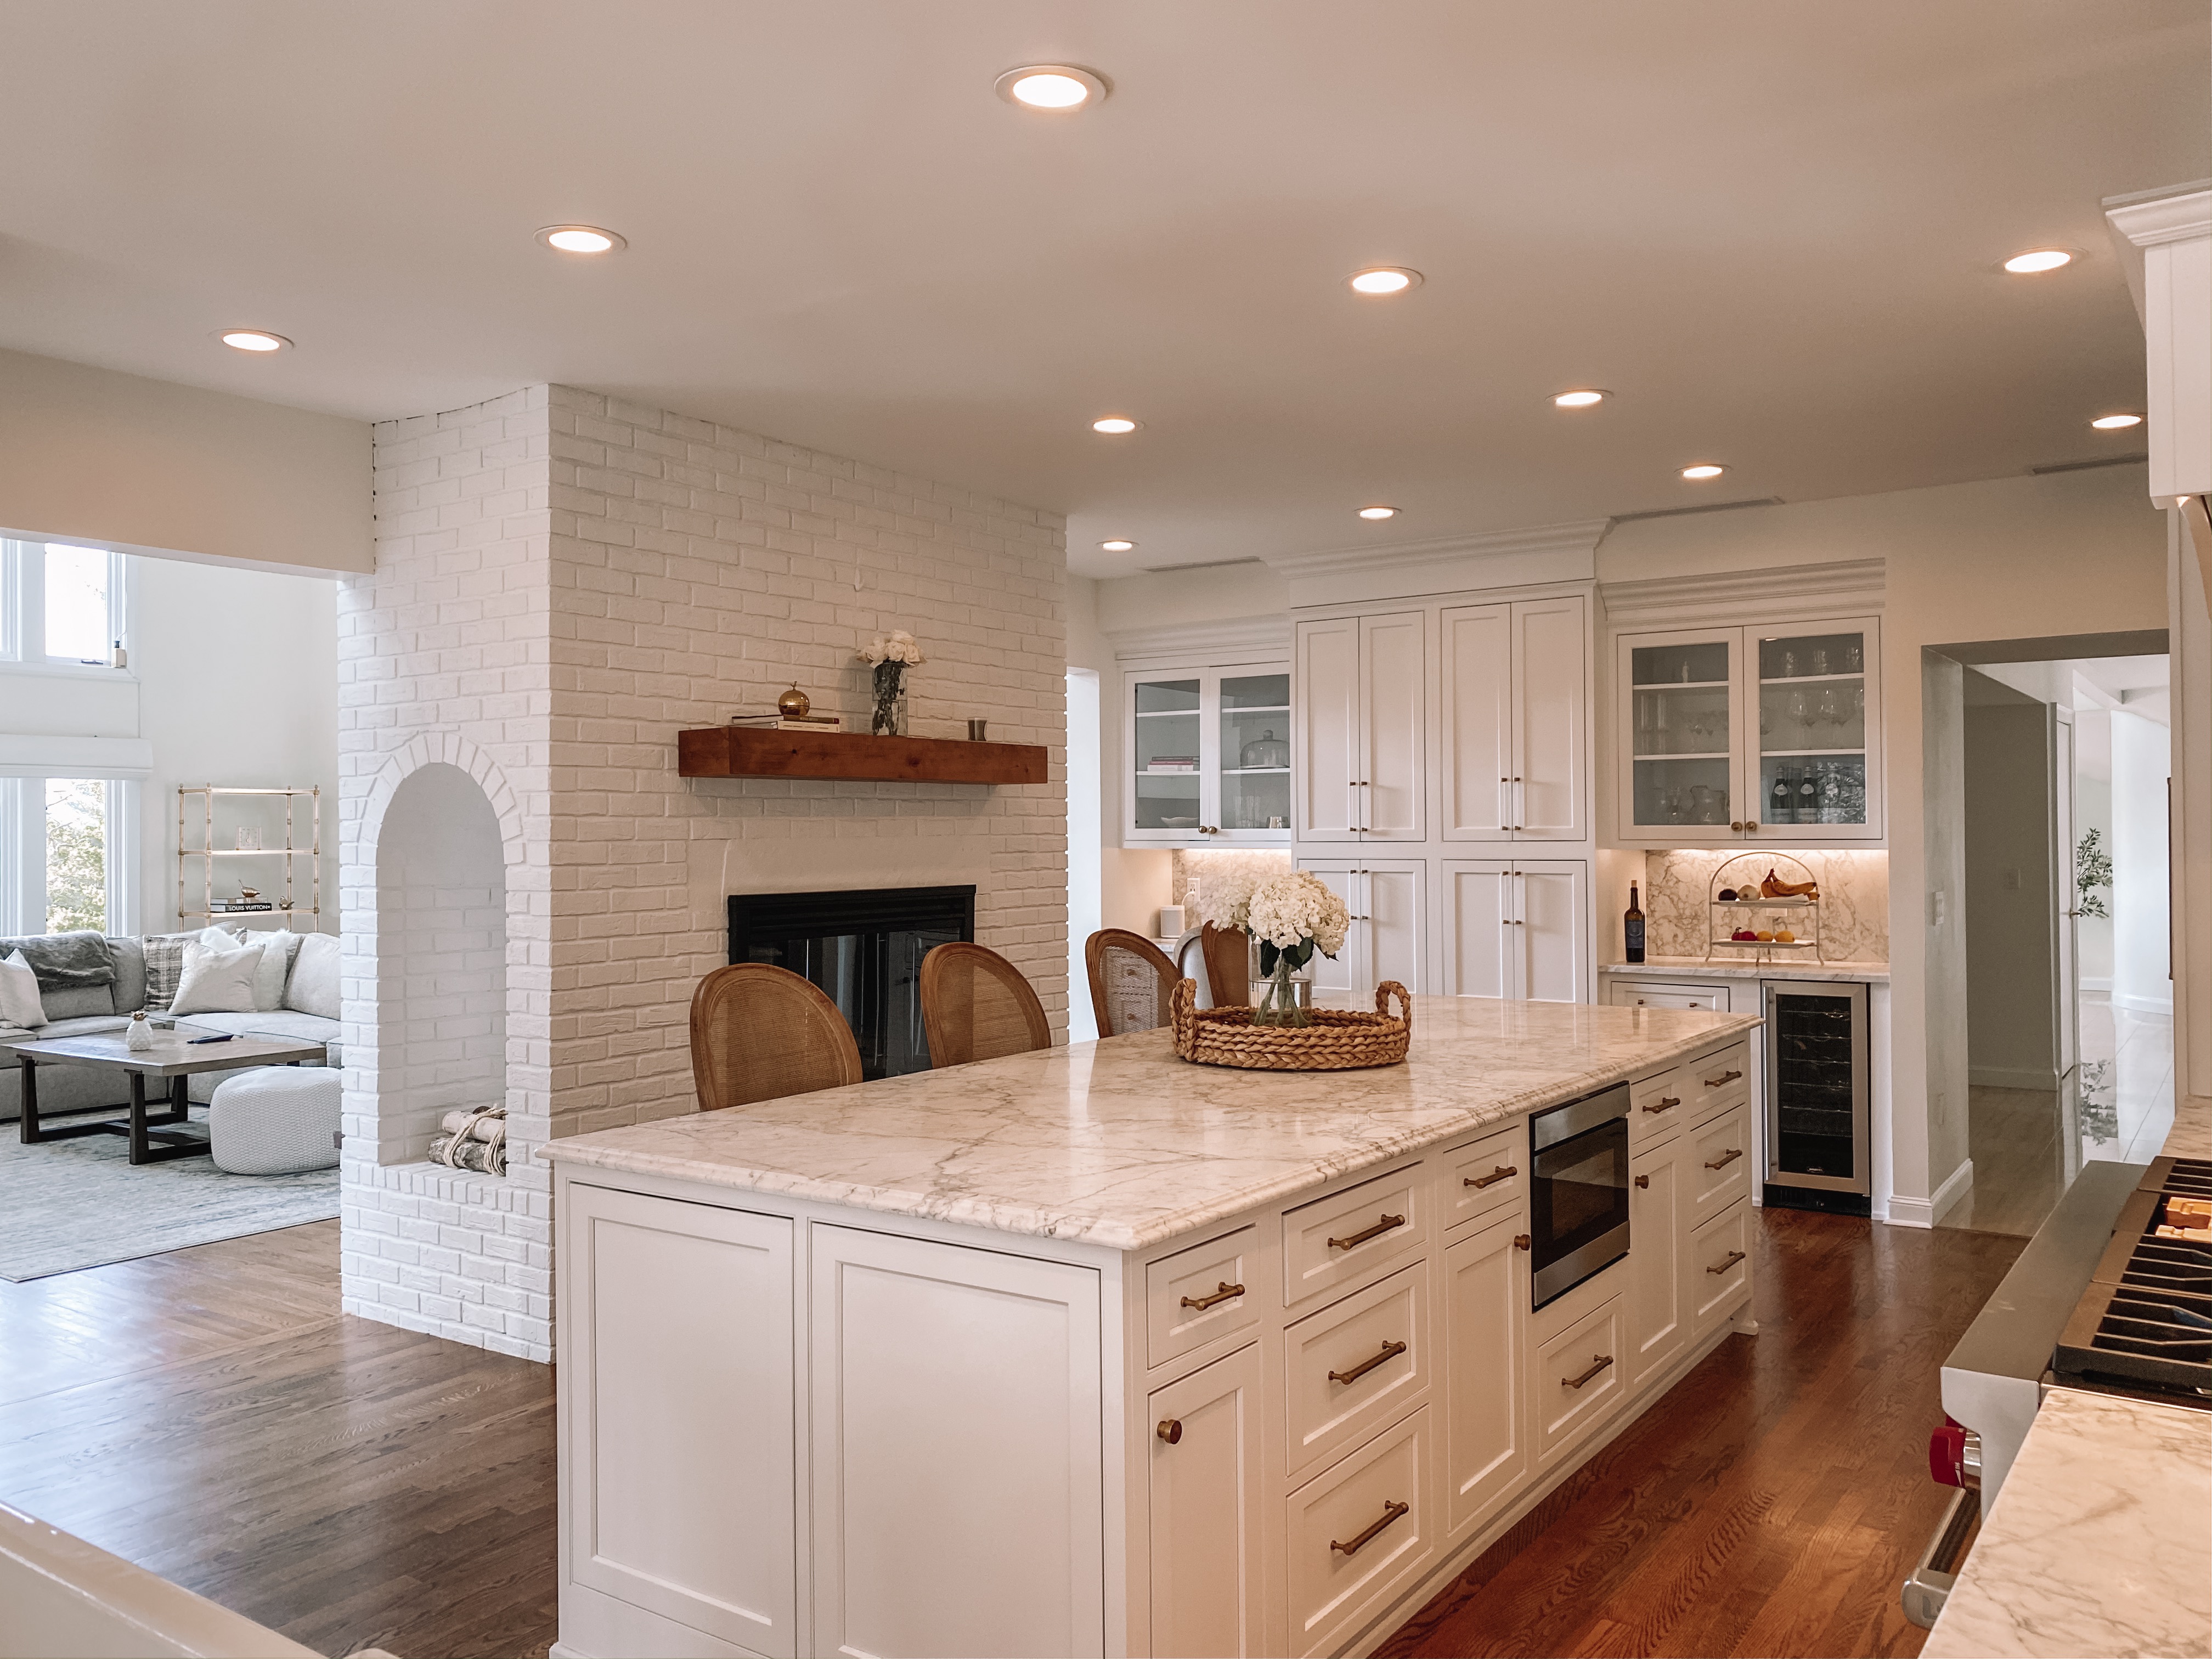
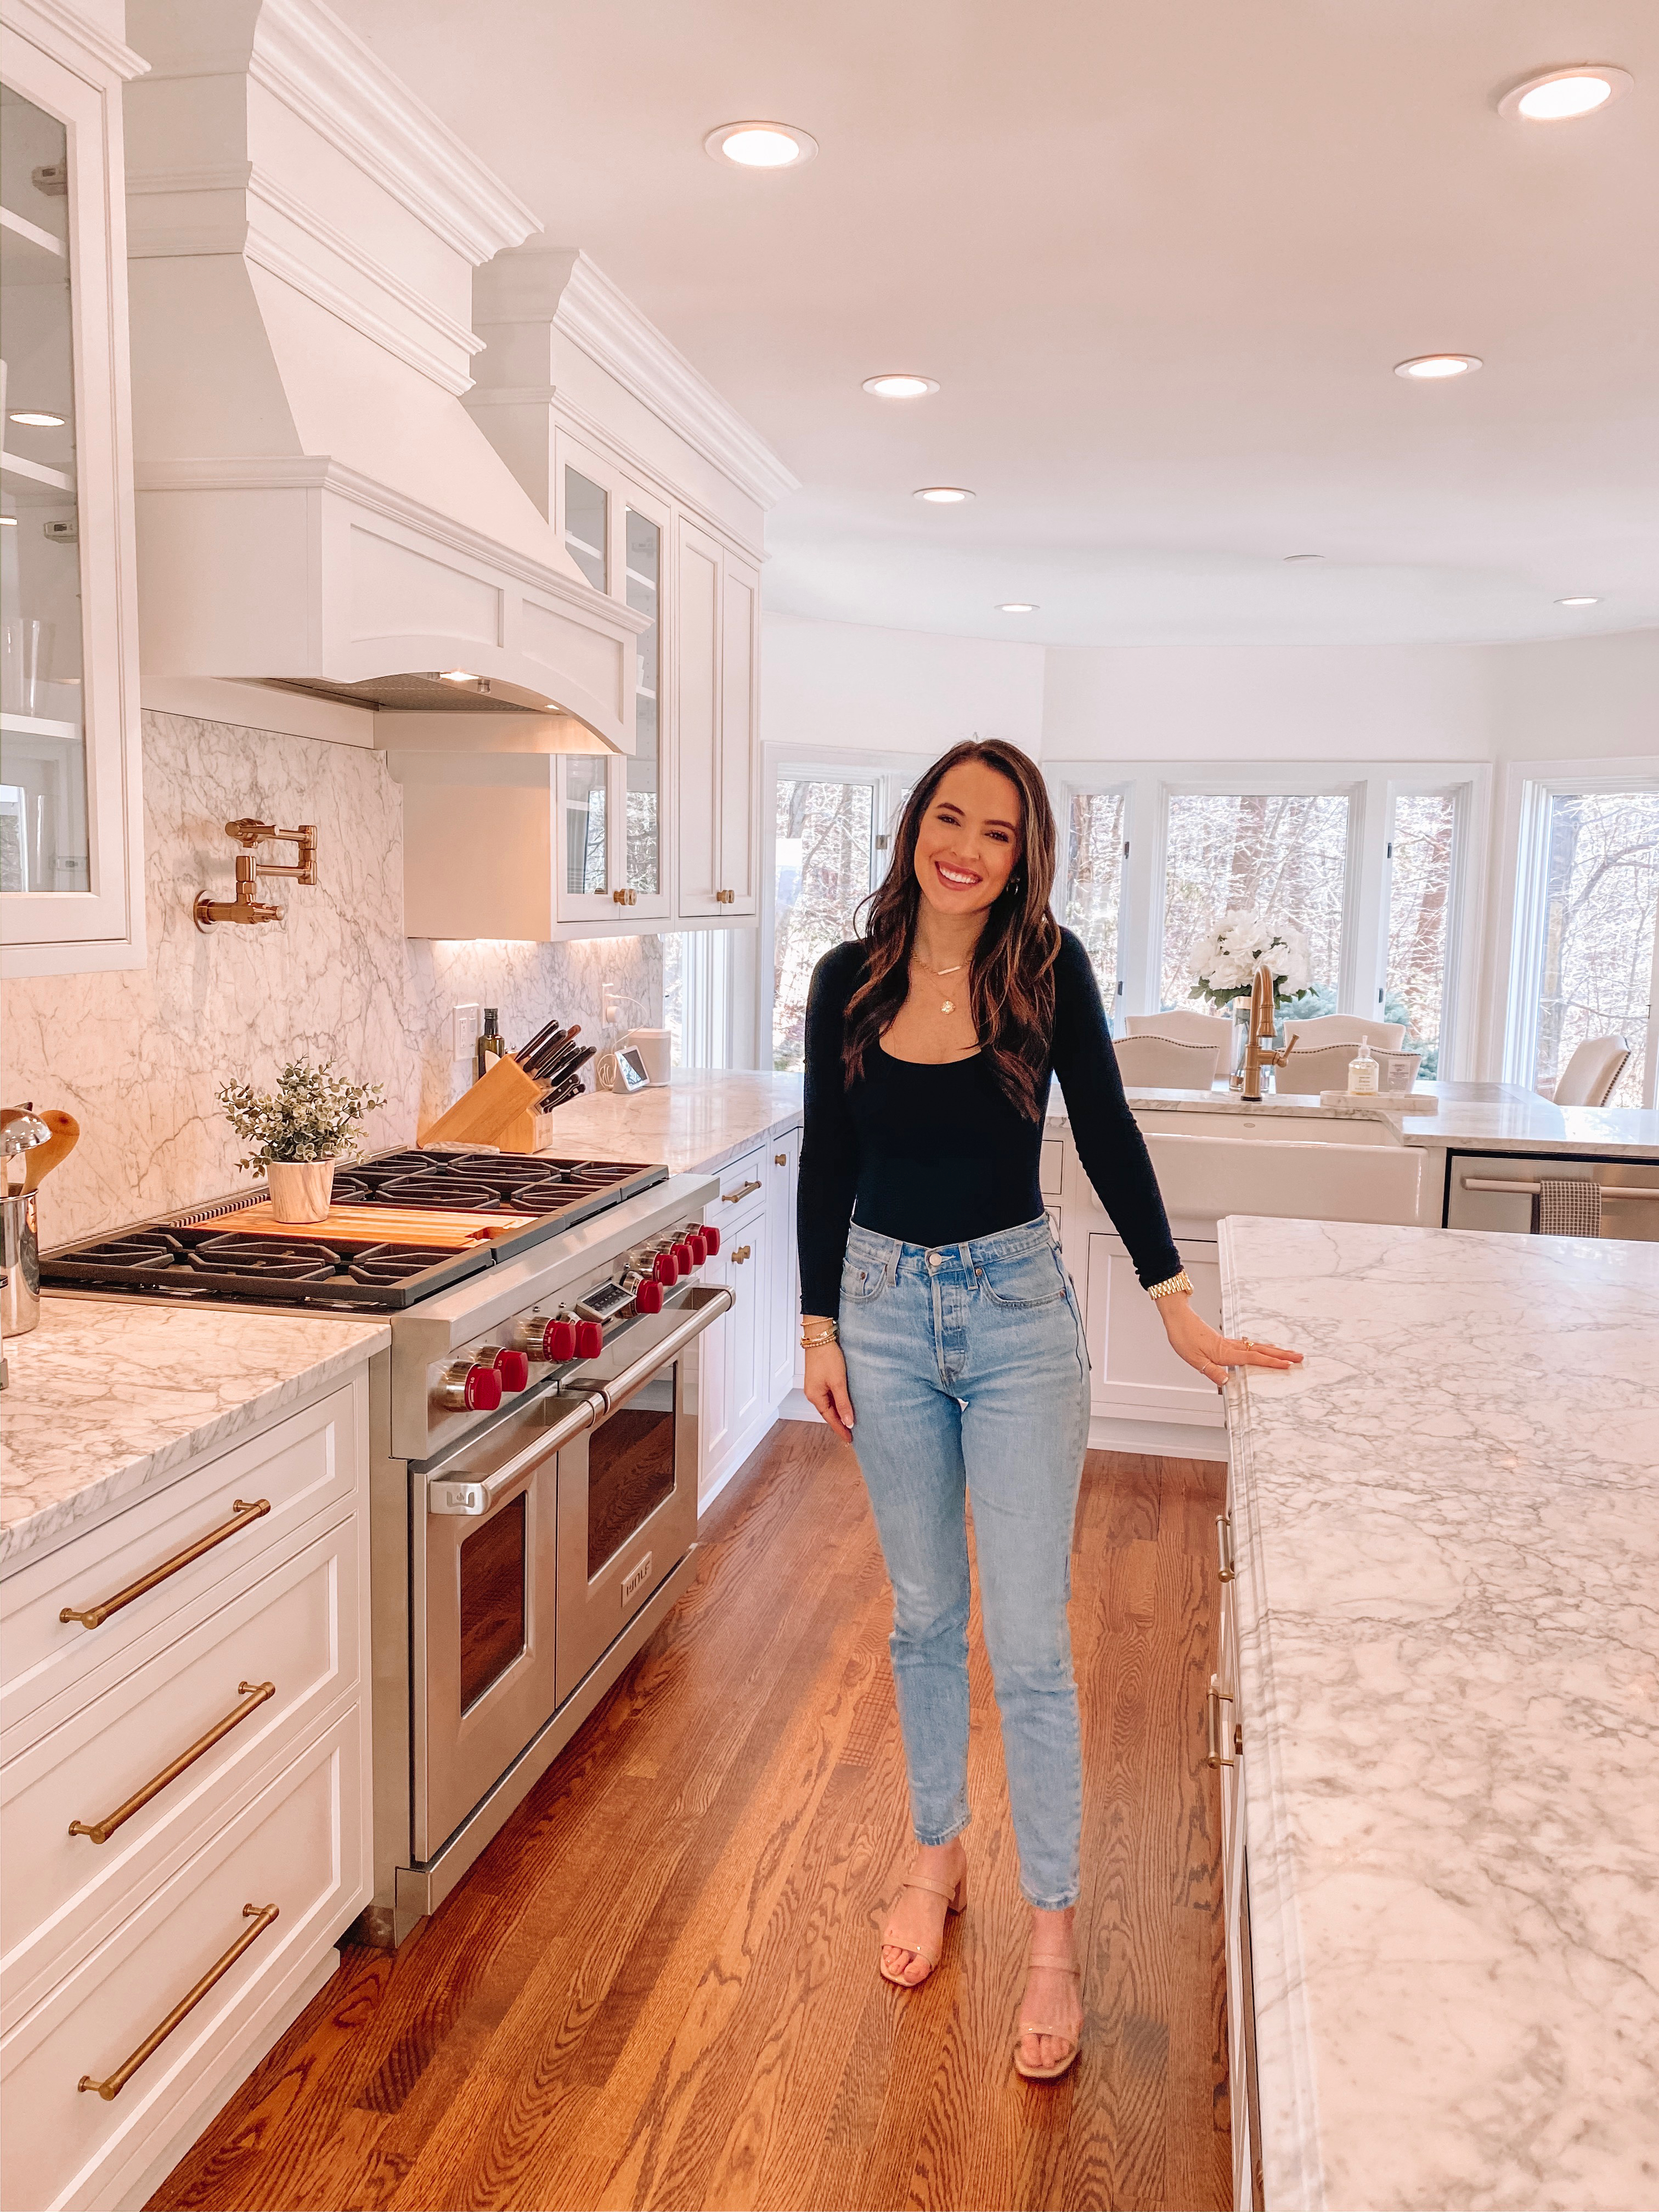
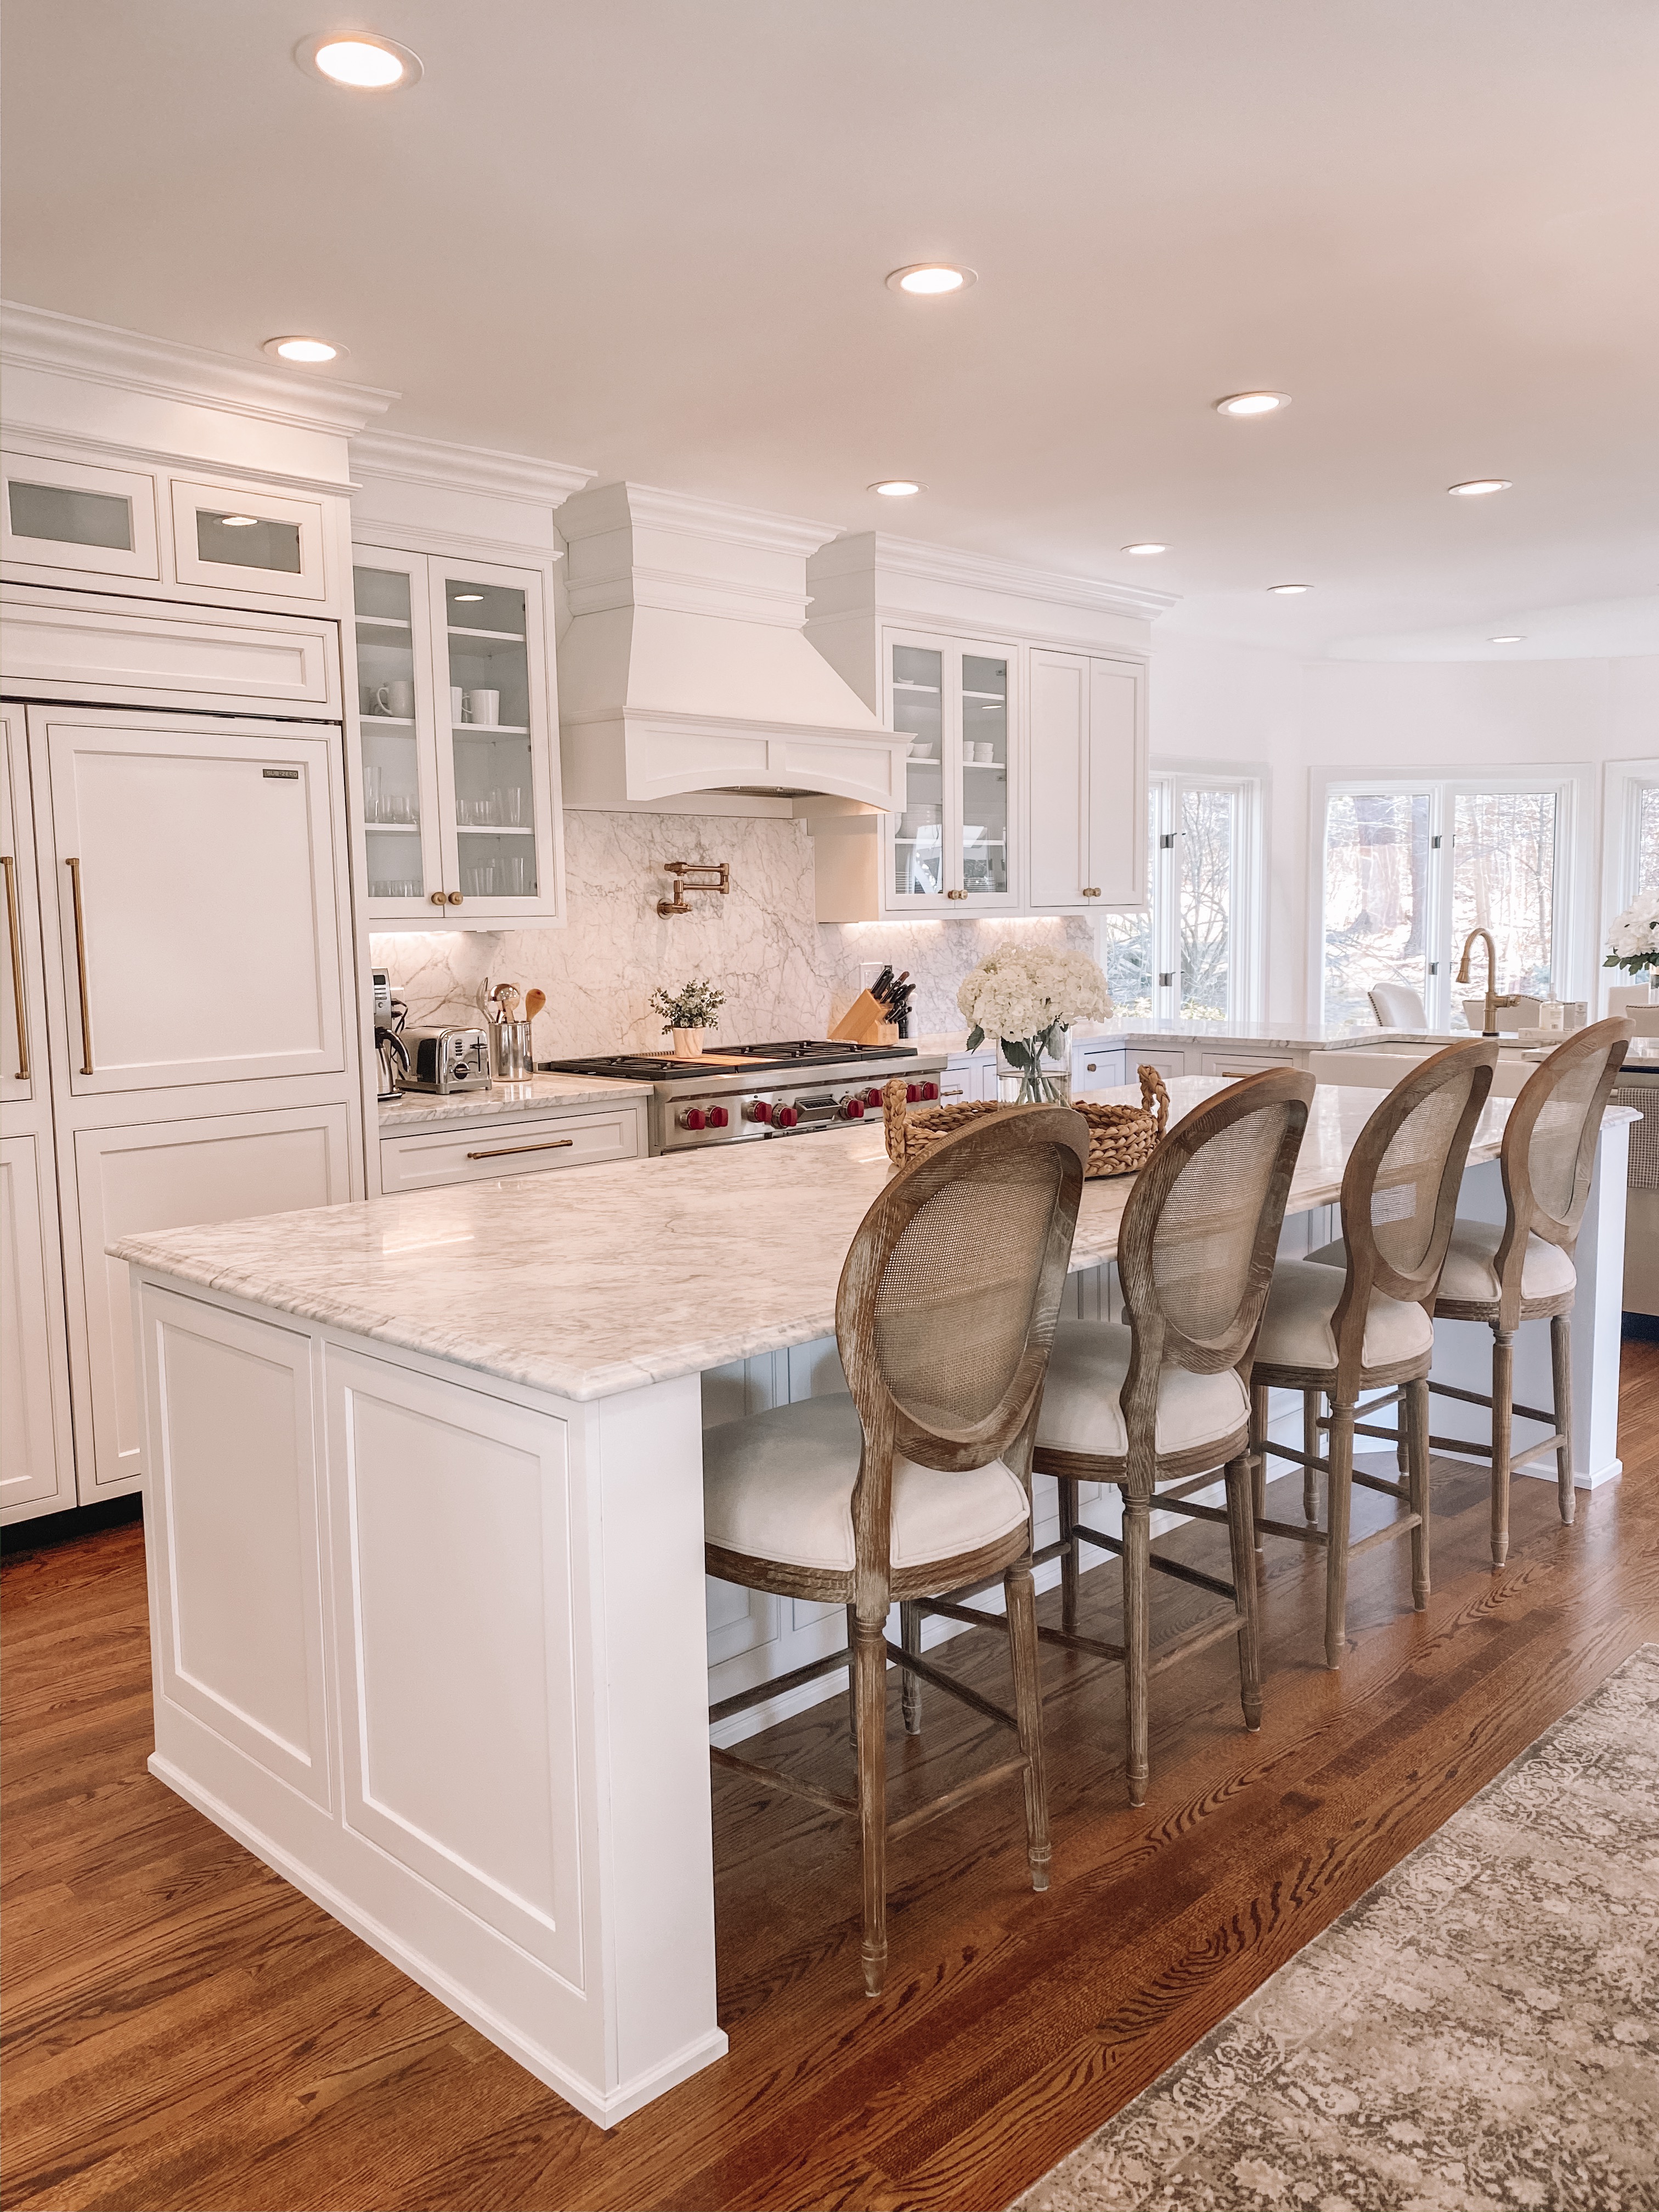
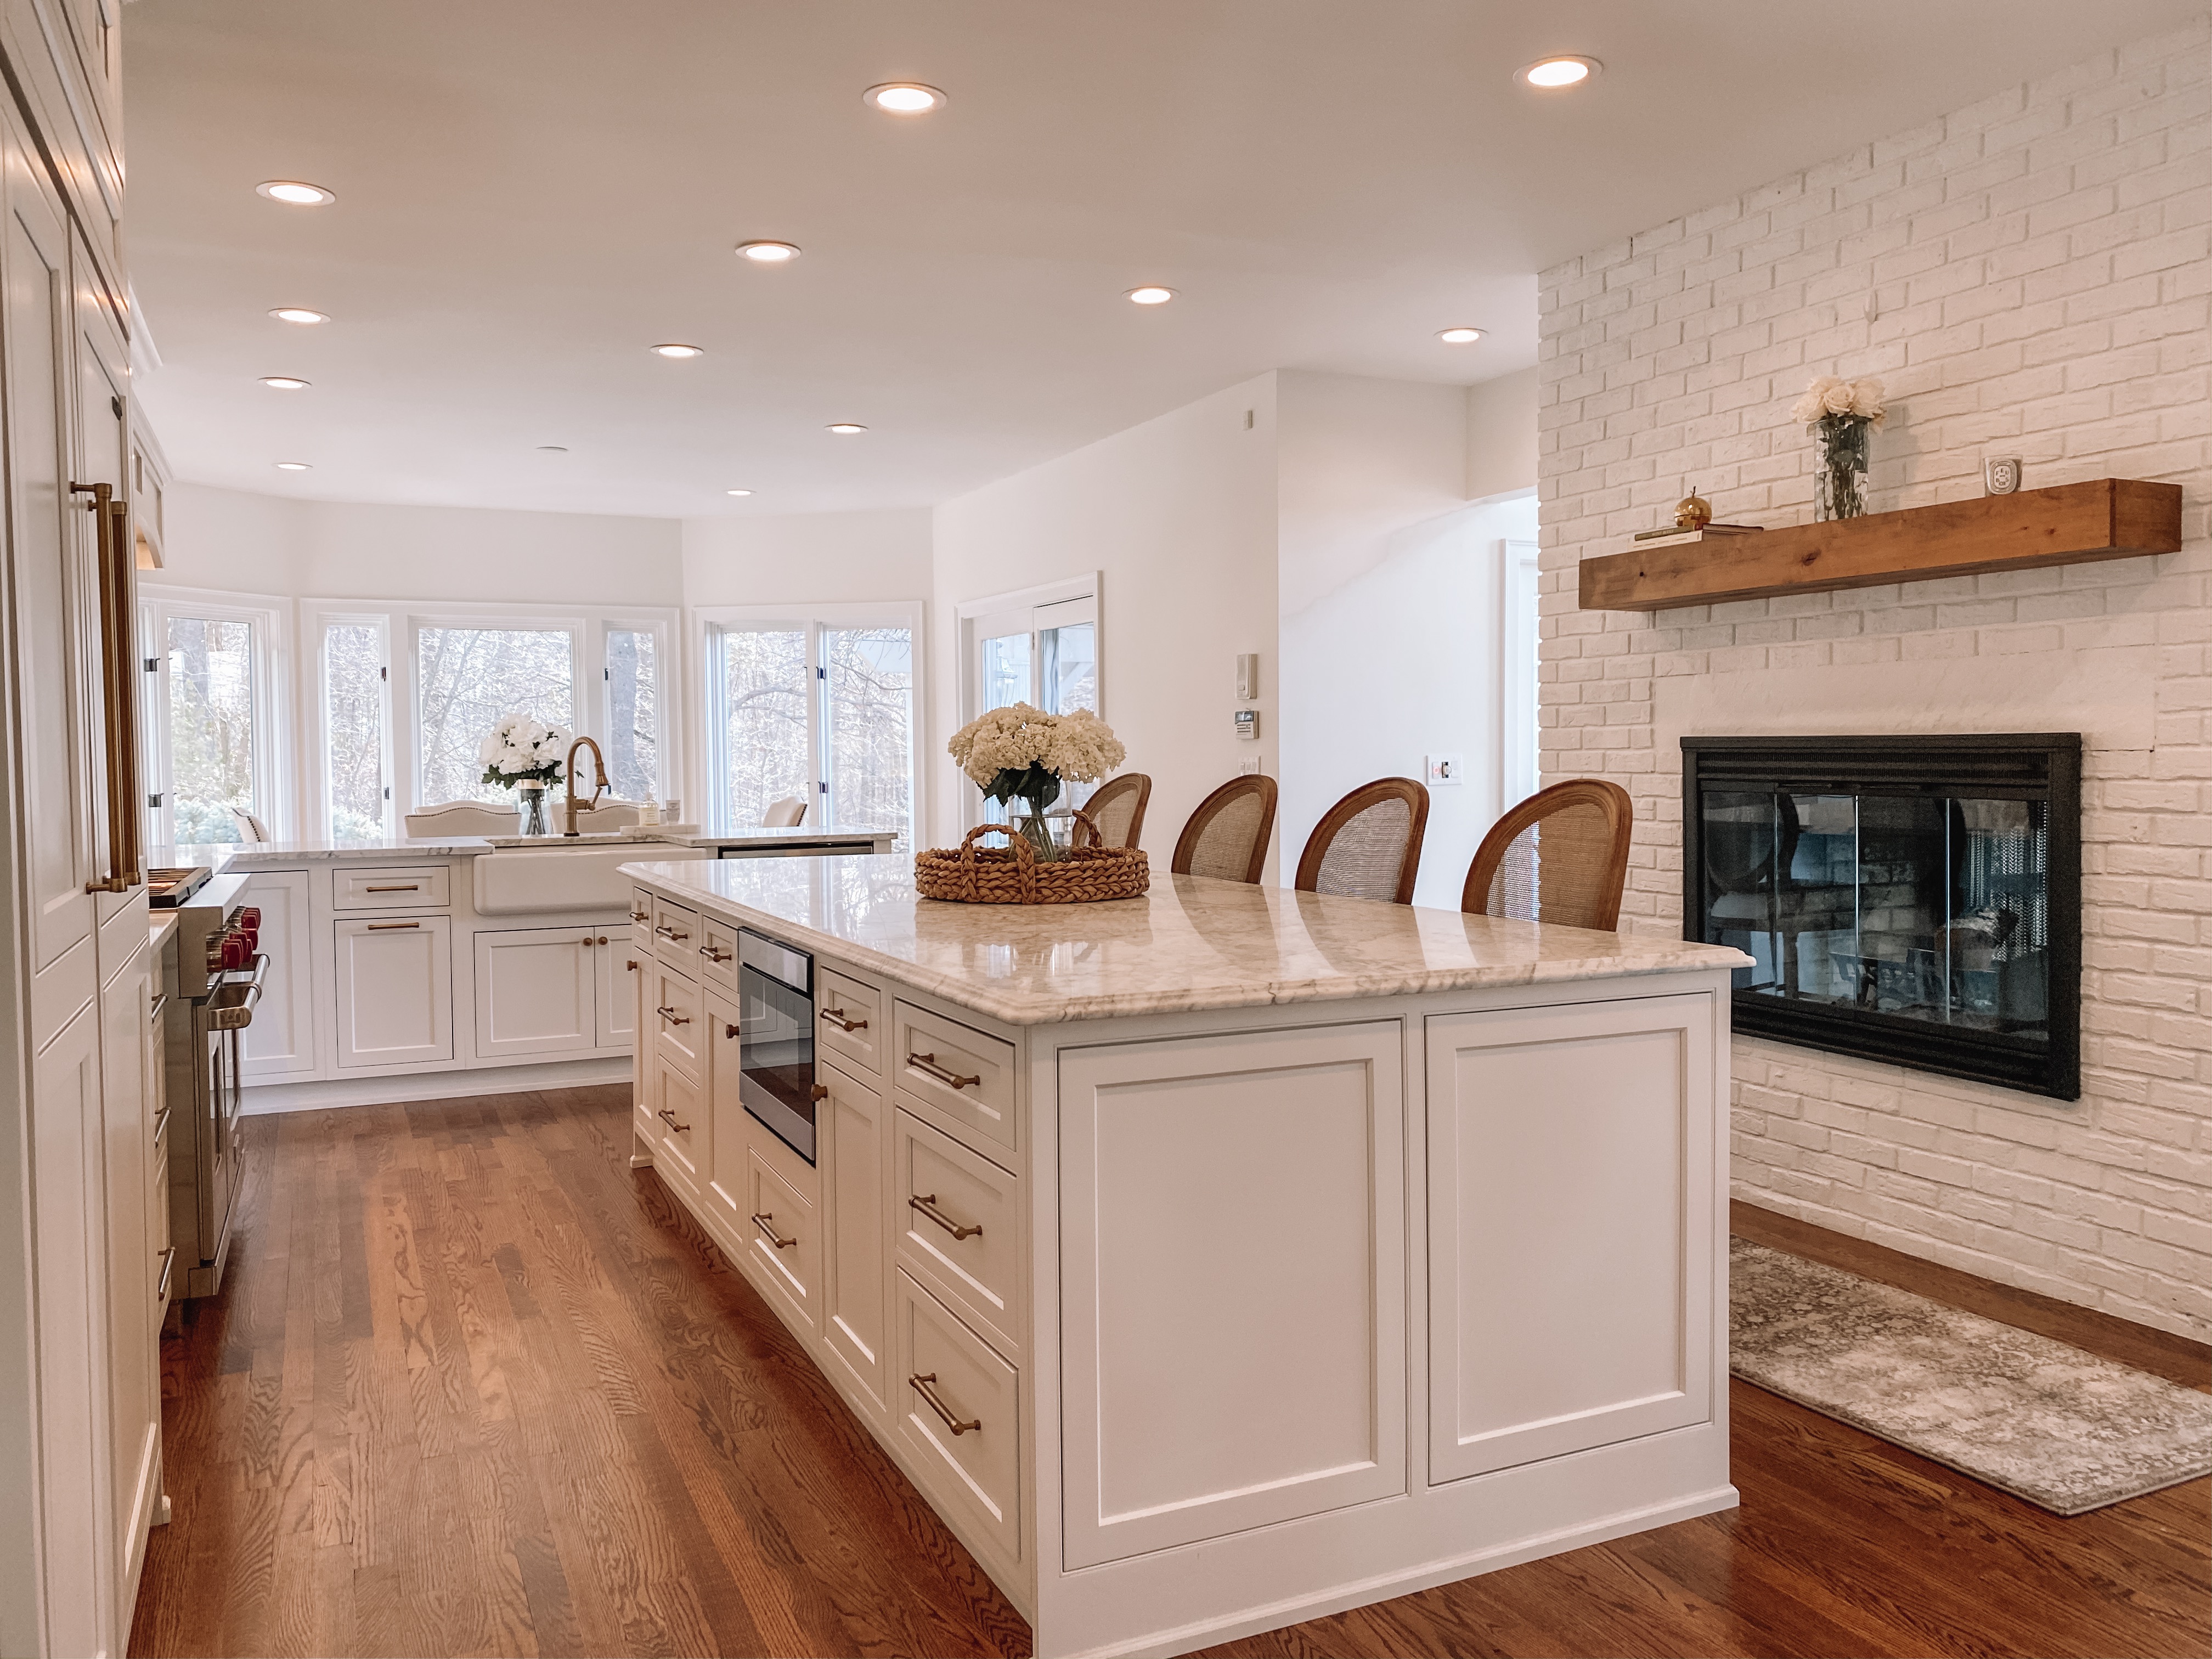
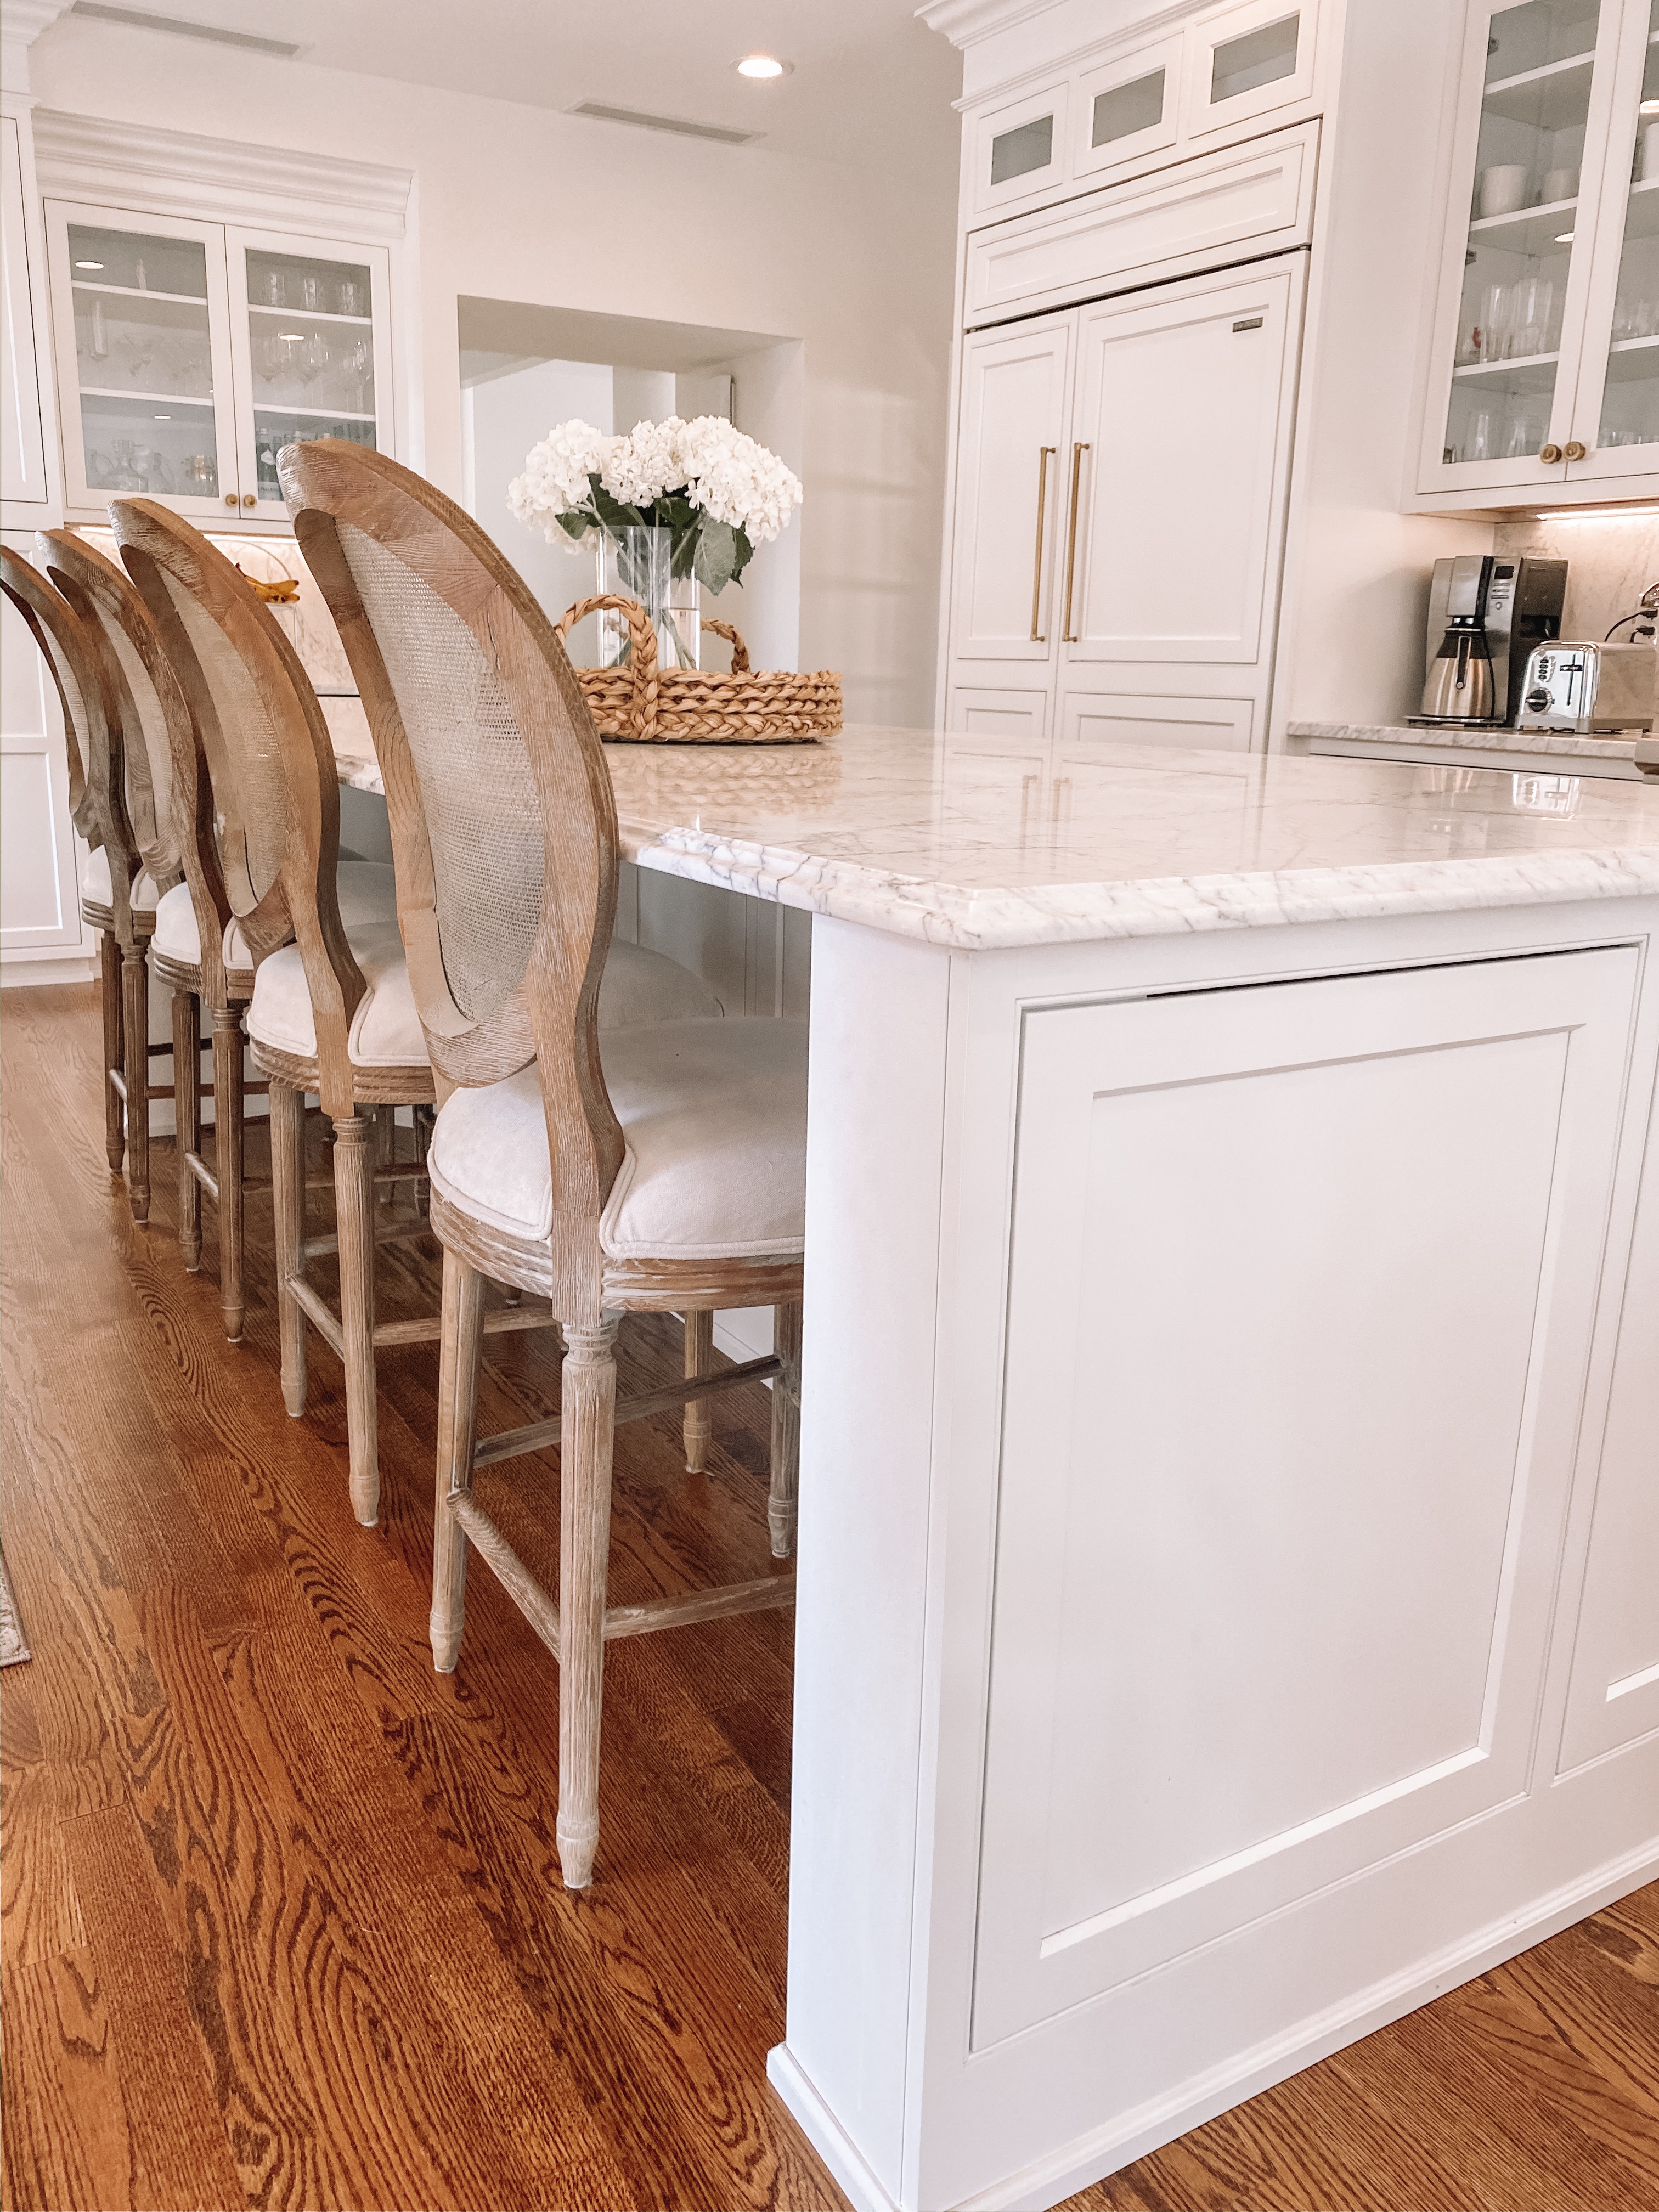
Here’s another angle of the kitchen which shows the flow a little better! The double sided fireplace is shared with our family room and you can see a better glimpse of the storage on the island. We relocated our microwave which used to be on the back wall and added it to the island to hide it a bit — it’s actually a drawer style so you don’t have to bend down to use it! We increased the size of the island to 10ft so we could comfortably sit 4 larger counter stools there! The kitchen is the hub and this is where EVERYONE we entertain congregates!
BEFORE & AFTER: HALLWAY INTO KITCHEN
This is a shot walking into the kitchen from the hallway and foyer area of our home. We removed the wine fridge from next to the sink and relocated it to the pantry wall and replaced that cabinet with a trash pullout — which made much more sense from a functionality standpoint.
BEFORE & AFTER: FIREPLACE
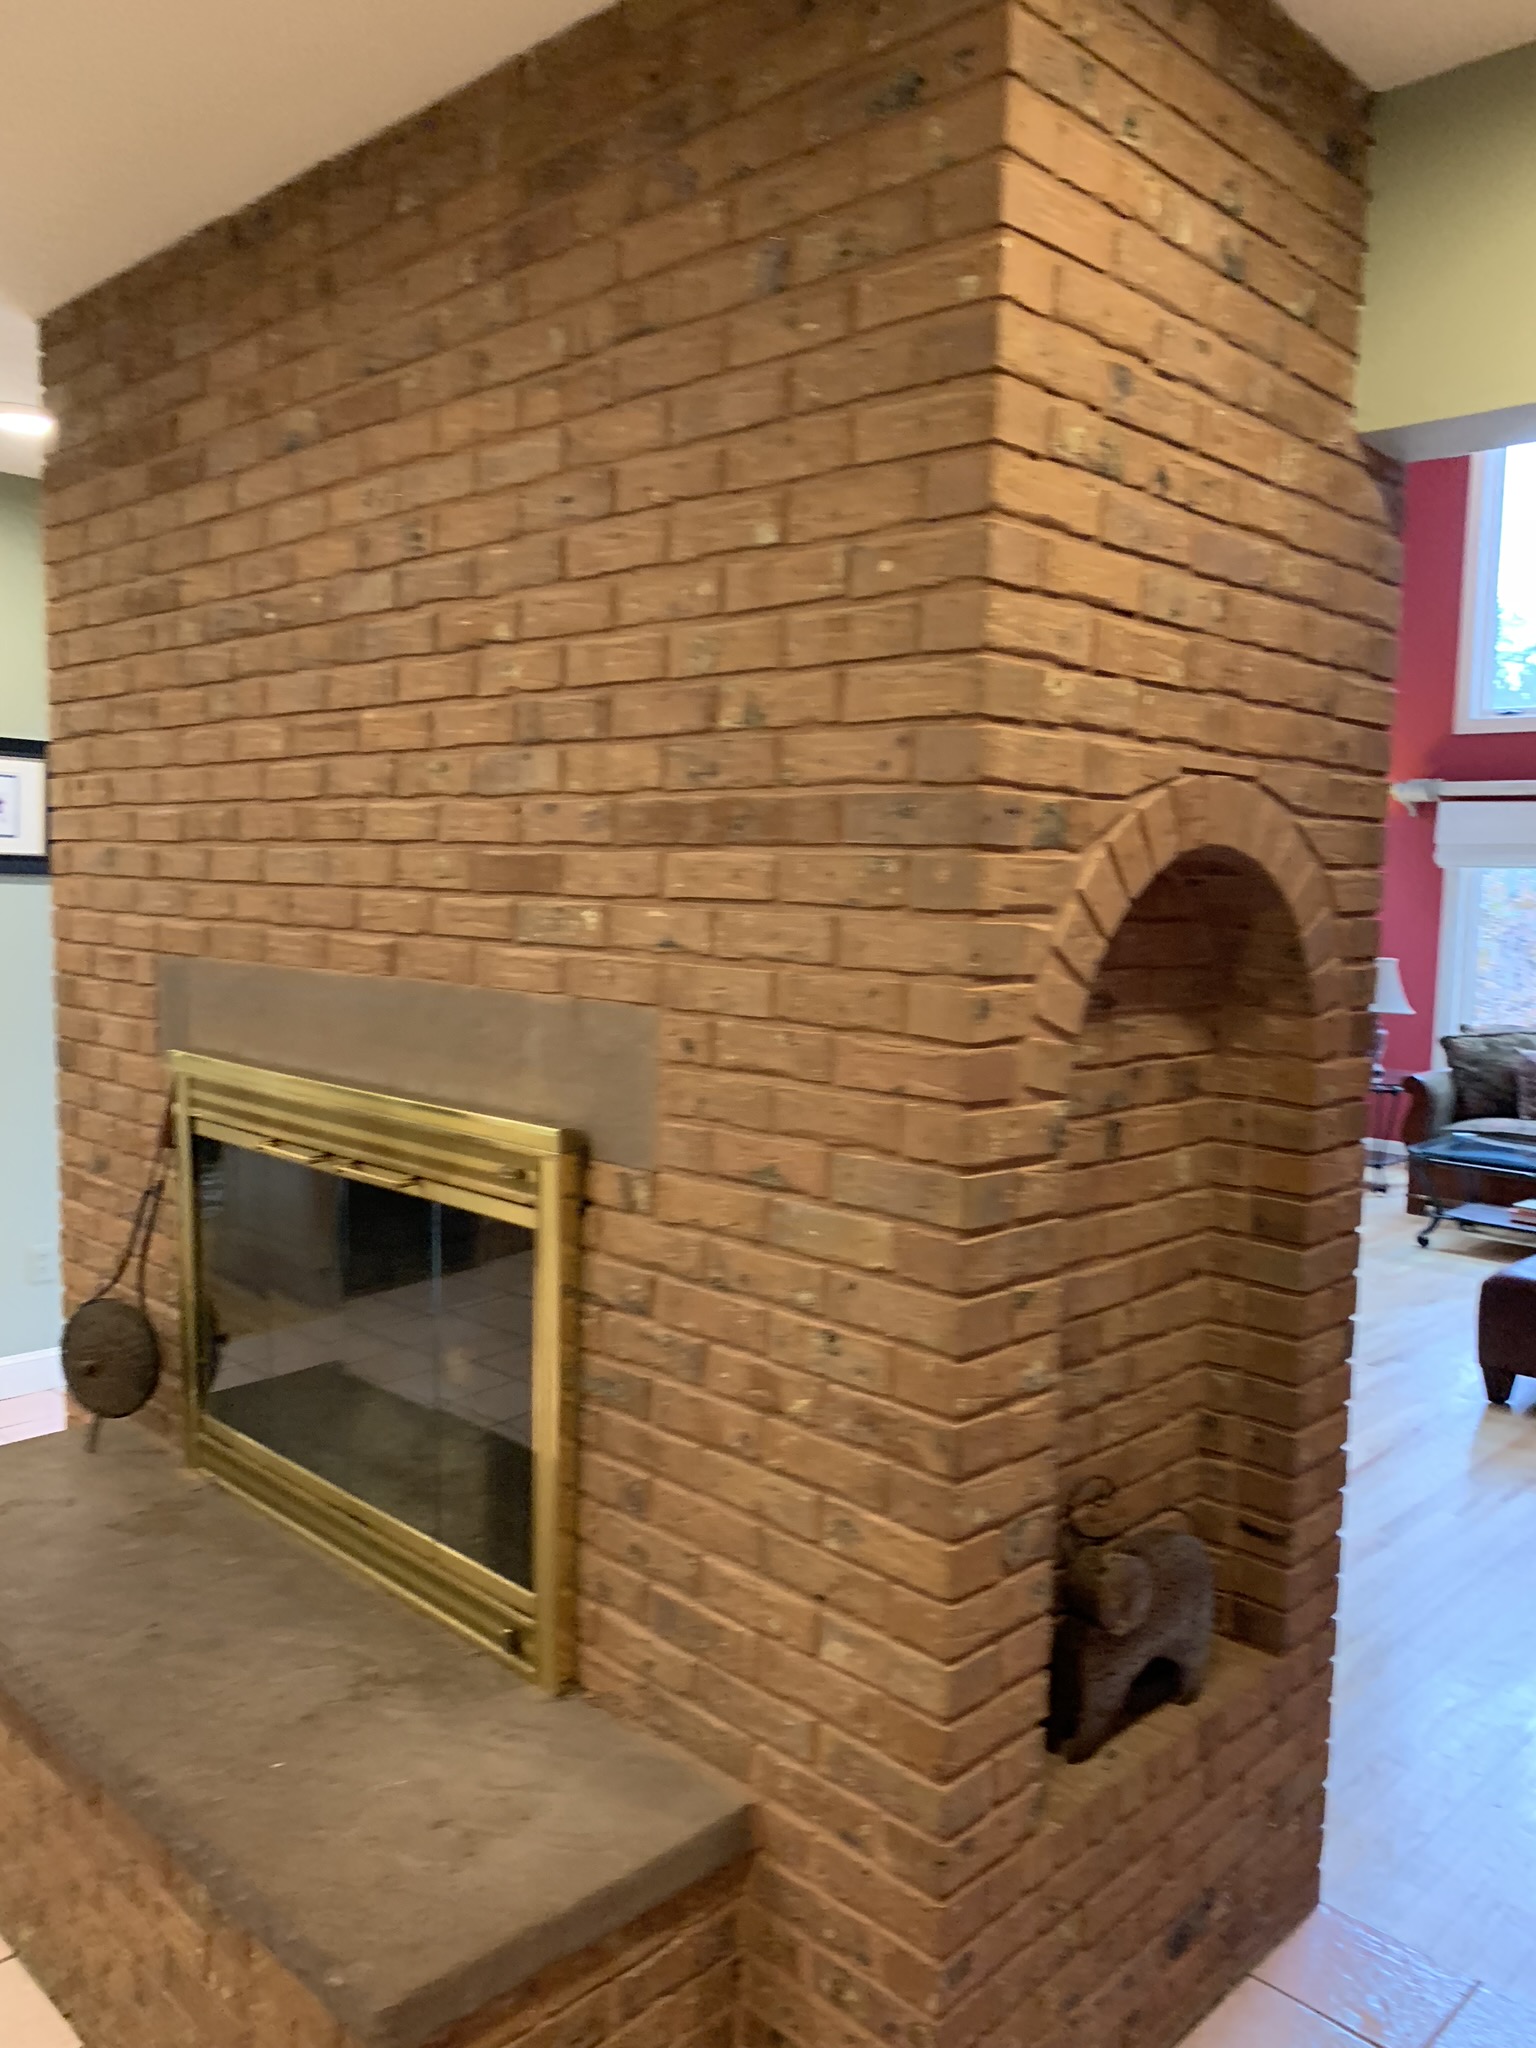
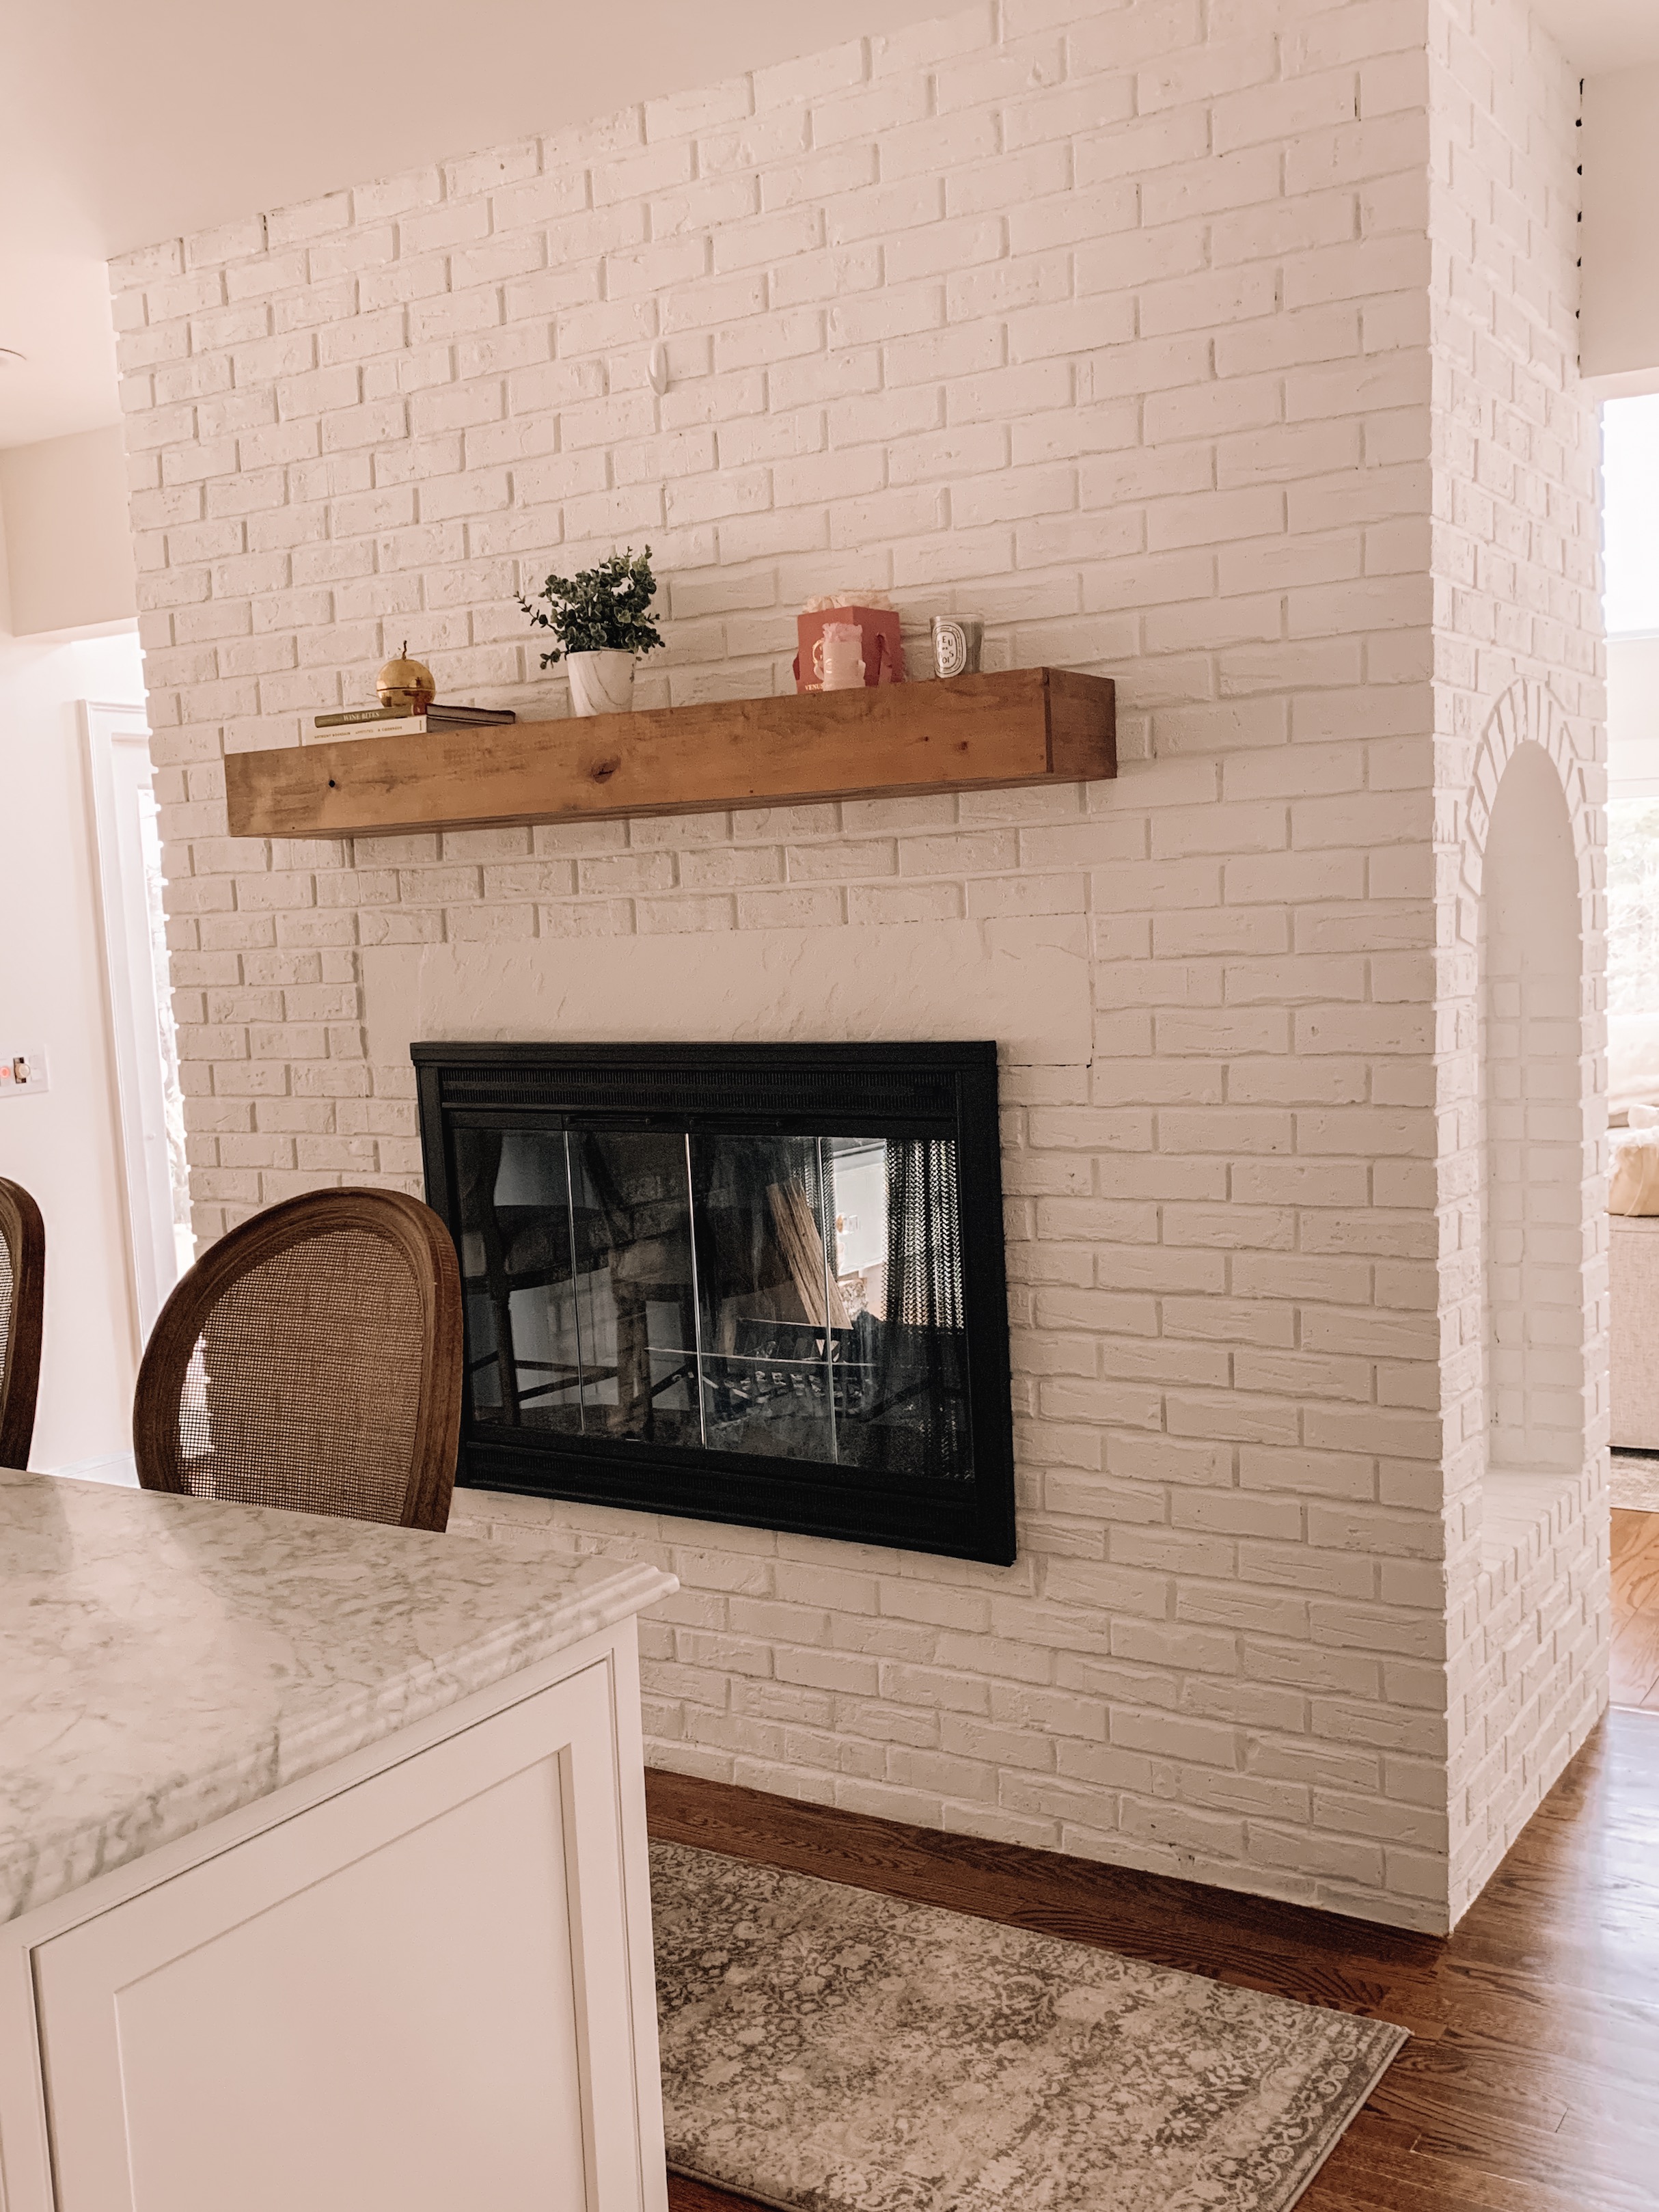
Since we had to move the appliance wall forward about 10 inches, we were severely worried about losing space within the current kitchen space — it was almost an entire foot! We decided to remove the hearth off the double sided fireplace which actually gave us a full foot back. We also wanted to lighten the look of the brick, so we painted both sides white and added a mantel for a little character! We also sprayed the frame black for a more modern look — I’m going to do a full post soon on this makeover since it was a DIY project!
BEFORE & AFTER: FROM BREAKFAST NOOK
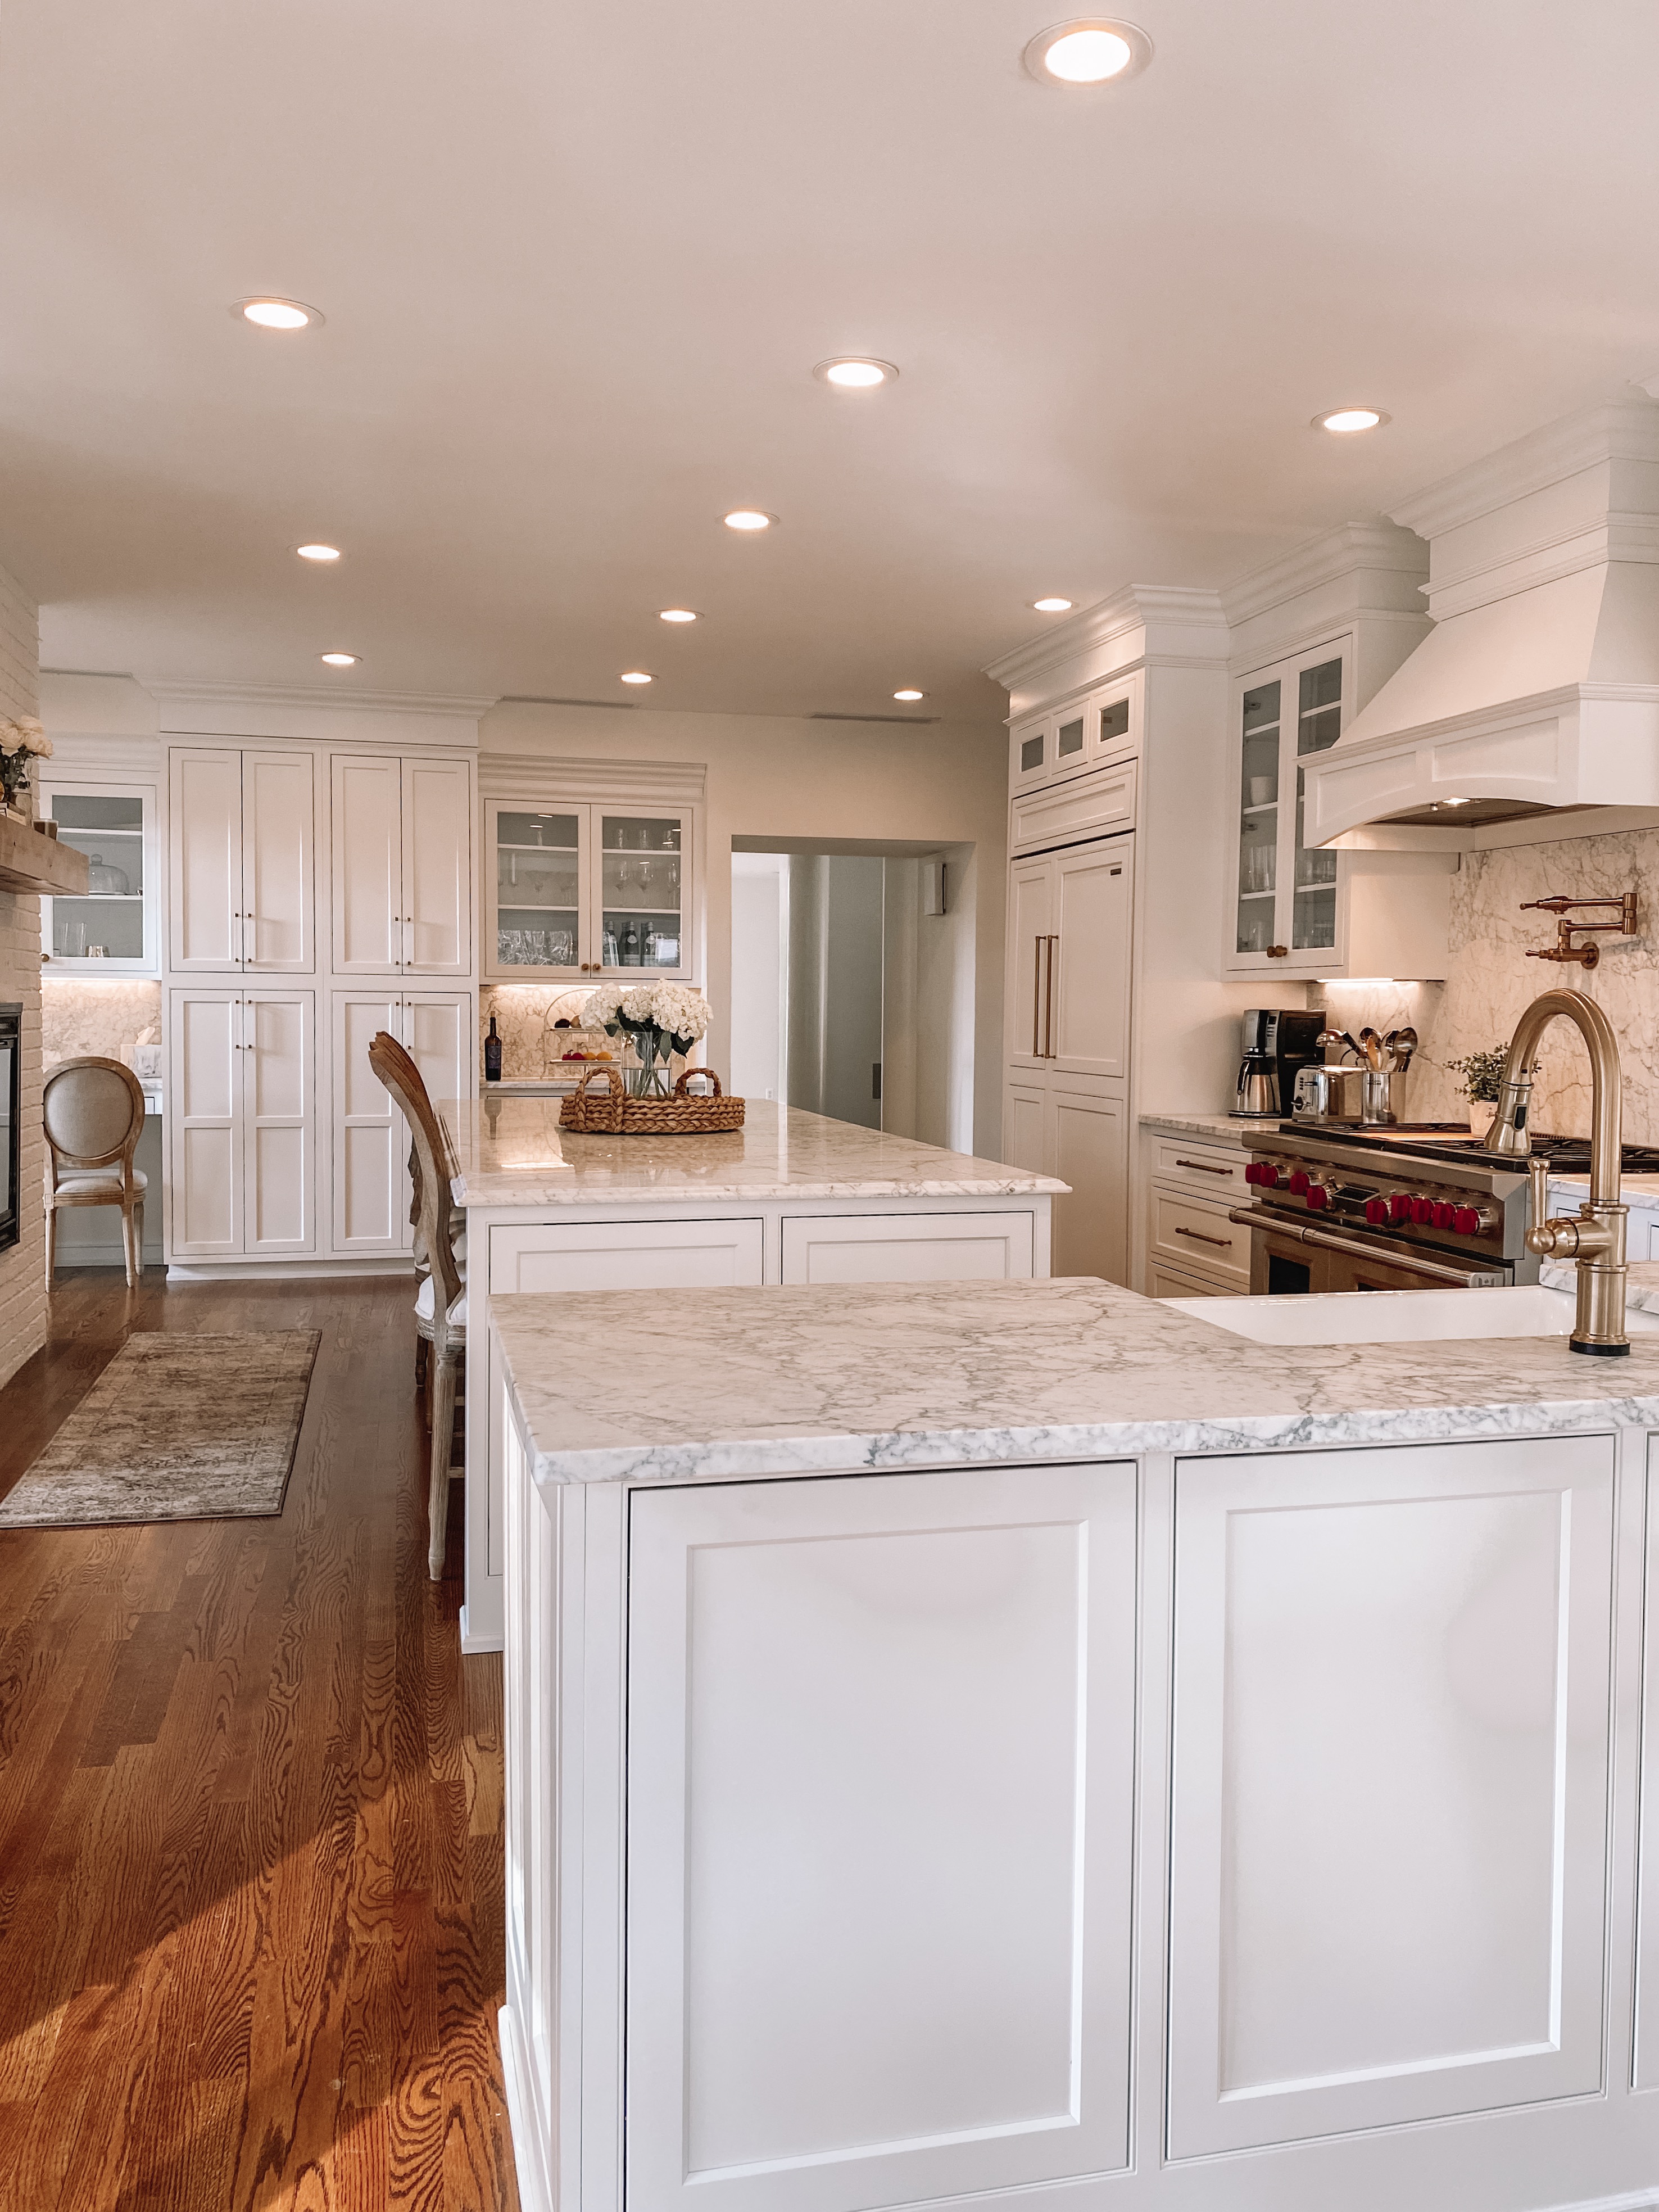
From our breakfast nook area in the far back, you can see that we relocated a lot of the cabinets that were on that side to the island, since we now had much more space to work with! It’s a lot more functional than going on the other side for storage and allowed us a little more space on the breakfast nook side for a table (since we didn’t have to worry about space to open cabinets).
BEFORE & AFTER: SINK
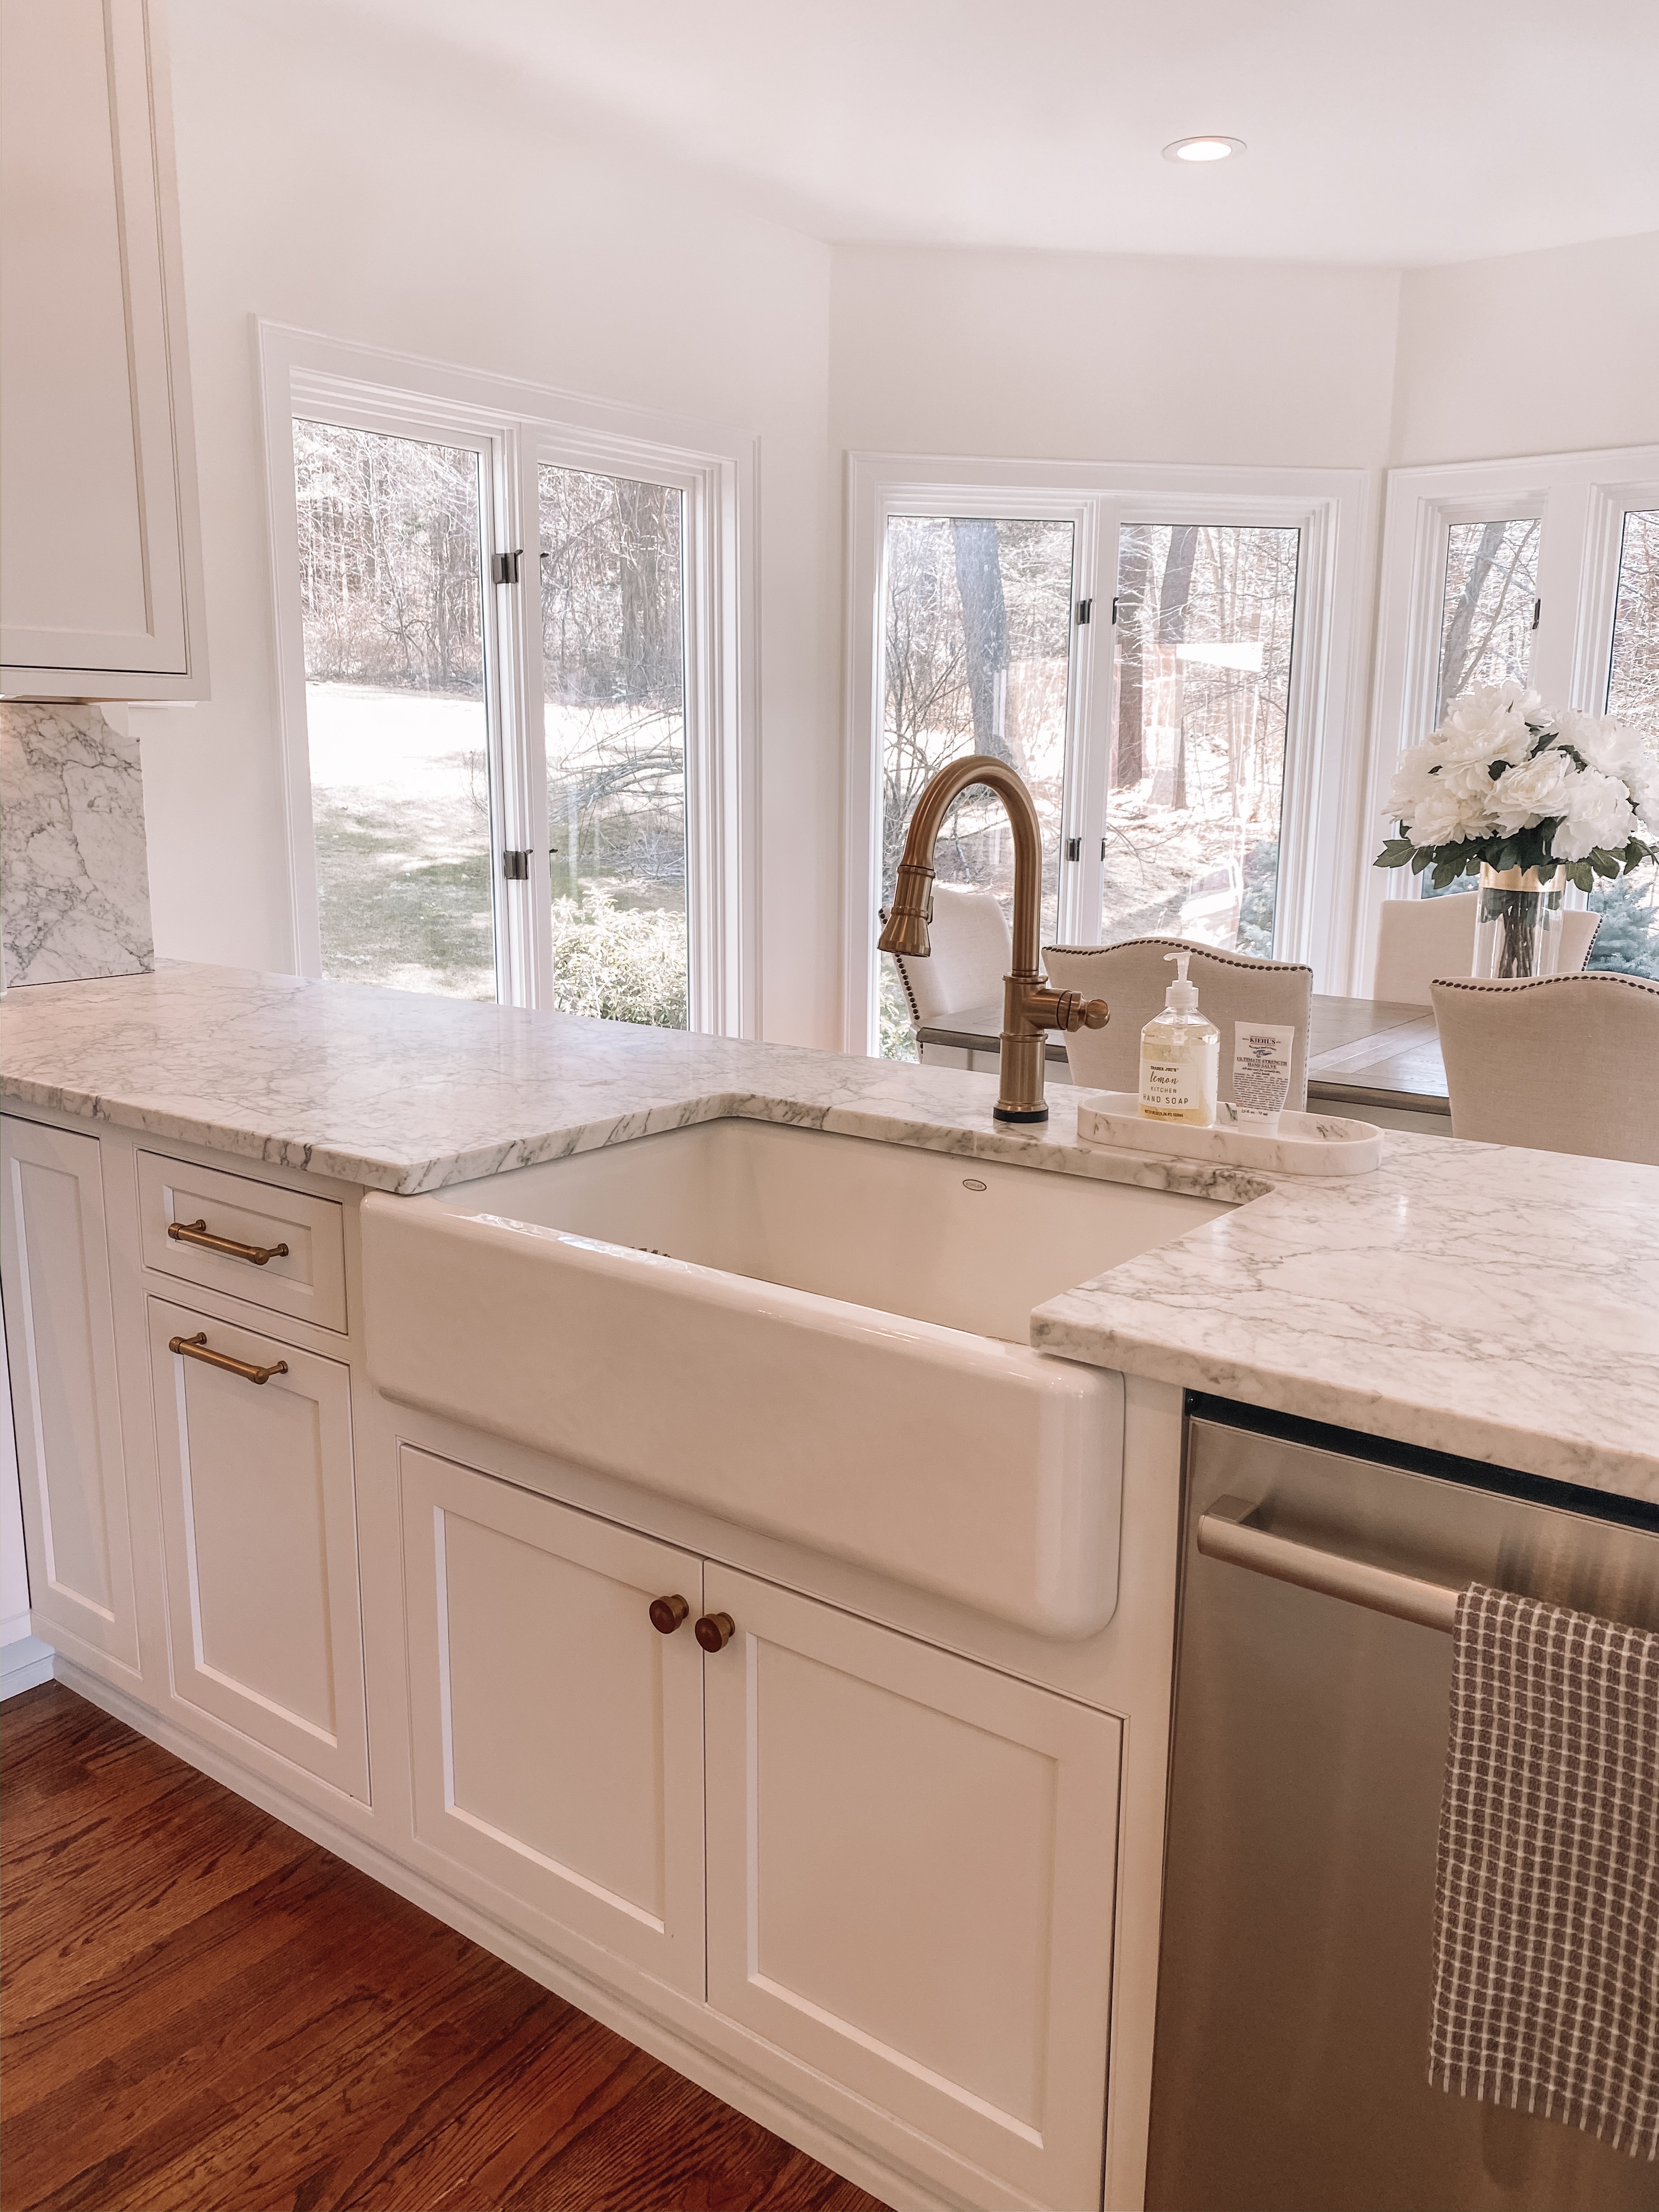
Our sink was one of my personal favorite transformations — the former sink was small and a double basin (one medium size and one extremely small). I wanted a deep farmhouse sink — not only do I love the character it adds, but it’s extremely functional for someone who cooks a lot (and therefore has a lot of pots and pans to clean). We made sure to add a garbage disposal (the switch is located inside the below cabinet). We also decided to upgrade to a pulldown faucet that is touch activated and has a temperature sensor — it lights up blue when the water is cold, purple when it’s luke warm and red when it’s hot! You know what temperature the water is (even if it’s set at something else) to avoid burns!
BEFORE & AFTER: COOKTOP PLACEMENT

Still one of my favorite upgrades — I love the layout changes we made and that we decided to move all cooking to the back wall. It allows the island to be my prep station while keeping most of the cooking mess at the back. I also snuck in a pot filler which is one of my favorite items in the kitchen! Cold water runs out of it (an easy addition since it was the same wall as the fridge and already had a water line) — it makes filling a heavy pot for pasta or boiling eggs super simple. Plus, I love the statement it adds!
Kitchen Renovation Timeline
This does not include any planning or cabinet design work, our custom cabinets were ordered about 2 months before we demo’ed to (they were 9-12 weeks lead time). We choose all appliances and sink about 3 months before demo started (as you need to order appliances so that the cabinets can be created around those specs).
Week 1 :: Demo: Remove flooring, cabinets, old appliances, fireplace hearth, soffits
Week 1-2 :: Rebuild subflooring before hardwood installation, add hardwood floors, 2 coats of floor stain and polyurethane, rebuild fireplace brick
Week 3-5 :: Duct work and HVAC begins for back wall, prime and prep fireplace for painting, cabinets delivered and inspected
Week 5-8 :: Duct work continues,initial electrical and plumbing work begins behind walls, frame and build new back wall, drywall/tape new back wall, prep walls for cabinet installation
Week 8-10 :: Cabinets installed, appliances delivered to ensure everything fit in new layout, refrigerator installed, sink installed, ordered glass for cabinet faces, finalized countertop choice, countertop templating, fireplace painted, ordered cabinet hardware/faucet/pot filler
Week 11 :: Hood and ventilation installed, electrical outlets and dimmers reinstalled
Week 12-13 :: Countertops installed, backsplash templating, cabinet glass and hardware installed, kitchen faucet and pot filler installed, gas range hooked up, microwaved installed… WE HAVE A WORKING KITCHEN AFTER 3 months!!!!
Week 14 :: Backsplash installed, remaining hardware installed (we had some on backorder), some moulding installed
Week 15-17 :: We had a few issues with our cabinets (a few things were ordered incorrectly by the cabinet company) including the spacing for built-in fridge and being short on material such as moulding and toe kick. The cabinet company had to come to our house and have their contractor readjust some of the spacing for the refrigerator and fix the paneling and surrounding cabinetry. While we were lucky they fixed their mistake, this set us back from scheduling any finishing work by a few weeks as we had to wait for certain parts to come in and wait for them to come and do the work.
Week 18 :: Last coat of polyurethane on hardwood floors now that all construction had been finished
Week 19-22 :: The progress was about 85% done at this point, but we started to near the holiday season which made it difficult to schedule (and we ran into some weather issues). The next month was sporadic work being done here and there which included: finishing moulding both top and bottom of cabinets, replacing baseboards, smoothing out any damaged walls from construction, painting
Week 22 :: FINALLY DONE. Vow to never renovate again. Kidding, kind of. 😉
SOURCES
Cabinets: FIELDSTONE
(Style: Charlaine, Beaded Inset, Soft Close | Wood: Maple | Color: Tinted Varnish White)
Countertops: (HONED) CARRARA MARBLE
(Island: Double OGee Edge, Surrounding Counters: Pencil Edge)
Backsplash: (HONED) CARRARA MARBLE
Hardwood Floors: Red Oak
(Stain: Provincial)
Paint: Benjamin Moore
Walls: White Dove
Trim: Simply White
Refrigerator: SUB ZERO 48 Panel Ready
Range: Wolf 48 Duel Fuel
Dishwasher: Bosche 800 Series
Hood Ventilation Insert/Blower: Stanisci
Microwave: Sharp Stainless Steel Drawer
Wine Refrigerator: MARVEL 15″
Sink: Kohler Undermount Single Basin
Garbage Disposal: InSinkErator
Faucet: Brizo “Artesso” Pull-Down, Touch Activation
(Color: Luxe Gold)
Pot Filler: Brizo “Artesso”
(Color: Luxe Gold)
Cabinet Hardware: RESTORATION HARDWARE
(Grafton Collection: Knobs, Pulls, Glass Pulls | Color: Aged Brass)
Smart Light Switches/Dimmers: iDevices


FREQUENTLY ASKED QUESTIONS
Who was your general contractor (GC)? Us (my husband and I, but mostly my husband). We had some help from my Dad and a really good friend of Raja’s who are both in the construction business who we leaned on for contacts and advice, but ultimately, we decided to take on the project ourselves for a few different reasons. This was an extremely huge renovation project that required so many moving parts, different contractors, and an extremely aggressive timeline. Since my husband and I BOTH work from home, we knew that was going to be extremely disruptive to our lifestyle and wanted it done AS QUICKLY AS POSSIBLE. It still took nearly 5 months and honestly, if we weren’t the ones fighting tooth and nail for things to be done on time, I can’t imagine how long it would have taken. We also discovered quickly that even if you had a GC to oversee the project, the likelihood of them being there 24/7 as work is being done is extremely rare as they are likely tackling a few projects at a time. When contractors would come and ask us questions, we realized we needed to be ALL IN to be a resource and help them out so everything could get done and stay on budget. As with all construction, you run into problems and unforeseen issues and delays — my husband wanted to make sure he understood every single detail so he could make certain budget and functionality calls without relying on or waiting for someone else.
Was it worth it to GC it yourself? Yes and no. From a cost perspective, we figured it would save us a lot. We interviewed GC’s at the beginning and the costs were high. Now we know why. It became my husband’s full-time job for nearly 3 months and the stress level was insanely high. In retrospect, we could have paid someone to manage so Raja could have continued working (he owns his own business), instead of taking time off to manage the project. It probably would have evened out — but we both go back and forth on if it would have paid off in the long run. I think we still would have been disrupted, it would have been chaotic to have someone else in and out of the house and working off someone else’s timeline would have been insanely frustrating. I’m so proud of Raja for stepping up and getting this done in a timely fashion — he learned SO much and did such an amazing job. I like to see our blood, sweat and tears in the kitchen — we tackled a crazy project and are really happy with the outcome.
Did you use a designer? No, all design choices were ours. We worked with a cabinet designer who helped arrange the cabinet layout, but all cosmetic choices were made by us.
What was the style goal? We wanted a timeless design. As a fashion blogger and a self-admitted lover of trendy things, this was extremely hard for me. I thought about all those current kitchen trends: different colored island, steel hood, floating shelves, fun printed tile, herringbone light floors, etc. and as much as I LOVE all that, we really wanted to keep the kitchen connected to the rest of the house AND the location of where we live — we live in Connecticut on a mountain. While white kitchens are super in style, they really never go out of the style. While I loved the look of light floors, I was hesitant to stain the kitchen and family room something completely different than the rest of the house. There’s no bigger house pet peeve of mine when a room or area of a house looks like it doesn’t belong with the rest — and you can tell what has been renovated in a house and what hasn’t. We went with a medium stain to try to match the rest of the hardwood throughout the remainder of the house, since we have no plans to redo that. Was it my top choice? No, but it matches and looks continuous which to me is so much more aesthetically pleasing. We figured we could always change hardware (since brass is in style currently), swap out the countertops if needed, etc. later down the line, for more of a “refresh” but wanted timeless bones to work with.
Why marble countertops? I can’t even begin to tell you how long we ran with this debate. We honeymooned in Italy for 3 weeks and we fell in love with the Italian Carrara marble everywhere. It’s much less durable than Quartz or Granite and more porous, but brings SO MUCH LIFE into the otherwise all-white space and feels like art to me. We actually had a Quartz company who reached out after hearing my countless Instagram stories and offered to give us Quartz for FREE (we would have just had to have it templated and fabricated on our own). We thought maybe THAT WAS A SIGN to go with the more “practical” option — but something just wasn’t sitting with us, so we ultimately passed on it. When we have our hearts set on something, we usually end up circling and circling but always go back to what we originally wanted. It’s a little tedious to keep clean and there have already been a few little marks here and there from use (mostly lemon which etches the stone). We make sure to leave out cutting boards and try to wipe down the counters after cooking and definitely before bed — if you leave red wine all over your counters at night, you would end up with a stain as the stone soaks it in. We went with a HONED finish (which is basically matte for stone, instead of glossy and polished). It’s supposed to make scratches and etches a little less noticeable because the light doesn’t reflect on it and also lets light stains heal themselves. Time will tell as it’s only been about 6 months with it, but overall, I couldn’t be happier with the choice aesthetically and it’s worth a little extra elbow grease to keep it looking pretty. If every restaurant in Europe can handle marble, I think we can! I’m going to do a full blog post on what we use to keep it clean and sealed!
Would you do it again? If I could have just moved into a house where someone had our exact style, that would have OBVIOUSLY been the dream scenario. Just about every single house we looked at needed a kitchen update — maybe a gut job, maybe hardware, but after years of renting a space where we couldn’t make any design changes, we KNEW we were going to want to make a space fully ours. It was definitely worth it, but I have PTSD even thinking about living without a kitchen for 3 solid months. It was a dark time. If I were to re-do a kitchen again and NOT be able to live there during it, that would be best case scenario.
Best piece of advice? Three things. 1) Have a realistic expectation of costs. People rattle off numbers without thinking sometimes and expectations can be way out of line. When you’re given a budget and timeline — add on 20% to each, maybe more. 2) LIVE THERE FIRST. I didn’t want to move in and then do a kitchen renovation, but let me tell you… we lived in the space for months and actually realized A LOT. There were things that I thought bothered me and things I never thought of before living and actually cooking in the kitchen. We saved ourselves a lot of money by downgrading some additional layout changes because we actually decided the original people who designed the kitchen knew what the heck they were doing. We also realized a few things that were missing that we added to the space. I just wish I didn’t have to live in the house DURING the renovation, but was glad we lived there before. 3) Be patient. We took our time, didn’t rush the design/planning process, and realized we needed to be flexible in a lot of areas. I remember being asked and asked early on by people — “what hardware are you going with?” “what color are you painting the walls?” — and our cabinet installer saying, “DON’T ORDER UNTIL IT’S TIME.” It’s actually INSANE how sometimes things you think of in your head do not play out in real life. We finalized the countertops before selecting hardware to make sure they played nicely with each other. I didn’t jump the gun and order what I thought I wanted and I’m glad I didn’t — it would have looked awful and too busy. We also waited until the kitchen was done to decide on paint so we could see lighting throughout the day and determined the original color we wanted was going to be TOO DARK. Especially if you’re designing yourself, CHILL OUT and take your time.
Are you 100% done? Nope. We’re still deciding if we want lighting pendants above the island and need to select a fixture for above the breakfast nook, but want to choose a new table and chairs before doing so. We’re planning to be here for a while and I’m not in a rush! 🙂
Thanks so much for stopping by, I’m SO excited that I finally get to share easily the hardest project of my life with ALL OF YOU — leave any questions below!
Shop the Decor
TAKE A TOUR
View this post on Instagram

3 Comments
Sadie
June 10, 2020 at 4:16 pmI’m a sucker for a good before and after and yours is amazing!! I love every inch of your kitchen! We just had a kitchen cabinet painting service paint our cabinets white and we love how it turned out but I have been at a loss for what else to do to give it more personality. I’m definitely going to use your kitchen for inspiration as we finish the rest of the remodel! Thanks for sharing!
Jennie
July 13, 2020 at 2:12 amWow, I just loved your kitchen renovation. It is looking very pretty now. I will also try this in my kitchen.
House Tour: Patio Reveal - Oh So Glam
July 13, 2020 at 11:47 am[…] long wood dining table where we could have dinner and entertain — the patio is right off our newly renovated kitchen and easily accessible. We ended up ordering this teak dining table from Patio Productions — […]